Thursday, June 30, 2022

Back to San Martino Game 3

Lippert storms Contracania

Having recently fought the Battle of San Martino with the Rejects (see: San Martino Part 1, San Martino Don't Thow a One!)) and Mike (see: San Martino Game #2), it was the UK Monday Night Group's turn to try their hands at the scenario.

Like the Rejects' game, the battle was fought over two sessions.  In the first session, Graham and Ian commanded the Austrians while Richard and Phil took charge of the Sardinians.  In the second session, players remained the same with the addition of Chris as a third Sardinian player.

Let's see how the game played out. 

The battle begins with Benedek's Corps massed around Pozzolengo with Lippert's Brigade positioned at the foot of the San Martino Heights, Philoppovic and the reserve situated near Pozzolengo, and Watervliet deployed upon the high ground to the north of Pozzolengo.  Mollard's Recon Column is deployed in San Martino, Ortaglia, Roccolo, and Contracania.  For now, Mollard is on his own but reinforcements are expected to arrive soon.

Benedek's corps poised to attack.
Mollard's recon column stands alone at San Martino.
Mollard defends San Martino.
To open the action, Mollard repositions Monferrato's two squadrons of light cavalry from the left to the right.  Graham remarked that Richard's cavalry repositioning was a brilliant ploy and mucked up the Austrian plan of attack from the get-go.  Perhaps, but as will be seen later in the battle, facing no Sardinian cavalry on the Austrian right, Watervliet and the Reserve hussars could advance unmolested by enemy cavalry.  Still, good example of thinking outside of the box for Richard.

For the Austrian plan, Watervliet is ordered to advance upon the enemy left while Lippert makes a direct attack up the heights.  Philoppovic is ordered to advance upon San Donnino to secure the Austrian left and prevent a Sardinian stab toward the vital bridge.  The Austrian Reserve hangs back around Pozzolengo awaiting further developments.

Opening maneuvers.

Seeing Mollard alone at San Martino, Benedek wastes no time in bringing on the fight.  Watervliet advances smartly upon the Sardinian left with thoughts of turning that flank while Lippert makes a direct attack upon Contracania.  The Sardinian defenders in Ortaglia keep their heads down as both Lippert and Watervliet's batteries bombard the farm complex. 

Mollard is relieved to see Arnaldi arrive from the north to take up positions on his left in the vineyards surrounding San Martino. Mollard's left may be secure for now.  Having Morozzo's large brigade arrive from the north to shore up the Sardinian exposed right offers even more relief.

Austrians on the attack!
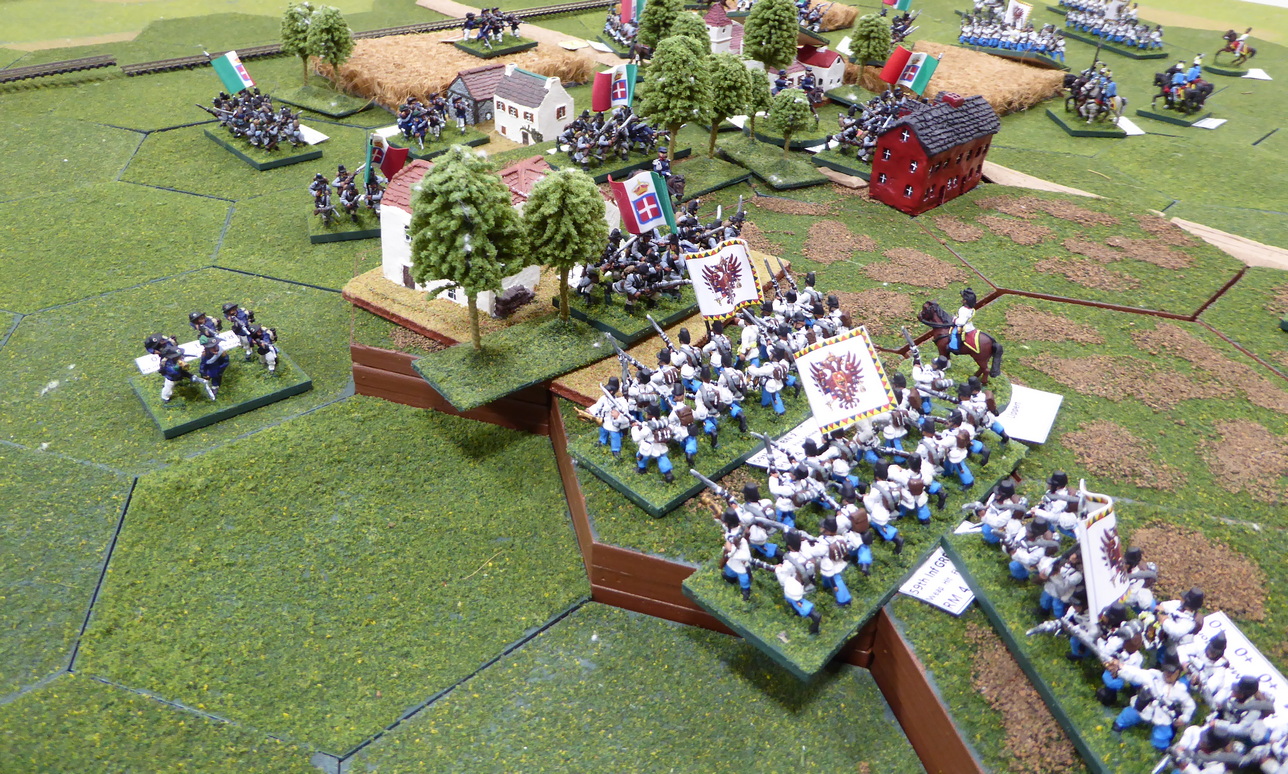
In the first serious exchanges of battle, Lippert sees his lead infantry battalion from the 59th Line evaporates under the hail of lead from the villas and treelines on the heights.  To compound this early setback, the assault upon Contracania does not go as expected.  While the Sardinian Bergalieri are thrown out of the villa, the Sardinians are able to rally and counterattack before the Austrians consolidate any gain.  Lippert is left out in the open exposed to enemy fire. Casualties rise quickly as musketry erupts from the two villas on the Heights.  The attack is not starting off well.  Further upsetting the Austrian plans to defend San Donnino and the bridge, one of Monferrato's light cavalry squadrons slips over the bridge before Philoppovic can secure it.  Damn!

Lippert attacks Contracania.
Returning to action on the Austrian right and Watervliet's advance upon San Martino, Arnaldi arrives to shore-up the Sardinian left in order to provide a buffer around San Martino.  Unfortunately, this buffer zone is not completely secure.  Austrian hussars swing around to attack an exposed battalion of the 7th Infantry positioned in the vineyard.  Surprised by this bold attack, the Sardinians, nevertheless, manage to retire from this close call although much worse for the wear.     
Austrian hussars attack!
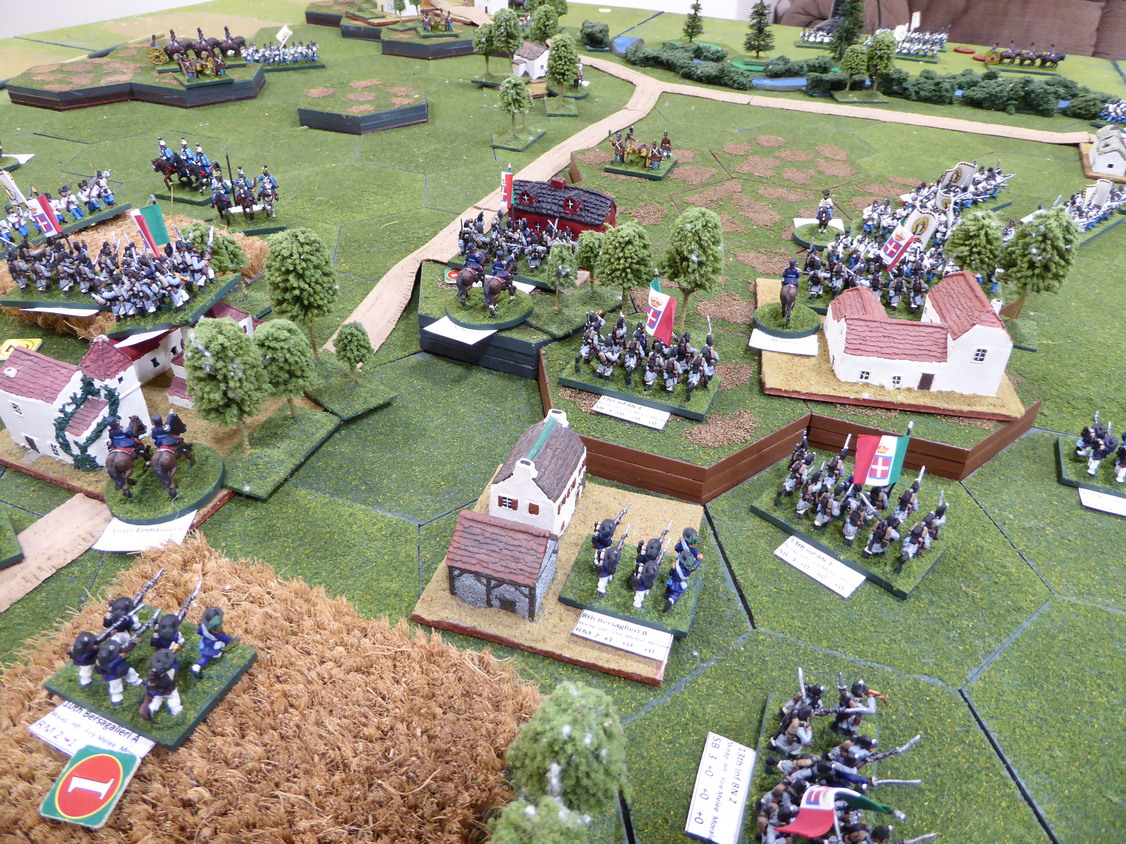
Following up on the rough handling of the Sardinians by cavalry near San Martino, the King orders the village to be secured.  So concerned is Sardinian command of the situation that both Victor Emmanuele and Mollard personally oversee these deployments.  Infantry quickly file through the village to close the exposed gap between Ortaglia on the Heights and San Martino.  Arnaldi pushes his brigade out to the left with his artillery pounding Austrian positions.  Seeing Sardinian infantry deploying in front of San Martino accompanied by the King's entourage of staff officers, Austrian artillery changes target from Ortaglia to the Sardinians on the road.  This bombardment is very effective and nearly catastrophic.  The infantry moving up in front of the village are scattered and both King and Mollard narrowly escape death. 
Arnaldi reinforces San Martino
On the Austrian left, caught off guard by Monferrato's sudden dash to the bridge, Philippovic must divert precious resources to contain and eliminate this nuisance.  He sends one jaeger and one infantry battalion south to deal with this interloper.  Meanwhile, the brigade battery is unlimbered on the road to the west of San Donnino to bring more enemy cavalry under fire.  The remainder of his brigade forms up in front of the village forming a link to the heights and Lippert.  The long line of white-coated troops makes fine targets for Morozzo's two batteries.
Dealing with a nuisance.
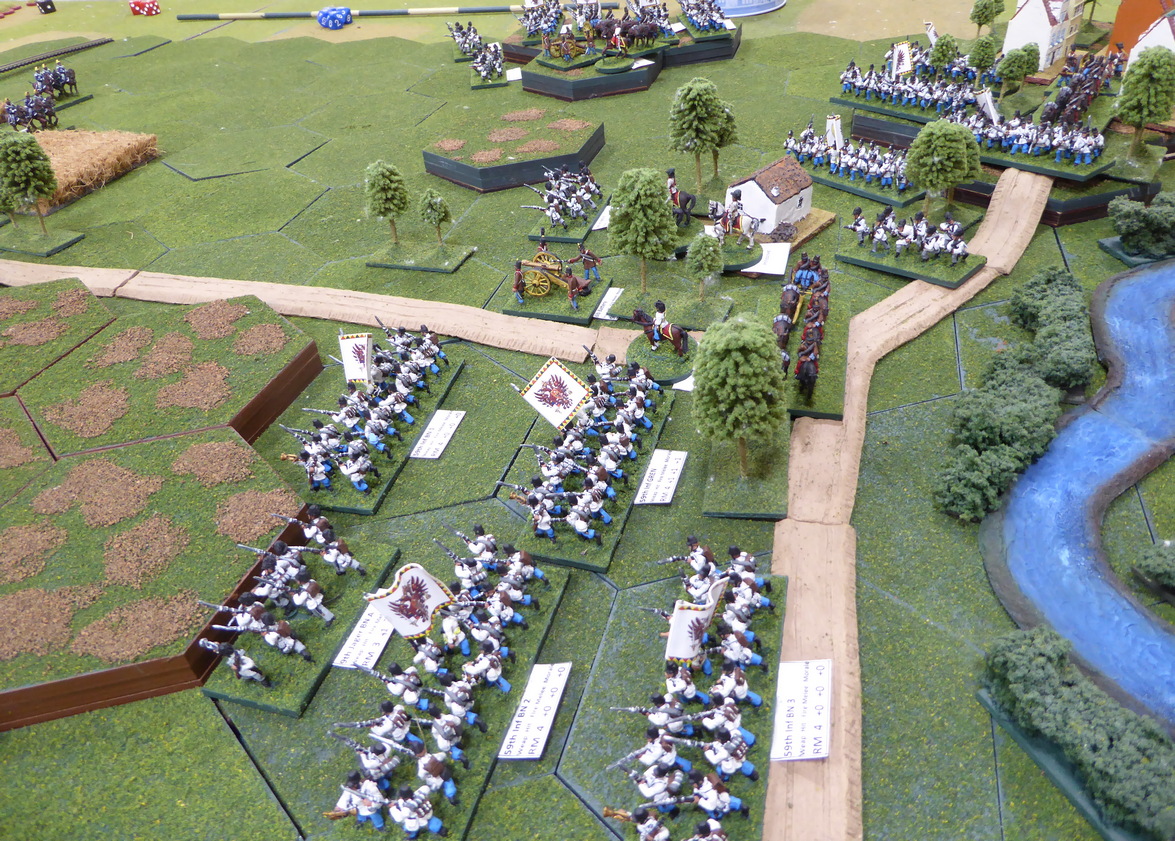
While Philippovic's situation on the Austrian left seems to be unraveling, Lippert makes one more assault against the fortified villa of Contracania.  Personally leading the attack, Lippert first sends the 2/59th against the enemy occupied villa.  This attack is repulsed with heavy casualties.  Without hesitation, Lippert leads the 59th grenadiers into the villa.  Once again, the Austrian attack is repulsed.  The grenadiers, too, suffer mightily at the hands of the stout defenders.  With these two costly repulses, Lippert calls off the attack upon the Heights.   
Lippert assaults Contracania.
While Lippert makes every effort to take Contracania and the Heights in the Austrian center, Watervliet cautiously advances against the Sardinian left.  Having two infantry battalions seeing heavy casualties in the first clashes, Watervliet is careful not to expend his limited resources carelessly.  This hesitation allows Arnaldi to bring up supports and strengthen his lines in front on San Martino.  Not only does Arnaldi bring up supports but his brigade actually increases its buffer around San Martino. 

Austrian artillery fire, seemingly pounding Ortaglia since the battle began, sees these bombardments finally pay out.  The defenders of Ortaglia are scattered and Mollard's command breaks.  Luckily, Morozzo has infantry close at hand and can occupy this vital position before it falls into enemy hands.  
Arnaldi's defense of San Martino.
Sardinian defense of San Martino and the Heights.
Battle Situation Turn 5.
Back on the Austrian left, Philippovic rids himself of the harassing cavalry across the river.  Unfortunately, this diversion costs valuable time.  Before his lines can reform, his unsupported artillery is overrun by another roving squadron of cavalry.  With all of the losses sustained before, the loss of the battery breaks Philippovic's Brigade. 
Philippovic breaks!
Fighting intensifies on the Sardinian left as Arnaldi counterattacks out of the vineyard while Austrian jaegers attempt to encircle San Martino.  Arnaldi's command is teetering on edge when Arnaldi sees that Watervliet has called off the attack.  What?  Watervliet's brigade begins to retire back toward Pozzolengo. 
Firefight on the Sardinian left.
To cover Watervielt's withdrawal, two squadrons of the 1st Hussars charge Arnaldi's unsupported battery on the railroad.  Not expecting such a bold action in the face of enemy retirement, the gunners are caught unprepared and the battery is lost.  Unfortunately for Arnaldi, the loss of the guns is enough to push the brigade over the breaking point.  In a waterfall of unfortunate events, Arnaldi's collapse causes the Sardinian army to break.  The battle is over.     
1st Hussars charge Arnaldi's guns.
Well!  The third battle of San Martino came down to a nail-biting end played over two sessions.  A narrow victory for the Austrians but one that was hard-fought.  Looking at the rosters, post-game, the outcome was very close indeed.  Lippert's command was only two hits away from, itself, breaking.  It really could have gone either way.  A shame, really, that anyone had to lose such a closely contested fight.

Congratulations to all players as they fought splendidly while coming to terms with a new set of rules.  Well played all!    

For me, hosting the battle a third time was great fun.  I learn a little more with each playing.

Thanks guys.

Monday, June 27, 2022

Almost There!

The 2022 plan to muster out enough French SYW figures to field a small French army is in the Home Stretch.  Having 17 infantry and 6 artillery BMUs finished, the latest push has been focused on painting 7 cavalry BMUs.  Why seven cavalry units?  Well, having fought Bassignana in a PBeM game some time ago, I figured this battle would offer up an immediate goal with which to set the bar.   

Today's work produces cavalry unit #6 in this scheme.  The cavalry unit fielded is Cuirassiers de Roi.  The twelve figures are Eureka Miniatures. As always, fine figures that look good en masse when based knee-to-knee.  Work progresses on cavalry unit #7.
Will the French be ready to take the field after cavalry #7 trots out from barracks?  Not quite.  My fledging French army requires some command elements.  Command elements will be coming along shortly.  Then, it may be time for a game.  

The WAS Battle of Bassignana looks interesting and I lean towards having that as the French debut.  Once ready, I may begin the trawling for remote players wanting to take up the challenges of this interesting battle.  Rules of Engagement will be Honours of War.

Friday, June 24, 2022

Summer Arrives!

Barracades in place for Hoopfest.
Downtown Spokane.

Finally!  For now, the rain has stopped and temperatures are beginning to rise.  With sunny skies and warming temperatures, mileage on the bike increases.  This week may see 200 miles put into the legs.

Another harbinger to the arrival of summer is the annual return of Hoopfest to Spokane.  Well, almost annual.  Having been canceled the last two years due to COVID, many are happy to see its return.  Billed as the largest 3-on-3 basketball tournament in the world, set up was well underway on Thursday as I cycled through Riverfront Park.  

With much work this week on the Homefront including landscaping and major house-painting oversight, precious little time was spent at the painting desk.  I did manage to knock out another dozen Sumerian javelinmen.  Figures are Wargames Foundry.  Back to painting SYW French when time permits.  

With a burst of outdoor activities on tap, painting effort may be curtailed.  An average of three hours daily for cycling coupled with domestic duties suggests hobby time must shrink.  Hopefully, meaningful painting sessions can be squeezed into the schedule.

On the gaming front, Game #3 of the Battle of San Martino began on Tuesday.  This coming Tuesday, the battle will continue to fight to a conclusion.  Both armies are taking a pounding but the outcome is still in question.  At least I think victory is up for grabs.  For an overview of Session #1 from the Austrian perspective, please visit,

The Italian Unification Job on Graham's blog.

Austrians prepare to attack
I plan to put together a consolidated battle report of the two-session game following the conclusion of battle.

Finally, two more Great Wargaming Survey analyses are in work.  Preliminary data crunching is complete.  Next up is to study the results to uncover an interesting tendency or two. The two topics to address look at material preference and why we wargame. 

Tuesday, June 21, 2022

Sumerian Skirmishers and a Raging River

In a change of pace from mustering out SYW French cavalry, a dozen Sumerian interlopers crash the painting queue to mix things up.  Actually, after painting a number of French cavalry regiments, I was ready to tackle something different.

To keep painting interest, well, interesting, twelve Wargames Foundry Sumerian javelin-wielding skirmishers push their way into the production line.  I still have another dozen javelinmen to paint and field but first, painting returns to more SYW French cavalry.  French mounted staff command stands are in work too.  After the command elements are finished, I think it time to put my small French army out on maneuvers.

As mentioned in recent posts, Spokane has seen unseasonably wet and cool weather.  Rivers are high with some at flood stage.  Given these conditions and under heavy skies, Nancy and I strolled around downtown to assess the falls and the volume of water passing through the gorge.

Lower Spokane Falls
Upper Spokane Falls

The photos show that a raging torrent of water races through the center of the city.  Out on the bike Monday morning (yes, I did get a bit wet), I saw many areas of the river at flood stage as I rode upriver to the east.  Having lived in Spokane for more than 25 years, rarely have I seen the river this high with so much water passing over the falls.

Later this morning, the third refight of Battle of San Martino gets underway.  Hopefully, I can produce a fun and interesting game for the participants.

Friday, June 17, 2022

San Martino: Game #2

Having seen the battle report from the San Martino game with the Rejects, Mike (Dieroll Volleys) threw his hat into the ring to give the battle and remote gaming a try.

Assessing the situation, Mike thought the Sardinians were the underdogs in this engagement and offered to take command of the Sardinians.  I would command the Austrians in a two-player game.  Mike's friend, David, would watch in.  For battle briefing, please visit,

On the Table Today.

Let's see how the battle played out.

As the battle opens, Sardinian division commander, Mollard, holds San Martino and clings to the Heights with his reconnaissance column.  Two Bersaglieri battalions hold Ortaglia and San Martino while one battalion of the 7th IR holds the villa of Contracania on the Sardinian right. 

Mollard holds San Martino
Facing Mollard is the might of Benedek's Austrian Corps of three brigades.  Spread out along the banks of the Fossa Redone, Lippert's Brigade is on the left, Philippovic's Brigade is in the center, and Watervliet's Brigade holds the right.
Mollard outnumbered as the battle opens.
Benedek deploys for battle.
Benedek sets his corps quickly into motion in an attempt to engage Mollard before Sardinian reinforcements arrive.  Lippert advances, concentrating his attack upon Mollard with an eye toward taking Contracania.  Lippert sends one battalion of the 59th to cover San Donnino while the rest of the brigade moves smartly toward Contracania.

Philippovic and Wavervliet look toward pinning Mollard at San Martino while turning Mollard's left.  Before these maneuvers can be carried out, Sardinian reinforcements arrive.  Arnaldi advances astride the road toward San Martino to support Mollard with part of his brigade fanning out to the east.  Skirmishing with Watervliet begins as the two opposing brigades close upon one another.

The two armies close.
On the Sardinian right, Morozzo wastes little time in bringing up his large brigade.  Lippert is driven back from Contracania relinquishing his advanced position on the heights as Morozzo covers Contracania from the west.  Lippert's 59th takes heavy casualties in the exchange as Sardinian guns and long range musketry pepper the Austrians as they cross the open ground.  The Sardinian defenders of both Contracania and Ortaglia prove too stout to dislodge even with supporting fire from Philoppovic and Watervliet.  Two Austrian battalions are lost before Benedek can bring up his reserve artillery.
Morozzo on the attack!
With Lippert's attacks on the center repulsed, Mollard holds the San Martino Heights, Ortaglia, San Martino, and Contracania.  Having Morozzo shoring up the Sardinian right, the Austrians may make little progress on this front although fighting over Contracania remains heated.  Pressure is mounting from the Austrians on the Sardinian left, however.
Mollard stands firm at San Martino.
Morozzo covers the Sardinian right.
With Morozzo advancing in strength upon San Donnino and the vital bridge, Benedek brings up his reserve artillery and hussar regiment to cover this threat.  Having personally overseen the positioning of the reserve artillery, Benedek seemingly dares the Sardinians to continue their advance.
Benedek brings up the artillery.
Mike looks comfortable with his
 positioning of the Sardinian Army.
On the Sardinian left, both Watervliet and Philippovic move to outflank Arnaldi and attack San Martino from the east.  Arnaldi takes up positions in the vineyards around San Martino.  Arnaldi even launches spoiling attacks from out of the vineyards.  These attacks see some success in halting the Austrian advance although Arnaldi suffers casualties he can ill afford.  While the Sardinian right looks solid, the Sardinian left looks fragile.
Austrians work to outflank the Sardinian position.
Situation Turn 5.
Arnaldi's pre-emptive attacks only buy a little time and wreck his brigade.  Arnaldi orders his brigade to retire back toward the main road covering San Martino.  Having advanced beyond San Martino, Watervliet turns his brigade west toward the objective.  In desperation, Monferrato launches cavalry charges into the advancing Austrians.  While the jagers are scattered, Monferrato's cavalry is spent for the day.
Monferrato's desperate cavalry charge.
With Arnaldi retiring, the way opens for Watervliet to drive upon San Martino from the east.  Philippovic, for his part, is still embroiled in a firefight with elements of Mollard's recon column.  The defenders of both San Martino and Ortalgia are proving very stubborn.  Even when a Sardinian battalion is thrown out of Ortaglia, Mollard cycles a fresher battalion into its place.  
Watervliet turns the Sardinian left.
Morozzo, having stabilized the Sardinian right, begins shifting battalions to support Mollard on San Martino Heights.  Lippert, with his brigade wrecked, can only look on as the enemy shifts away from his depleted defenders.
Austrian hussars watch on as
 Morozzo redeploys to the Heights.
 
On the Sardinian left, losses are high with many battalions scattered.  Yet, the Sardinians still cling to Contracania and San Martino.  The Austrian army is in not much better shape.  Lippert is wrecked and both Philippovic and Watervliet have sustained heavy casualties.  Many of the Austrian battalions are only one hit away from collapse.
Austrian casualties are high.
Sardinians hold Contracania
and Ortaglia on the Heights.
Sardinians cling to San Martino.
At the end of eight turns, we agree that the Austrians will have a difficult time taking San Martino.  Contracania is well out of reach for the Austrians and the capture of San Martino looks unlikely in the time given and Austrian casualties suffered.

With that, we declare that the Sardinians have hung on to win another minor victory.  Congratulations to Mike.  Well played!

After we closed out the session, I noticed that Mollard's Brigade had broken on Turn 8.  With two brigades broken, the Sardinians would have been compelled to withdraw from the field.  Still, Mike deserves a hard-fought victory given the state of Benedek's decimated Austrian Corps.

Hopefully, Mike, we meet on the field of battle another day so that I may even the score.

Great fun and thank you!

Wednesday, June 15, 2022

Royal-Pologne + More

Work on fielding SYW French cavalry continues.  With seven cavalry regiments planned in the first tranche of cavalry for the burgeoning French army, today's effort makes up #5.  Two more to go.  These dozen horsemen muster out as Royal-Pologne.  Figures are Eureka Miniatures.

Seemingly on the Home Stretch of the French army build-up, I remembered that these fine Frenchmen would require general staff to lead them.  This realization will set the timetable back a bit but I have mounted officers in the painting queue.  I am getting close to mustering-out the first semblance of a French army.

On the gaming front this week, two games are already in the books.

The first game was a remote game on Monday with Mike (Dieroll Volleys) and David (David Grech) as we fought over the ground at San Martino.  This was Mike's first remote game via Zoom and I reckon David's first game too.  Despite one of the cameras having a nagging lag, I thought the game fun.  I need to investigate the root cause of the camera lag and try to resolve that issue before the next game.  More details on the action once I gather the game artifacts in preparation to writing-up a battle report.

The fight for San Martino
The second game was on Tuesday in which my ace pilot took to the skies again for a WWI dogfight.  With four allied planes (two Camels, two 1-1/2 Strutters) against two German fighters (one Fokker Dr1, one DVa), my Dr1 got on the tail of one of the Strutters and shot off the wings.  Hooray!  This may have been kill #8 but I lose track of such matters.

Rittmeister von Freitag gets another kill!
Finally, out on the bike this afternoon to assess the state of the river after several days of heavy rain.  Not surprising, the river is running at flood stage and water is roaring through the center of town and over the falls.  Quite dramatic.
That's enough for today...