Wednesday, June 28, 2023

Fight For Henry House Hill

The Battle of First Manassas was joined when McDowell launched a flanking attack against scattered Rebels on Matthews' Hill.  All replays of this mid-morning fight ended with the Confederate Army in tatters.  In every refight, the Rebels lost three brigades early on in the fight.  The destruction of these three Confederate brigades mirrored the historical outcome.   Once on the backfoot, the Confederate Army struggled to regain its balance.  Actually it never did regain its footing and all games, ultimately, tipped for the Federal Army.  These results were ahistorical.  How could this be?  Well, there could be many reasons why but one observation was that the Confederates fed their troops into battle piecemeal and exposed them to risk too early.  The Union Army was much better at managing unit rotation and replacement.

To give the Confederate Army a fighting chance, the next scenario resets the battle after the early afternoon lull with Jackson already on Henry House Hill and Rebel reinforcements streaming pell-mell to the field.  Would this change the outcome? 

On short notice, I was able to dragoon four players into taking up the gauntlet of command.  Players (and their blogs) are:
USA:
Chris (Horse and Musket Gaming) as General Heintzelman (three brigades total).
David B. (The Ragged Soldier) as General McDowell, General Tyler, General Porter (three brigades total).

CSA:
Tony (Prometheus in Aspic) as General Beauregard (three brigades total).
Mark (Mud Blood and Steel) as General Johnston (two brigades plus Hampton's Legion).

As a reminder, the battlefield at the start of the 1pm game turn looked like this:
Situation 1pm.
Let's see how the battle played out in yesterday’s game!

After putting the Confederate Army to flight following the action at Matthews' Hill, the Federal Army pauses to regroup.  Burnside's Brigade is wrecked and Porter's Brigade has sustained some casualties. Their division commander has been wounded and carried from the field.  The stage is set for the fight at Henry Hill. 

As the action unfolds, Porter deploys along the Warrenton Pike facing the enemy positioned on Henry House Hill.  Tyler brings up Sherman and Keys' Brigades on his left while Heintzelman brings his division down the Sudley-Manassas Road.  With Hampton's Legion covering the salient at Robinson House, Johnston deploys Jackson and his brigade on Henry House Hill.   
Federal Army poised along Young's Branch
while Tyler brings up two brigades of his division on the left.
Sherman moves up to support Porter.
Jackson silently watches from afar.
Hampton's Legion at Robinson House.
With Tyler bringing up two brigades on his left and Heintzelman bringing up three brigades on his right, Porter boldly crosses the Young's Branch stream.  Cautiously, Sherman shakes his brigade out into line as he comes up in support of Porter.  Wilcox leads his brigade across the stream on the Federal far right with an eye toward turning the Rebel left.  As the Federals step across the stream, Jackson orders some of his men off the heights and down to the road.  What?  One Rebel regiment and one gun section are quickly followed by a second regiment and gun section.  Now, Jackson has four guns and support astride the road.  The two armies begin exchanging artillery fire. 
Union troops splash into Young's Branch.
Sherman shakes his brigade out into line.
Jackson orders troops off Henry Hill and
 onto the Sudley-Manassas Road.
Wilcox marches across the stream intent on turning a flank.
Jackson stands ready.
With reports of Cocke's Brigade of Rebels moving up on Jackson's right toward Robinson House, Porter moves to envelope Hampton's Legion before it can be rescued.  With Sherman moving up in support and Keyes swinging even farther left, Porter attacks.  To prevent Cocke from reinforcing Hampton, Keyes moves around against the Rebel right.  Lining the stream and occupying the woods, Cocke holds on.  Advancing up the slopes to Robinson House, Porter's first attempt is shattered.  Reconsidering, Porter switches to musketry to try to root the Rebels out of the farm.  Robinson suffers but stands firm at first but eventually succumbs. 
Porter prepares the attack on Hampton's Legion
as the Long Blue Lines form up along the pike
all the way to Sudley-Manassas Road.
Porter attacks!
Keyes moves up on Porter's left.
Keyes attacks!
With the Federal left stuck in a firefight with no advantage gained, the battle focus shifts back to the fight along the Sudley-Manassas Road.  Franklin moves up to cover Howard as he brings up his brigade and deploys for battle.   The 33rd VA positioned at the foot of Henry House Hill absorbs punishment from Franklin and Federal artillery firing down from Matthews' Hill.  Suffering some, they remain firm.  Meanwhile, Howard's lead regiment is cut down before it can successfully deploy as Elzey's Brigade forms up on Jackson's left across the Sudley-Manassas Road.  Elzey's lead regiment shares a similar fate as it is shredded forming up into line.  With Wilcox working his way around the Rebel left, does McDowell still have time to push the Rebels from Henry House Hill?
Firefight below Henry House Hill.
Wilcox works his way onto the Rebel left.
Jackson is relieved to see Elzey arrive!
With Bonham arriving onto Henry House Hill,
Rebel positions look secure.
Wilcox cannot counter the arrival of more Confederates. 
With Porter and Franklin nearing their breaking points, McDowell calls off the attack.  The Rebellion will not be quashed today.
Dispositions at battle's end.
After nearly four hours of play and the hour late, the Federal Army, while not conceding defeat, calls off the attacks.    

Victory and congratulations to the Confederate commanders of Tony and Mark!  My condolences to David and Chris.

Having the same group of players fighting over much the same ground within a few weeks' time is a joy.  With rules and situation still fresh in mind, tactics are developing and rules are becoming more familiar.  Still, Henry House Hill is a rather large game to tackle at the regimental level and remotely.  Could the Union Army have fought on?  Yes it could.  Would the outcome have been changed?  We will never know but the Confederate positions looked solid upon Henry House Hill.  Having only momentarily gotten a toehold at Robinson House, the Federals never really threatened Henry Hill.  The Federal Army may have won the battle in the morning on Matthews' Hill, they lost it in the afternoon on Henry House Hill.  Did the introduction of a lull (and reset) between the fight on Matthews' Hill and Henry Hill alter the outcome of the previous, full battle fights?  It did. The Rebels carried the day.  

My many thanks to Chris, David, Mark, and Tony for a very enjoyable session.  What's next?  While there remain battles to yet chronicle, I look forward to the next new scenario.  Will we stick to ACW?  Stay tuned.

Up next is a second run-out of this Henry Hill scenario on Thursday.

Sunday, June 25, 2023

Jackson Standing Like A Stonewall

Jackson stands upon Henry House Hill.

Having fought the Battle of Young's Branch (First Manassas) several times with similar results, I figured time to try something different.  The early morning fight on Matthews' Hill replicated the historical outcome precisely.  That is, Rebel brigades of Bee, Bartow, and Evans were broken and in rout.  The Federals saw Burnside wrecked and Porter with losses but still ready to fight.  The trouble in these historical, early results was that the Confederates had not dealt sufficient punishment to the attacking Federals.  The Federals were able to consolidate and mount attacks upon the Rebels dealing with each arriving Rebel brigade to great success.

In each of our tabletop refights, the Federals pressed on denying the Rebels a chance to form up.  What if the Confederates were able to take advantage of the lull in the fighting between the defeat on Matthews' Hill and the Federal attacks upon Henry's Hill?  Let's put the two Confederate Armies (and Federal Army) into their historical positions of about 12:30pm and see if their chance of obtaining the historical result improves. 

Situation at 12:30pm

Victory depends upon Henry House Hill hexes taken and brigades broken.  Both armies have reinforcements on the way but, for now, Jackson stands upon Henry House Hill.  Will he stand like a Stonewall or will he crumble like a wall with no mortar?

Battle Briefings to write and QRS to update before the action begins anew.

Thursday, June 22, 2023

Gaming Face-to-Face?

The panorama photo above was taken at the end of May on an afternoon downtown stroll.  The Spokane River was still high with a torrent of water spilling down the lower falls.  Three weeks later and the flow has reduced dramatically.

Gaming face-to-face (F2F), me?  Yep.  Although most of my gaming seems to revolve around the remote variety via zoom, I got in a F2F game yesterday.  Yeah, an unexpected surprise to me too.

The battle fought was a scenario from one of Michael Hopper's many Napoleonic scenario books.  This time, the battle selected came from Eagles Over Bavaria and the 1809 Reinhausen scenario.  Notice that I am listed as a playtester in this volume.  

The battle was a two-player affair in which I took command of the Austrian brigade facing an equally sized (but more flexible) French brigade.  Terry (the Assisted by fellow on the book cover) umpired.  The French were defending town sections on both sides of the Regen River.  Austrian task was to take the two town sections situated on the east bank of the river. 

Anyway, in less than two hours of play, my Austrians managed to quite handily demolish their French adversaries having destroyed six of their nine infantry battalions and an artillery battery.  Austrian losses?  Hmm. None! 

On the Stuff Recently Acquired front, this week saw a resupply of hexes from my favorite purveyor of wooden bits.  The box is more than two feet tall and stacked with hexes to expand both my four inch and five inch playing surfaces.

I also snagged a HUGE castle and keep from Vol at A Miniatures Hobby Room.  Vol even hand delivered the castle in two heavy boxes.  When Nancy saw the castle and I told her that Vol was downsizing his wargaming collection, she asked when do I plan to downsize.  I know.  Very funny question. 

Anyway, I imagine this behemoth may feature in either Reconquista or WotR games in the future.  As an added bonus, Vol is interested in gaming.  With his massive collection of warships from a variety of periods, I would not be surprised to see the gaming table transformed to open seas at some point.

Finally, this weekend features the annual three-on-three basketball tournament in my fair city.  Billed as the largest 3-on-3 tournament on earth with 6,000 teams on 450 courts, downtown will be packed with players and spectators throughout the weekend.  For this weekend, my cycling will need to divert around the downtown area as it will be virtually impassible.  A few photos taken before the storm.


Tuesday, June 20, 2023

Piedmont Artillery 1740s

After knocking out Piedmont Regiment La Marina (see previous post), I pressed on by pushing Piedmontese artillery into the painting queue.  With lighter demands over the holiday weekend and no immediate game to plan, I sat down to the painting desk to enjoy a couple of meaningful painting sessions.
The results of this concentration are six guns and crew.  Figures are Old Glory.

I wrestled with indecision on the Piedmontese gun carriage color scheme.  I have seen and read a number of contrasting and contradictory options.  In the end, I went with gray as seen in the plate available from the NYPL Digital Collection.
Source: NYPL Digital Collection
Next off the painting desk I expect to see SYW Hanoverians begin to trickle out although I may slip in a unit of crossbowmen for the Reconquista project.

Young's Branch (First Manassas) remains out on the gaming table with the expectation of a few more playings before I pack it away and move on to another ACW battle.  The last engagement, which has not been chronicled, offered a chance to rethink ranges and the differences between smoothbore and rifles.  My thoughts on those topics I save for another time.   

Saturday, June 17, 2023

Piedmont La Marina Regiment

After the last two weeks of planning and plotting the Young's Branch scenario, playing the battle three times, and writing up two battle reports, the painting desk lays fallow.  Adding in increased late-spring/early summer cycling mileage and domestic duties reduces painting opportunities further. 

Looking back at my seasonal painting tendencies from 1996-2020 (see graphic below), late spring typically sees a seasonal lull in painting activity.  2023 seems to stick to form although June will not see much increase in productivity over May.  Perhaps I can turn productivity around in July?  I ought to update this seasonal analysis at year-end and see if these tendencies are still in play since the 2020 analysis was published.

Anyway, back to the painting desk.

I managed to push a 23-figure regiment of Piedmontese infantry off the painting desk. The regiment is La Marina and is comprised of 22 Old Glory foot led by a Eureka mounted colonel.

As a parting shot, a view of La Marina marching away and into storage.

More SYW/WAS figures on deck including the first of the Hanoverians and a mass of artillery for a variety of combatants.  Maybe July will see more activity?

With a cool morning and sunny skies, time to head out on the bike...

Tuesday, June 13, 2023

Young's Branch 21JUL1861 Again

As long as men remember Dixie, they will recall the 5th Virginia!
-- Chris P., June 8th 2023.

The Battle of Young's Branch sees action again on the table.  Battle begins with the same situation as seen in the earlier game (see: Young's Branch 21 JUL 1861).  This time, five players take part in the remote game.

Players (and their blogs) are:
USA:
Chris (Horse and Musket Gaming) as General McDowell and General Hunter
David B. (The Ragged Soldier) as General Burnside and General Tyler
Tony (Prometheus in Aspic) as General Porter and General Heintzelman
CSA:
Mark (Mud Blood and Steel) as General Johnston
David C. (St Cyr on Wheels) as General Beauregard

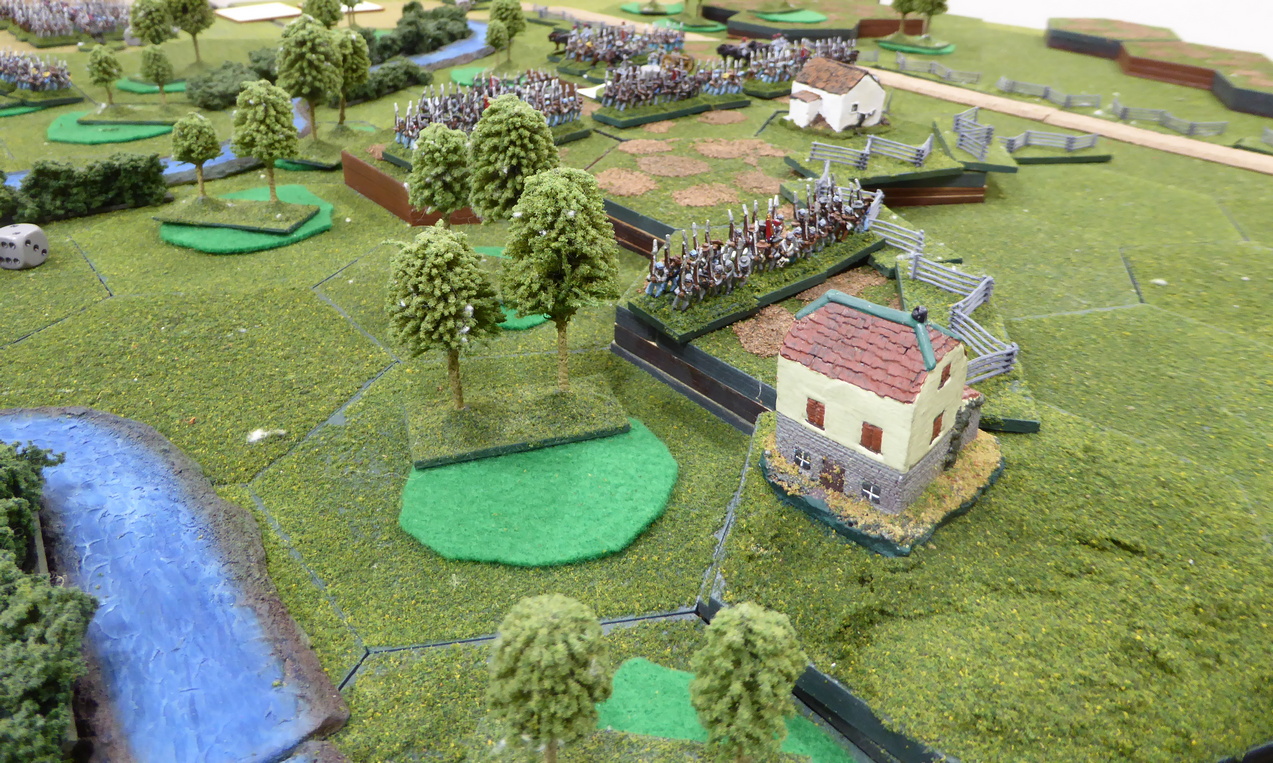
Players chose to see Battle Briefings for their own army only with limited details on the enemy they faced.  As a reminder, the table looks like this.
Battlefield layout
Let's get straight to battle!

McDowell effectively steals a march on Beauregard and makes a flanking move against the Confederate left.  Hunter's Division storms out of the north at Sudley Mill to advance south toward Matthews' Hill.  Burnside's Brigade leads the way with Porter's Brigade not far behind.

Getting word of Federal movements against the Confderate left, Evans quickly dispatches his two regiments from the Stone Bridge (off table from the eastern end of Warrenton Pike) to Matthews' Hill.  Remaining at the Stone Bridge is a detachment of skirmishers.  Johnston, likewise, sees the danger and sends Bee and Bartow's Brigades north from Henry Hill in support of Evans.
Bee and Bartow quickly march to reinforce Evans.
Evans forms up on Matthews' Hill
 joined by Lynchburg Artillery.
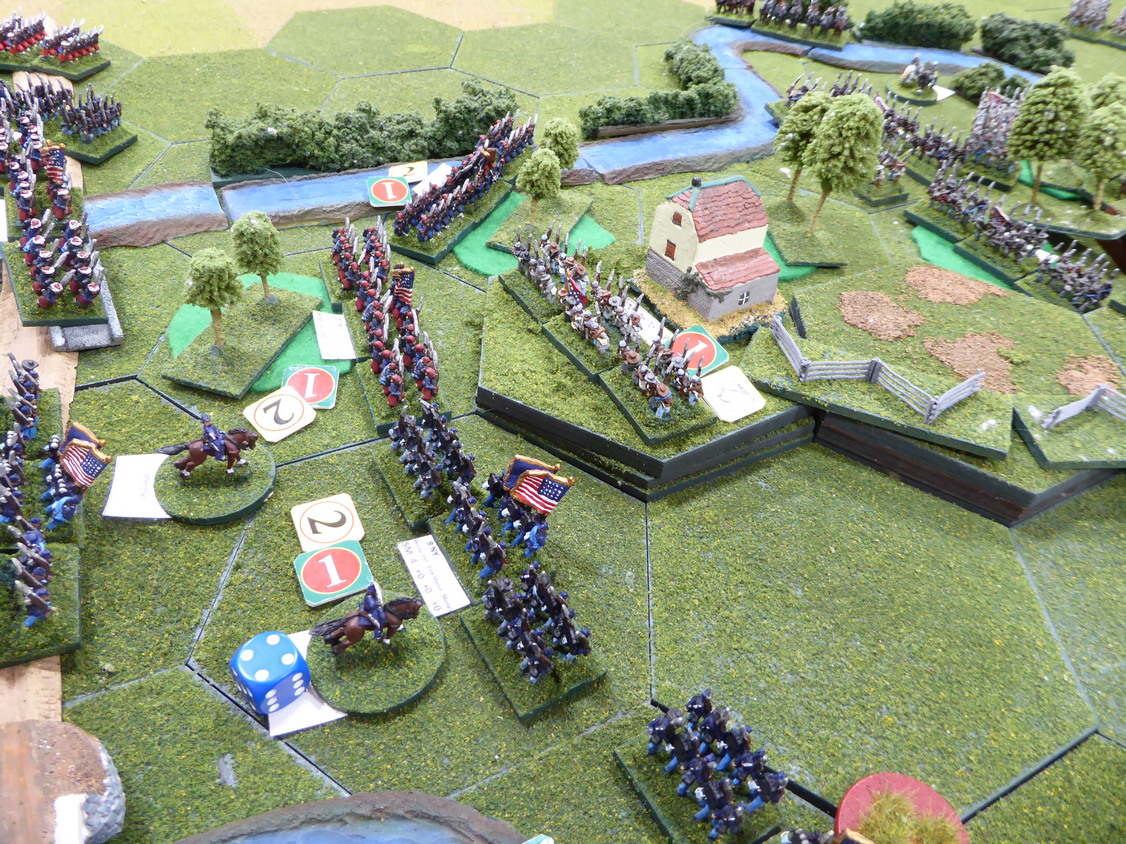
Evans does not wait long before the long lines of blue coats appear to the north on Sudley-Manassas Road.  Burnside deploys to the left of the road while Porter moves up on Burnside's right.

Burnside sends one regiment around the eastern slopes of Matthews' Hill while the remainder of his brigade concentrates on the Rebel positions on the heights to its front.  In the firefight, Burnside succeeds in driving off the 4th SC.  As Burnside presses forward in the advance, Evans pulls the 1st LA and guns back from the crest.  Bee deploys his Rebels in front of The Stone House as Bartow swings one regiment out to the east to cover the bridges over Young's Branch.  One of Bee's regiments is called to Matthews' Hill to protect Lynchburg's guns.  His second regiment advances to occupy Matthews' House before Federals can take the position.  In heavy fighting in the woods north of Matthews' House, Federal infantry are ejected and flee.
Hunter deploys his division in front of Matthews' Hill.
Seeing one of his brigades destroyed, Burnside orders the remainder of his brigade to take Matthews' Hill before Evans can be reinforced in strength.  Two of Burnside's regiments move forward.  Deploying into line right, Porter sends his brigade forward spreading out to the west to cover the Federal right.

With Burnside advancing upon their front, Bee's infantry on Matthews' Hill and Lynchburg's guns fail to recognize the threat to their flank.  Porter pushes one regiment and a few guns down the road to the western slope of Matthews' Hill.
Rebels fall back from the northern
crest of Matthews' Hill. 
Caught in a crossfire in the woods at Matthews' House,
 the 71st NY is destroyed. 
Burnside and Porter press forward.
Rebel positions on Matthew's Hill look untenable.
Under serious threat of being outflanked, Bee and Lynchburg fall back to The Stone House.  Bee brings up one regiment and Wise's artillery to the Warrenton Pike.  The guns unlimber and fire on the Federals moving down on Sudley-Manassas Road.
Bee gives up Matthews' Hill falling back to Stone House.
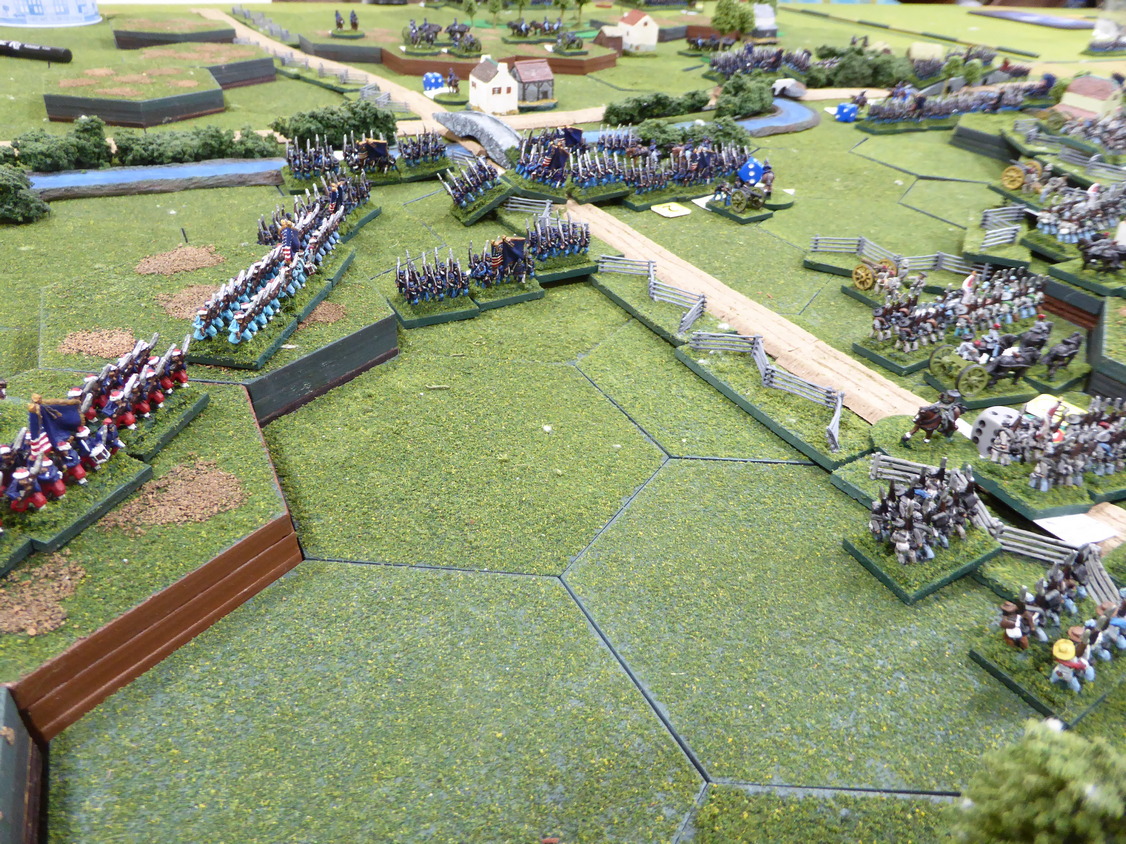
As Hunter brings more of Burnside and Porter's Brigades into action, the Rebels begin retiring to the Warrenton Pike-Young's Branch line.  Only the 7th GA and 1st LA remain north of the pike.  Securing Matthews' Hill, Hunter orders Burnside and Porter to bring up more guns.  As Federal guns unlimber and fire pours into Rebels positioned around The Stone House, Bee searches for safety on the south bank of Young's Branch.
Federals control Matthews' Hill.
With Matthews' Hill secure,
Hunter brings up more guns and infantry.
Bartow's Brigade and the 1st LA find themselves increasingly under pressure from the Federals on Matthews' Hill.  As the firefight intensifies, the 1st LA scatters.  Evans' Brigade is broken.  Near The Stone House, Bee's Rebels are taking a pounding from artillery and musketry.  Bee's Brigade is broken with three out of four regiments shattered.  With the exception of Bartow, all Confederate troops are back on the south bank of Young's Branch.  Federal guns continue to pound Rebel positions along the stream.  Reports filter to the Rebel front that Jackson's Brigade is coming up from the south.  Hooray!
The Rebel center weakens as the Rebel left falls back.
Johnston and Jackson reach Henry Hill as Burnside and Porter move against The Stone House.  Burnside takes heavy casualties as he advances within range of the Rebels lining Young's Branch.  Burnside is broken.  At Matthews' Hill, the 8th GA is destroyed defending the ground.  Bartow is broken.  The Rebel front line is crumbling. 

Showing careful attention to detail, both Burnside and Porter rotate badly damaged regiments out of line replacing them with fresh regiments.  Beauregard reaches the battlefield leading Hampton's Legion and Staunton's artillery.  Beauregard takes up position at Henry House on Jackson's left.
Federals move against the Stone house.
Johnston and Beauregard reach the battlefield
atop Henry Hill.
As the Federals press on,
 the Rebel Young's Branch line crumbles.
To add misery to the Rebel situation along the pike, Sherman's Brigade of Tyler's Division is seen marching toward the Warrenton Pike from a recently discovered ford across Bull Run.  Not be unmatched, Cocke's Confederate Brigade has arrived as well.  It is noon.
Sherman arrives on the Federal left!
Cocke arrives from the southeast.
Hunter's Brigade in and around The Stone House.
Federals hold Matthews' Hill.
Confederates hold Henry Hill.
Johnston (Jackson) and Beauregard on Henry Hill.
After about three hours of play, we agree to halt the action and reconvene in two days to resume play.  During the intermission, commanders could reassess the situation and prepare for battle continuation.  Rosters and army situation were provided. 
Battle situation at noon.
When battle is rejoined, the Federal command structure has been rejiggered a bit to allow each player to take command of one division.  Chris (as McDowell) takes Hunter's Division, Tony takes Heintzelman's Division, and David takes Tyler's Division.

Back to the action!

As Sherman approaches the bridge over Young's Branch, he takes hot fire from Evans' skirmishers.  Sherman deploys to the left on the pike to bring more rifles to bear.  Jackson, from his position on Henry Hill, occupies Robinson House and pushes infantry into the woods lining the stream.  In the center, Heintzelman brings Franklin up to relieve Burnside's battered and broken brigade.  Franklin occupies Matthews' House and the woods to the east.

On the Federal right, Porter is sent across the stream in pursuit of Bee's remnants.  Bee's single remaining regiment and Wise's artillery make a stand on the high ground a few hundred yards to the south of the Sudley-Manassas bridge.   
Sherman makes contact with the enemy
and fans out along Young's Branch.
Jackson counters by pushing infantry up.
The Federal army controls the Young's Branch line.
Porter crosses Young's Branch.
Still more Federal reinforcements come up.  Keyes follows closely upon Sherman crossing at the ford Sherman earlier discovered.  With more Federal reinforcements coming up and most of McDowell's Union army poised along the banks of Young's Branch, Sherman attacks!
Keyes Brigade reaches the battlefield.
Howard's Brigade marches down the Sudley-Manassas Road.
Sherman splashes across the stream intent on smacking Jackson at Robinson House.  First, he clears the woods to his front of the 33rd VA and then orders fire upon the Rebel guns at Robinson House.  Under a hail of lead, Rebel guns are forced to retire.  With the path clear to Robinson House, Sherman storms ahead.
Sherman crosses Young's Branch.
Rebel guns are cleared away at Robinson House.
Sherman reaches Robinson House.
At the head of two regiments, Sherman assaults the heights at Robinson House.  He meets no enemy opposition until he runs into the end of the 5th VA's line.  Surprised by the sudden appearance of Federals rushing from Robinson House, the Virginians cooly wheel to bring the enemy to bear.  Suffering mightily at the hands of the Virginians, Sherman and his blue coats tumble back down the slopes of Henry Hill.  Sherman is shocked.  The 5th Virginians' stand will go down in the annals of history.
Sherman leads the charge!
Sherman is repulsed with heavy casualties!
Despite Sherman's setback, the Federals keep coming.  Beauregard throws in Hampton's Legion to slow the enemy.  They are cutdown in an instant.  Cocke's Brigade arrives across the Sudley-Manassas Road and is fed into the fight.  Bee must be saved!  Unfortunately, on the Rebel left, Federal troops are massing while Rebels are fed into action piecemeal.  First, Bee's outpost of infantry and guns are scattered at the hands of Porter's boys.  The Federal line looks unstoppable.  Then, one by one, Rebel infantry from Cocke's Brigade waver and head for the rear. 
Federals massing for the attack!
Cocke feeds his brigade into the action piecemeal.
Federals pound Cocke's Brigade. 
The Thin Grey Line gets thinner.
Although the Confederates still have three fresh brigades to bring up, the Rebel commanders discuss their next moves.  With three brigades broken and Jackson teetering on collapse, the Rebels decide (after much deliberation and the lateness of the hour) that discretion is the better part of valor and call off the fighting.  The Rebel armies retire.

The Rebellion may be over!

Congratulations to the Federal commanders on a well-executed victory!  My condolences to the Rebels commanders.  All played a brilliant game as they came to grips with the rules, scenario, their enemy, and the umpire.

For me, great fun as these large, multi-player battles prove time-after-time to be.

Thanks to all of the fellas for an entertaining and insightful two-day battle.
Until we meet on the battlefield again.