Showing posts with label Rules. Show all posts

Tuesday, October 7, 2025

Clash Course in Flower of Chivalry

As an alternative to a Monday Paint & Chat session, Reject Richard gathered a collection of Postie's Rejects for a remote game.  Richard pulled out a 30-plus year-old Medieval ruleset for the session's entertainment.  Richard converted these old rules to hexes, made some amendments, and gave the rules a couple of solo playtests.
The rules that Richard dredged up from his vault are Flower of Chivalry by The Canadian Wargames Group and Bruce McFarlane.  Now, I have had this set of rules filed away on my shelves of wargame rules since about the date it was published in 1993.  Since I only recently became interested in bringing Medieval warfare to the gaming table, McFarlane's book sat on my shelf mostly unread.  Certainly, the rules, themselves, were not give much consideration.  Coming in at only four pages of the 76 page book, they were easy to overlook.  This is especially true since the rules are quite terse with ambiguities at every paragraph.  With four pages of rules and a number of interesting concepts and mechanisms, cramming everything into such a small space would be a hard task.  The game uses card draw, percentile dice, D10s, Orders, Leader Aggression and Command Ratings, Personal Challenges, Army Morale, Variable Actions, and a concept of Battle Lust.  As for brevity, for example, Morale and Melee explanations are only given one paragraph each and short paragraphs at that!  After a quick read, I envisioned sizable holes to be fill.  I explored no further.
Figure photos courtesy of Richard.
This is where Richard comes in armed with multiple pages of custom designed QRS' and the knowledge to lead us all through the basics of the game.  Since Richard will almost certainly provide a more comprehensive battle report (see My Wargaming Habit), I provide a simple, captioned overview of the action from my few screenshots.

The battle opens with a French column caught on the march by an Imperialist Army.  The battle begins!  Since I commanded the French van, my brief recap focuses on that wing almost exclusively. 
Imperialists interrupt the French march.
Imperialist Right heads for the high ground at charge rate.
Dual cameras showing the battle from each side.
The French turn to face the enemy.
All three French Battles deploy as the Imperialists approach.
On the French Left, crossbow crossfire drives off the
Imperialist MAA causing significant damage.
Having destroyed the enemy Landsknechts at the bottom
 of the hill through firepower, alone, French Center attacks.
As the French Center goes crashing in to clash with enemy pikemen, 
the French Right sees its commander cut down in a personal challenge.
  They are leaderless for a turn.
French Gendarmes continue fighting arquebusiers over the hill
on the left in a protracted melee. 
Gendarmes should have made short work of these fellows!
Against the French Left, Imperialist MAA charge to the hill.
With no remaining actions, the horsemen stop.
With Imperialist MAA hampered by the hill,
French Landsknechts move into contact.
French Center makes progress against the enemy center.
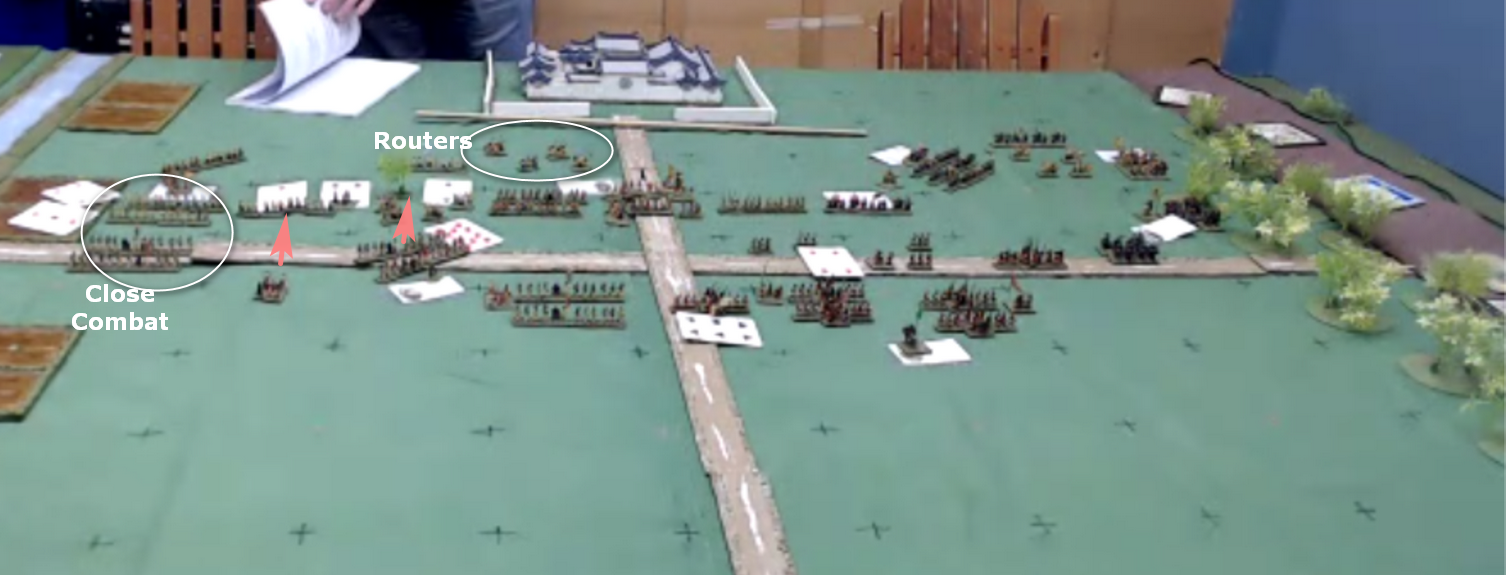
In one turn, the Imperialist Left and Center collapse.
This battle is over!
Decisive victory to the French!  A battle well executed by my French comrades Ray and Dan.  Game lasted about three-and-a-half hours.

The game provided a lot of interesting play with some uncertainty and careful decision making.  With only one game in the books, I look forward to more opportunities to give Flowers of Chivalry a bit more exercise.  On exercising, a review of these rules along with my thoughts and a compare and contrast to Basic Impetvs and my more recent work for the WotR might be interesting.  At least, to me, perhaps!
Thank you, Richard and the Rejects for a very entertaining gaming session!

Wednesday, June 18, 2025

A Preview of Mortimer's Cross

After a delay due to illness (mine!), the first outing of the Battle of Mortimer's Cross took to the table in a game on Wednesday afternoon.  In a F2F game, I faced Vol (A Miniatures Hobby Room) who made the one-hour drive for an afternoon game.  Vol and I have not faced each other across the table in a long time so it was good to rekindle this competition.  Vol took command of the Lancastrian Army and I the Yorkist Army.
Since the table needs resetting for a Thursday remote game with Peter (Grid based wargaming) to be fought over the same ground, no time for a proper battle report today.  Instead, I will simply note that the battle was back onto a hex grid for today's game rather than last game's open table.  In trials before the foray into gridless play, hexes were five-inch "dirt" hexes used in Basic Impetvs Ancients' games.  Hexes have been downsized to four-inch "grass" hexes for Blood n Roses rules.
Game played smoothly and I enjoyed having the game return to its hex roots.  Looking forward to Thursday's game with Peter especially since rules are fresh in mind.  Peter will be commanding the Yorkist Army.

Wednesday, August 21, 2024

Review: Thomas' Wargaming 19th Century Europe - Redux

 Neil Thomas' WARGAMING NINETEENTH CENTURY EUROPE 1815-1878

Given David's recent musings on contemplating embarking upon a Risorgimento project in 6mm and Neil Thomas' Wargaming Nineteenth Century Europe 1815-1878 (see Imperfect Painting), my thoughts returned to this classic work and the rules, themselves.  Tossed into this inspirational mix is Keith's move to resurrect or recycle old posts (see An "Almost" Anniversary Post).  Seems that the pair of posts from David and Keith converged to nudge me in a similar direction.  Call it serendipity.

With their inspirations, I resurrect a post from the very early days of Palouse Wargaming Journal.  Reproduced below is the 29 OCT 2012 post on my overview of Thomas' book.  Hard to believe this review was published a dozen years ago.  At the time, my review garnered a grand total of one comment.

Thomas' Wargaming 19th Century Europe book remains one of my Top 10 all-time wargaming books.  I might even push it into my Top 5.  Even with the passage of a dozen years, my appreciation for this book is unwavering.  While I do not use these rules for my own Risorgimento wargaming, perhaps I should give it a try?  Typically, my adaptation to Fields of Honor is my "go to" choice for gaming the period.  In fact, I tend to use Fields of Honor for many horse and musket periods.

What might be interesting is to offer a side-by side comparison of both rulesets to investigate any similarities and differences.  Will a comparison between the two cause a change in perception of Thomas?  For now, below is the republication of my review of Thomas' book from 2012 (see original post at Review: Thomas' Wargaming 19th Century Europe).

Hope you enjoy this look back down memory lane.  I did.

--- Original Post from 29 OCT 2012 ---    

Having an interest in 19th Century warfare in general and the Second Italian War of Independence in particular, I recently bought Thomas' book.  Wargaming 19th Century Europe is my first Thomas wargaming book so I didn't know what to expect.  Existing reviews are lacking the detail needed to make an informed decision but I plunged ahead anyway on the road to discovery.


Although the book covers a wide span of history (some might argue too large since weapons and tactics evolved throughout this period), Thomas justifies his position by reminding the reader that the mindset of commanders during this period remained practically unchanged.  That is, commanders continued employing Napoleonic tactics over this 60-year span.  This same argument could be made for the American Civil War as well.  

Thomas provides a comprehensive examination from a wargaming perspective.  Thomas breaks the book into a number of manageable chunks.  These components include sections on:
  • Historical background
  • Design notes
  • Wargame rules
  • Generic scenarios
  • Army lists
  • Historical scenarios
  • Appendices listing bibliography, scales and figure discussion, and wargame related vendors
The rules, themselves, only take up eight pages and cover,
  • Units and Formations
  • Basing
  • Sequence of Play
  • Changes of Formation
  • The Charge Sequence
  • Movement
  • Firing
  • Hand-to-Hand Combat
  • Morale
The rules' mechanisms lean decidedly towards the simple end of the wargame complexity scale and Thomas defends this approach throughout his design notes chapter (entitled, Nineteenth-Century Wargaming).  Thomas emphasizes the "simple" rules' design approach to allow players to focus on the game rather than the rules.  The rules have no specified time or figure scale. 

All units of the same type are the same size regardless of historical doctrine.  Unit size is,
  • Infantry - four bases
  • Skirmishers - two bases
  • Cavalry and Dragoons - four bases
  • Artillery - one base
Basing guidelines are provided but any basing scheme should work as long as both combatants are based similarly.  

One interesting step in the Sequence of Play is that formation change is a separate step and that infantry may not move in line.  The result is that infantry may only charge to contact while in column.  Only infantry and artillery may change formation.

In the Charge Sequence, Thomas provides a matrix for easily determining whether a charging unit may contact a defending unit.  Conditional charges are allowed provided that the charging unit outnumbers the target.  If attacked frontally, defenders may fire at the attacker before hand-to-hand combat is resolved.  

In the Fire Phase, firing units throw a number of dice per stand dependent upon unit type (rate of fire).  Ranges are singular per weapon type with the exception that smoothbore guns have both a short and long range, and skirmishers add 8cm to weapons' range.  Hits are cross-referenced with respect to firing unit and target.  For example, an infantry unit firing in line against an infantry in close order line needs 4-6 on each D6 to score one hit.  Each base may take four hits before removing one base.  Saving throws are allowed for provided the target unit is either in cover (woods or towns) or armed with breechloading weapons.  The rationale for the breechloading saving throw is to model the tendency for breechloading armed troops to "go to ground" when under heavy fire.     

In Hand-to-Hand Combat Phase, each unit totals the number of dice it throws against its opponent with each stand receiving a set number of dice dependent upon the attacking and defending unit types.  Like fire, saving throws are allowed for units in woods or towns.  The side taking the largest number of hits retreats after Hand-to-Hand. 

During the Morale Phase, only three conditions trigger a morale test.  These conditions are:
  • Losing a base through fire combat
  • Charging cavalry takes fire from defending target
  • Losing Hand-to-Hand combat
Notice that in the case of a cavalry charge, the defender does not necessarily have to cause casualties to trigger this morale test.  Thomas argues that the process of taking fire during a cavalry charge was often enough to cause 'extreme' disorder within the charging cavalry's ranks.  Units are rated in five distinct morale classifications.  These are, 
  • Fanatic
  • Elite
  • Average
  • Levy
  • Rabble
with each classification given a set range of values on 1D6 for passing the morale test.  Fanatics fail only a on a roll of '1' while Rabble fail on any roll other than a '6'.

To me, the most interesting portion of Thomas' book is contained in his design notes in chapter 2.  This chapter allows the reader insight into Thomas' rationale for designing the rules as written.  Some thought provoking ideas are surfaced within and prompts me to consider some of my own gaming designs.  Thomas' rules definitely possess the flavor of classic, Old School wargames as handed down from the pioneers of Featherstone, Grant, Wesencraft, and Morschauser.

Tuesday, August 15, 2023

Muskets and Springfields

When I first saw these rules announced, my thought was, "these look interesting."  Played on a grid with no figure removal, Muskets and Springfields (M&S) looked right up my alley.  Now, with my experience with the recent hit and miss nature of books and rules released from the seemingly factory-line quick publishing of some companies, I am a bit wary.  This time, I threw caution to the wind and placed an order, sight unseen.

Having played many rules (see for example the different rulesets played in 2022 alone at Year in Review: Games Played) playtested others, and read many, many more rules across more than 50 years of wargaming, a read from cover to cover with a return to reinforce concepts often provides a good grasp of the mechanisms.  Including a QRS close by as reference helps too.  Hopefully, a core design philosophy can be extracted as well.  

After reading the rules through twice with several returns to reread crucial sections, I had many questions.  Questions arose not only in the rules, themselves, but to the author's understanding of the period.  Given these reservations, I went in search of reviews.  One of the few reviews found was Colin's impression at Carryings On
Up the Dale.  Colin enjoyed the rules with no mention of the mechanisms I found troubling.  Next up was the author's (Nigel Emsen) Design Notes.   

Both Colin and Nigel provide an overview and feel for the flow of the rules.  I make no review of the rules, themselves.  Rules' metadata can be found elsewhere.  As I read the rules, stopping to reflect often, there were many facets that simply either did not make sense or were (in my mind) in error.

Where to begin?

Let's start with the title, itself.  Muskets and Springfields is an odd choice for a title.  First, Springfields were muskets; rifled muskets but still muskets.  Perhaps Smoothbores and Springfields would have been a better title choice?  Second, "...because M&S sits at the operational level, there is no separation between smoothbore and rifle armed small arms" why this title at all, then?  With a ground scale of one square equaling 300 yards and no distinction between smoothbore and rifles, the title has no relevance.

This brings up my second point.  Operational level?  With a ground scale of 300 yards, basic maneuver unit (BMU) of a brigade, and all of the scenarios depicting small ACW battles or only portions of large battles, the rules are tactical not operational.  Perhaps our definitions of "operational level" differ but to me, operational invokes campaigns not refighting portions of battles.  The inclusion of capturing and spiking guns is a bit much when players take roles of Army down to Division command. 

Even setting the basic unit in the game as a brigade is not without ambiguity.  In the six scenarios provided, this basic unit seems to vary.  In some scenarios the BMU is a brigade.  In others, a brigade is composed of multiple regiments.  Still in another, a brigade is composed of a number of stands.  There is no consistency that a BMU is, in fact, a brigade.  Perhaps, "brigade-equivalent" may have been a better term?

Speaking of terminology, each unit carries a Morale State that can be in one of three states.  These are either "Unknown", "Steady", or "Nervous".  A unit's Morale State is not known until it first takes damage.  The author calls this rule, the "fight or flight" rule.  "Fight or flight"?  Why not use the period expression of "Seeing the elephant"?  Even the phrase of "first takes damage" is misleading since the next section in the rules under Attrition states that a unit must receive at least two hits in any one turn to trigger this event.  Another oddity is the use of the term "Shooting and Scooting" for evading.  I have never read of any ACW units "shooting and scooting" as a charge bears down.  Is the use of a deck of cards for activation really a "bag-pull" system?

What about troop types? Any challenges there?  Yes! Zouaves (and Native American warbands) in melee are easier to hit (-2 modifier) and fight with 4D10.  Regular infantry melee with 6D10s.  Why?  Oh, Zouaves and warbands are immune to Morale Tests!  Makes me wonder if the author knows what a Zouave was in the ACW.

In shooting and melee a unit rolls a specified number of D10s looking for successes but nowhere does it specify if the roll must exceed or fall under the target number.  Do the modifiers adjust the Base Number or the die roll?  The answer can be worked out by studying the modifier table but this should be explicit to avoid confusion.  Similarly, nowhere is it mentioned how a melee ends.  Does the losing unit retire from the square if neither is eliminated?

Finally, the scenario maps have issues.  Given that this is a grid-based game, the maps carry no grid.  Typos are frequent.  At Cedar Mountain, one of the Confederate commanders is shown as "C. SWINDERS" and a farm is shown as "Crillenden."  Good grief.

First impressions are that this work requires more development.  When one ambiguity surfaces, I question that one exception.  When ambiguities abound, I begin to question everything.  There may be some good ideas in here somewhere but getting to them is a chore.

Sunday, June 6, 2021

Impetvs Warbook2

Back in January, I received my pre-ordered copy of Impetus Warbook1.  At that time (see Impetus Warbook1), I commented on finding a surprise within the Army List book.  That surprise was a photo of my Kallapani stand used without permission.

To finish the story, several readers suggested I contact Lorenzo at Dadi & Piombo to sort out the situation.  That I did.  After several email exchanges and an apology, Lorenzo offered a complimentary copy of Warbook2 when it was released.  As seen from the cover of the book above, Lorenzo made good on his commitment.  The book arrived last week.  A very welcome gesture.

Warbook2 is spiral bound rather than perfect bound as was Warbook1.  I prefer the spiral binding since the book can lay flat on the table.  The Army Lists cover armies from 43BC to 1100AD and loaded with full color photos of miniatures.

The book contains nine volumes of Army Lists for,
  • Rome and the Empires
  • Rome Crisis and Fall
  • Britannia
  • Ancient Far East
  • Steppe Peoples
  • Armies of Islam
  • Justinian Age
  • Age of Charlemagne
  • Year 1000  
including almost 100 Army Lists.

This will provide a handy Impetus 2.0 Army List revision for these armies.  Unfortunately, these time periods are under-represented in my collections.  Still, a handy reference to have as I contemplate new armies. 

Saturday, March 13, 2021

For Whom The Dice Rolls

The latest entry from the growing stable of wargaming rules from Graham Evans dropped into my mailbox this week.  That rulebook is For Whom The Dice Rolls (FWTDR) covering brigade and divisional sized battles during the Spanish Civil War.  Graham sent me a copy of the rules, fresh off the printing press, as an acknowledgement of my playtesting efforts.  

Besides a small amount of reading on the conflict in fiction (Hemingway) and non-fiction (Beevor), I had little exposure to this war. Over four months of playtesting, I have learned a great deal more.
sample in-game photo
The rulebook is a hefty 95 pages and is printed in color. Lots of background information within as well.  FWTDR is a handsome production, indeed.

To reciprocate for Graham's generosity, I painted up a battalion's worth of Basque infantry.  These 15mm Peter Pig fellows will be winging their way to Graham soon.
15mm Basque infantry
With my growing familiarity to FWTDR over the last four months, I expect to return to this topic in future posts.  Having been involved in the later, nitty-gritty playtests, perhaps, a full review by me is not appropriate?  As I wrestle with that decision, other topics are fair game, though.  A number of rules-related topics are already formulating in my mind.  Perhaps a review is still appropriate since I have at least played the game several times and scrutinized the text and game mechanisms?  In whichever direction I ultimately decide to explore, this will not be the last you see of FWTDR here.     

For now, congratulations to Graham for publishing another interesting set of rules for yet another, somewhat obscure conflict.  Let me know when you buy that vacation place in the Bahamas.

For more information, please visit: Wargaming for Grown-ups.

Friday, February 5, 2021

Taiping Era - First Game

Great title, no? 

While I have two of Graham's wargame rules and currently playtesting a third, Taiping Era is a new one to me.  Therefore, it was with great interest that Graham offered this up for the weekly game.  The battle was a dry run for Graham's presentation at this weekend's VCOW.  With briefings and QRS in-hand, five players set to work. The game, played on a grid, is very suitable to remote play. 

The battle comprised a meeting engagement between Gordon's Ever Victorious Army joined by a Hunan army against the Taiping Rebels.  I was placed in the role of Gordon and would be attacking on the left.  A brief, one-sided report of the battle follows but for a more detailed account with better photos, please visit Graham's battle report at Taiping Trial and Error.  My report is one-sided in that I primarily focused on the action seen on my side of the table.  My Hunan comrade, Ian, seemed to be holding his on my right but having trouble passing his Moral Vigor rolls.
The advance to contact begins.
Gordon moves swiftly and deploys into line
 as the Hunan army keeps pace on his right.
EVA fire takes its toll on the Taiping right
while a clash on Gordon's far left develops.
The EVA gives a volley and countercharges!
The first clash on Gordon's left ends in a standoff
while Taiping skirmishers  at the crossroads turn
tail and break for the rear.
The Taiping right collapses as Gordon's EVA remains
Ever Victorious!
Graham provides a post-battle briefing
as the destruction of the Taiping right is evaluated.
Even though I had not read the rules, play from the QRS was possible after a couple of turns.  Most of the information needed for play was at hand on the QRS and easily found and understood.  The game provided an enjoyable three hours as Gordon marched to victory.

The rules employ some interesting mechanisms that I may dive into further in another post.  Perhaps after having played another game?

On the gaming front, I will see four battles in four days.  Three remote and one F2F.  Yes, F2F!  The F2F game will feature a very cautious, properly socially distanced, two-player playtest of a Commands & Colors Lace Wars variant for Culloden.  WoFun 18mm figures will be present.  Oh, and the Battle of Rivoli continues to rage across my gaming table.

Monday, November 30, 2020

To Ur is Human - First Impressions

Having purchased the rules, To Ur is Human (To Ur), one year ago and having finally fought a Sumerian battle among the irrigation ditches of the Fertile Crescent two weeks ago, time for a First Impressions of the rules.  The game mentioned was fought under the guidance of the author, Graham Evans.  To Ur states that it is a set of Tabletop Wargame Rules for Conflict in Sumerian Mesopotamia.  What does that mean?  We will find out.

To Ur measures in at 29 pages in length.  Typeface is large so the rules' content is shorter in length than suggested by the page length.  The back cover of the book contains a QRS.  Publishing the QRS on the back cover is a very useful practice.  Unlike Graham’s later, Its Getting a Bit Chile, To Ur features only the core rules without sections describing figure availability, painting guides, scenarios, etc..

To Ur features an Igo-Ugo system played on a grid.  Sure, play could be adapted to free-form movement and measurements but a grid allows for effortless resolution and little ambiguity.  Well, more on ambiguity later when movement, missile fire, and charging are discussed.  With no ground scale nor figure-to-man ratio given, To Ur represents combat in ancient Sumeria abstractly.  A Basic Maneuver Unit (BMU) consists of four bases for infantry and two bases for battle carts.  The number of figures per base is not important.  Any number of figures will do.  Each base can suffer four hits before its removal.  Given that, a four stand unit can absorb 16 hits before removal to due casualties.

Movement is most often one grid per turn unless charging.  Missile troops may fire up to three grids for bows.  Facing within a grid is important.  A unit may position itself in one of eight attitudes within the grid (four facing grid sides and four facing grid corners).  With the plodding rate of advance, an attacking unit may suffer several turns of missile fire before coming to grips with an adversary.  Light infantry can move and shoot. In fact, light missile troops may advance one square, shoot, and then retire one square.   A very handy attribute! Each unit is classified by Type (Heavy Infantry, Medium Infantry, Light Infantry, and Battle Carts) and by Training (Elite, Trained, Levy). Each side has one Big Man or Lugal.

The Turn Sequence is typical of many Igo-Ugo wargame rules. The sequence is,
  • Move CiC (Lugal)
  • Charge Declaration
  • Movement
  • Shooting
  • Hand-to-Hand Combat
  • Rally
  • Assess victory conditions
What is at the heart of the design philosophy for To Ur?  Strip away all but the essential elements and the players are left with a psychological test of wills between adversaries.  Whether or not units will close or run is governed by a Fear Test.  A unit can be in one of three morale states: Fight, Fright, or Flight.   Units take this test when charging, after a round of Hand-to-Hand combat, or attempting to rally.  This test features an opposed roll by the two combatants.  Each side rolls 1D6 and adds only a handful of modifiers.  As a result of this computed differential, each participating unit’s morale state may remain the same, go down or up.  A player may attempt to maximize chances for success but there is enough variability built into the Fear Table that each contest contains inherent risk.  Whoever can manage this risk more effectively over the course of battle may win the day.   An interesting twist to the use of the Fear Table and opposed die rolls is that this same mechanism is used for rallying. Imagine that. An opponent with a hot hand may prevent your unit from rallying!

One complexity and ambiguity with many grid-based games is diagonal measurement across the grid whether for movement or for missile fire.  Different rules approach this challenge differently by employing different distance metrics.   To Ur tackles this by stating measurement criteria but then offering multiple examples of both movement and missile fire. The process can be confusing but enough examples are included to work through most situations.  I appreciate that foresight.  I am sure some of these complicated measurements will become second nature with repeated playings but for now, complex moves, charges, and missile fire may require extra effort at first.

As for combat resolution, both missile fire and hand-to-hand (HtH) combat use D6’s.  Each unit is awarded a number of dice per base. For missile fire, this could be up to two dice per base or 8D6 for a full four-stand unit. For HtH, units can throw as many as four dice per base for a total up to 16D6. Modifiers can add even more D6s per base.  A bucket of dice can be thrown in HtH combat. Typically, 5s and 6s hit for most unit types although light infantry hit on 4+.

Production quality is good and the price very inexpensive.  I paid less than USD$10 post paid from Amazon.  The rules are well diagrammed to illustrate a number of the subtleties.  As noted earlier, examples of play are numerous.

With only one game under my belt, has this tempted me into beginning a new project?  Of course, it has!  I have spent considerable time pouring over the catalogs from Wargames Foundry and Newline Designs comparing their 28mm Sumerian offerings.  I may already have too many projects on my plate so a more measured and prudent approach may be to try modifying the rules to accommodate my later Bronze Age armies. The main change would center on the tactical differences between Sumerian battle carts and later chariots. That should not pose too tough of a hurdle to overcome.

As for rules' complexity and completeness, the rules are medium complexity primarily due to the constraints imposed by a grid.  Even only playing the game one time, I found the answer to every question within the rules.  That sounds complete.  Could I have absorbed the rules on my own without the author present as my guide?  Eventually, sure, but having Graham lead me through the rules helped tremendously.  An enjoyable gaming session for us all, I think!   Looking forward to my next encounter in ancient Mesopotamia.

Well done, Graham!

For more information on To Ur is Human, please contact Graham at Wargaming for Grown-Ups.

Sunday, July 26, 2020

Fields of Honor: AWI - First Look

A first look, twenty years late!
Fields of Honor - The American War of Independence (FoH-AWI) was published back in 2000 by Pinnacle Entertainment Group.  The American War of Independence version of the rules is a descendant of the 1994 Fields of Honor (FoH) rules covering warfare in the 19th Century.  Since the original FoH's publication 25 years ago, I have continued to hold the rules with much fondness.  Even though I have not played them in many, many years, FoH still represents a comprehensive and well developed ruleset.  Given this provenance, I was quick to buy FoH-AWI when it was published twenty years ago.  

FoH-AWI was unique in that it not only included rules and playing pieces for a traditional hex and counter game but also rules for use with miniatures.  While I tried the hex and counter version upon publication, putting the miniatures' rules into play did not occur.  Until now, that is.

As a brief overview, FoH-AWI has a simple turn sequence using an IGO-UGO mechanism.  The Turn Sequence has four phases.  Attacker movement, Attacker combat, Defender movement, and Defender combat.  For combat, a unit may either fire or melee but not both.

Each unit has a Quality Rating for each of Fire/Melee/Morale.  This rating has five values (A,B,C,D,E) and is independent for each of the three attributes.  Quality Rating acts as a die roll modifier for each of the Fire/Melee/Morale attributes.  The die roll modifiers range from +2 (A) to -2 (E).  With five possible values for each of three distinct attributes, each unit's characteristic can be fine tuned to suit the scenario or situation. 

With only four phases in a turn and a limited number of modifiers to consider for each of the Fire/Melee/Morale play is fast since the few modifiers are easily remembered after a few turns.  Attached leaders may add bonuses for Fire/Melee/Morale but may become casualties if the unit is destroyed.

One interesting twist to the rules is the inclusion of random FORTUNE and CALAMITY tables.  At the beginning of each turn, each player rolls 1D10.  On a '1' the player receives a Calamity such as Out of Ammo, Demoralization, or eight other events. On a '0' the player receives a Fortune Event such as Captured Orders, Inspiration, or eight other events.  The inclusion of events keeps scenario replayability high.  None of the events are game stopping.  

How does the game play?  Well, wanting a small scenario as an initial test, I reached for a scenario played several times from Norm's Two Flags - One Nation ACW ruleset.  The scenario chosen was Action at Mill Creek (see Action at Mill Creek) and transported back in time to the AWI.   

The British win this contest if they can place two regiments onto the hill and be the last to hold the bridge.  The Americans have positioned their medium gun and two militia regiments onto the heights.  Two Continentals foot regiments are covering the bridge and three regiments will be arriving as reinforcements. 
Let's see how it played.
British troops begin the advance upon
 the American positions
The Lights lead the way to the bridge
The Long Red Line
General advance as British take fire from artillery
The Lights splash into the creek
The Americans opt for HOLD orders (OP FIRE)
to wait to see the whites of their eyes
British right reinforces the attack
upon the militia on the heights
Colonial militia take heavy casualties as one regiment
scatters  and a second withdraws from the heights
British take the right most hillock
Continentals reinforce the hill
but perhaps not for long as the position is outflanked
Colonial guns deliver pain but the Redcoats stand firm.
Not able to stall the assault on the guns,
the guns are destroyed
Colonial reinforcements arrive pouring murderous
 fire into the British but success is short-lived.
With pressure mounting against the hill, a
third infantry regiment is scattered on the Colonial right.
With the American force reduced to 50% strength, I put an end to the bloodshed.  The bridge was firmly in British hands and the heights held two British regiments.  Given one or two more turns, the remaining Rebels would have been driven from the heights and likely the field.  Tactical victory to the British.

In six turns, the British were able to march up and blast the Americans from their positions.  The British dished out more than they took with only light casualties inflicted against the King's troops.  The militia got off a couple of volleys but the British line infantry were not shaken.  When pressed by regulars, the colonial militia buckled.  This battlefield trial seemed one-sided but was that pre-destined?  The battle deserves another go, at least.

The Events did not come into play in this battle.  It would have been interesting to see some of these enter into the game.  Perhaps, an event could have pushed the British onto a back foot to allow just a little time for the Americans to regroup.  One thing I discovered too late was the power of placing the Americans on HOLD orders until the British came up into range.  A HOLD would allow an American unit to interrupt the British move/attack sequence and get off the first volley.  Also to consider is placing Continentals on the hill and militia in the woods.  Perhaps allow the colonial reinforcements to enter earlier too?

Sunday, January 19, 2020

First Impressions: IGaBC

Hot on the heals of Graham Evans’ To Ur is Human, a second set of rules emerges from his rules’ backlog.  Sticking to the road less traveled, Graham turns his attention to the New World and the 1879-1884 South American conflict know as the War in the Pacific.

The author has a penchant for tackling obscure conflicts and the War in the Pacific is no different.  How does one develop an interest in such an obscure theater of warfare?  Well, like me, travel can be the catalyst for a new project.  For Evans, a trip to Peru was that igniter for inspiration.  I came away from my Peruvian adventure with thoughts of modeling various conflicts too but, for me, those thoughts passed.  Not for Graham.  The result of that spark of motivation led to his It’s Getting a Bit Chile (IGaBC).

While IGaBC states that it is a set of Tabletop Wargame Rules for the Land Conflict in the War of the Pacific 1879-1884, it really is much more than that.  IGaBC is almost a complete package in the tradition of a wargamer’s guide.  At 76 pages in length, this represents an impressive work.  Rules comprise the bulk of the book but typeface is large and easy to read.  In addition to the core rules, topics include, a brief history and chronology of the conflict, figure availability, painting guide, and a useful bibliography. Really, IGaBC provides enough information to get going on a new project straight away.

On to the rules.  IGaBC is an Igo-Ugo system played on a grid.  Options are available and described for non-grid play.  Basic Maneuver Unit (BMU) is the infantry battalion, cavalry squadron, and artillery battery.  Ground scale is 250 yards per square.  An infantry BMU consists of four bases with cavalry and artillery BMUs comprising two stands.  There is no figure/base removal for casualties except in unusual circumstances.  Entire units are either on table or removed from play when ineffective.  This is how I like it.  I prefer figures and units to remain on table as long as possible.  It takes effort to build a collection.  No reason to have the figures put out on the table and then put back into storage boxes almost immediately upon receiving the first casualties.

The Turn Sequence is typical of many Igo-Ugo wargame rules.  The sequence is,

  • Charge Declaration
  • Movement
  • Rally
  • Firing
  • Hand-to-Hand Combat
What is interesting in the sequence here is that Rally follows the Movement Phase.  Units attempting to remove Disorder markers do so during the Rally Phase.  Rally attempts count as movement so units later firing do so with the Firers Moved penalty.  Units may attempt to rally off each Disorder a unit has accrued having a one in six chance to do so.  Leaders may aid in recovering disorder as well as offering customizable traits.  A unit must choose which method to rally (self-rally or leader-aided).  Troop quality does not affect the ability to rally.  Poor units rally with the same probability as good troops.  More about disorder later.

What is the essence of the gaming engine for IGaBC? If I strip away all but the essential elements, the rules can be distilled down to three important concepts.  Those are Formation, Support, and Disorder (FSD for short).  Since only infantry may have support, I will focus on the infantry aspects of FSD.

Infantry can be in one of seven formation stances within a square.  Well diagrammed within the rules, each has its own attributes for deployment, density, support, advantages and disadvantages.  Each unique, diagrammed stance shows, at a glance, the attributes of the BMU.  This is a clever visual concept and reminds me somewhat of Weigle’s 1870 series of rules.  What can be gleaned from a BMU’s stance are facing, the number of firing stands, the number of support stands, unit density, and target type.

Besides unit formation, the two key components of a BMU’s attributes are Support and Disorder. Disorder represents a unit’s loss of combat effectiveness as it sustains punishment from fire or close combat.  Disorder is incremental.  As a unit takes punishment, disorder may accrue if not rallied off.  With no Disorder markers, a unit fights with 1D8.  With one Disorder marker, a unit fights using 1D6.  With two Disorder markers, a unit fights using 1D4.  When a unit accrues three Disorders, it may not fire but fights with 1D4 in hand-to-hand.  Any more and the unit either retires, retreats, or routs. This method of disorder accrual reminds me of Santa Anna Rules and its method of modeling the effects of straggling.  Perhaps, rather than having absorbed Disorder markers placed under the support base, IGaBC could take a page out of Santa Anna Rules and rotate a support base to the rear to denote an absorbed Disorder Marker thus eliminating a need to place Disorder markers under a support base? Once rallied off, the support base would return to its normal attitude.

Supporting bases may mitigate disorder.  Some infantry formations offer support; others do not.  Support represents a unit’s ability to absorb friction from combat.  Absorption of disorder by a supporting base is temporary.  Changing formation from a more dense to less dense stance allows a unit to ignore disorder too. That is another interesting twist.

What about combat in IGaBC?  Depending upon the number of participating stands, level of disorder (remember throwing either 1D8, 1D6, or 1D4 per stand), Target Type, and a handful of column shift modifiers, an attacker sums all of the attack dice and scores one disorder for each multiple of the target’s To Hit Multiple.  If a target’s To Hit Multiple is ‘8’ and the attacker’s attack dice total is ‘10’ then the defenders receives one Disorder Marker.  Fractions are ignored.

While the Chilean Army fielded the better quality troops carrying better weapons than her adversaries, Evans’ warns against playing the ratings too literally.  Top Quality troops with New rifles will likely easily overwhelm Poor Quality troops with Old rifles.  As he says, “It may be realistic but it might not be much of a game...

Does this combat engine model the situation on the ground?  I cannot say but it offers a number of interesting twists to a typical combat engine.  Having multiple, different sided dice (D8,D6,D4) are not something I enjoy.  I understand the rationale for its inclusion but it seems too fiddly to me and ripe for error.  All in all, it looks like it would work despite my personal reservations.

Production quality is good.  While a few typos and errors crept into the final copy, these did not distract from the work.  The rules are well diagrammed to illustrate a number of the key concepts.  Examples of play are numerous too.  One of the inclusions that I appreciated in To Ur is Human and continued here is a comprehensive QRS printed onto the back cover.  This should be a standard practice unless QRS’ are printed separately, detachable, and included in the rules.

Alan Curtis’ painting guide to the war is a very useful addition to IGaBC.  My only complaint is that while the Chileans are listed as having adopted French style uniforms, no mention of the uniform cut for either Bolivia or Peru.  When I ordered IGaBC, I also ordered Esposito and Pinto’s The War of the Pacific.  While not listed in the bibliography, this is an excellent book covering the war, the armies, and uniforms.  Filled with a number of color uniform plates, I wonder how this 170 page work compares with Esposito’s Osprey?

Has this tempted me into a new period?  The jury is still out on that one.  Armies tend to be small and colorful.  Graham has mentioned that FPW French and ACW figures could be pressed into service to field most of the combatants.  This could be an interesting research project to find alternative figures outside of the figures produced by Outpost Wargames Services in 15mm.  That might be worth the effort in and of itself. This work has piqued my interest.

In conclusion, IGaBC is comprehensive piece of work for a little gamed period.  Keep in mind, my First Impressions are just that; first impressions of the rules, themselves. I have yet to try the game in practice.

Well done and thank you, Graham, for opening my eyes to a new frontier!