Showing posts with label 30mm ECW. Show all posts

Thursday, March 6, 2025

Archaeology In The Lead Pile

Digging down through the various strata of The Lead Pile recently, I came across several packs of horsemen for the 30mm ECW project.  Now, there remains not so many leftovers to paint in this project so I pulled out three packs and pushed the nine figures into the painting queue.  
From my perspective the ECW project is mostly complete.  Only some odds and ends and enough cavalry for one more body of horse.  Looking back at the Painting Log, the last time any units mustered out was December 2022, a little over two years ago.  Still, adding one horse unit and cleaning out a few packs of figures was worth the time and effort, I thought.
The figures are from The Assault Group and were picked up many, many years ago.  Many of these nine horsemen are wearing older style helmets more suitable to 30YW but they will do for service in my ECW battles.  Nice figures.

On the gaming front this week, Peter (Grid based Wargaming) hosted me in a remote, Medieval game using Arrowstorm.  My first time with the rules and I must admit I was soundly thrashed in Game #1 but made some progress in Game #2.  Still, in Game #2 I fell to Peter's clever tactics.  Perhaps I will get him next time?  We are discussing a rematch. 
Peter has also challenged me to bring my WotR collection to the table for its first outing.  Not able to resist a challenge, I am working on rules for the period for presentation soon(ish).  With some luck, I hope to see the collection on the table within a fortnight.

Wednesday, September 11, 2024

Cheriton, It's a Wrap!

Last week witnessed the fifth replaying of the 1644 Battle of Cheriton.  Game #5 saw an encore performance by most of Game #1's participants. The first game saw Mark, Chris, and the Two Daves take to the field.  In the last game, Mark, Chris, and Dave B were joined by Tony to complete the foursome.  The three players in the first game all swapped allegiances for the game giving each a view of the battle from both sides of the table.  Army dispositions and player commands are shown on the following game map.
Initial army and player dispositions.
So far in this series, Waller has seen three victories, one draw, and no losses.  The single draw was awarded as time ran out.  By general consensus a draw seemed reasonable.  Could Hopton break this chain of Parliamentarian victories?
Haselrigge's Cavalry Wing forms up.
To review the action from prior games, please see the links below,

With four games already chronicled in the Battle Log, a reasonable body of work is available as a baseline for assessing game flow.  All of these previous actions saw the battle develop in a predictable manner.  Well, developing in a predictable manner after we witnessed how Game #1 played out.  By the way, it was Game #1 that saw the single draw.  Still, that first battle developed similarly to all of the following battles.

Whereas Waller begins holding the high ground on the South Spur, in all five games, Waller orders Potley's infantry down from the heights to take the fight to Hopton.  All recognized the importance of making a push toward the hedge-lined lane bisecting the battlefield while commanded shot units begin to contest Cheriton Woods.  
Battle lines as the action begins.
Both armies advance.
Parliamentarian Center enters the "arena".
Royalist foot push toward the hedge as well.
View from behind Royalist Left.
While both infantry centers make a beeline to reach the protective barrier in the center of the battlefield, Waller orders Balfour's Right Cavalry Wing to sweep around behind Roundhead lines in order to support Haselrigge's cavalry on the Left.  Confined by Cheriton Woods on the right, infantry to the left, and an open yet rough heath to the front, all of the Roundhead players chose to bring Balfour over to the Left in support of Haselrigge.  Now, this redeployment takes time but all make the same choice.  
Balfour redeploys...
by bringing his cavalry over to the Left.
As infantry converge upon the hedge in the center, Haslerigge strikes out toward the enemy's Right Wing.  In a series of charges, countercharges, and pursuits, Mark dismantles Lisle's (and Forth's) cavalry.  Royalist cavalry are sent reeling with at least one cavalry unit fleeing the field.  Losses are high for both armies but Haselrigge emerges victorious and controlling that sector of the battlefield.  Seeing the destruction of his right, Hopton sends Stuart's cavalry over to shore up that wing.  
The fight for the center...
as Haselrigge dismantles the Royalist Right.
Help is on the way!  Is it?
The fight over control of the hedge in the center intensifies as firefights and charges are the order of the moment.  Casualties mount as the battle ebbs and flows.  The Royalists make some headway only to be repulsed while the Roundheads see similar results.  The battle in the center is hotly contested and the ground is still up for grabs.
Fighting along Broad Lane.
Fighting in the heath.
Bard moves his infantry up to drive off the dragoons.
Paulet leads a Royalist foot over the hedge...
but the cost is high.
One Royalist foot regiment destroyed
as Paulet scampers to safety. 
As a second Royalist regiment is driven back and the purple coats come across the hedge, Bard's grey coats move up to contest the ground.  Bard successfully drives the enemy back but his advance exposes a flank.  Seizing this opportunity, Haslerigge leads a charge over the hedge and into the unsuspecting Royalists.  Unable to respond, Bard's regiment is cut to pieces.  Now Hopton's Right is gone.  Definitely gone!  Stuart attempts to stem this tide with one of his horse units but it is overwhelmed.  Not only has Hopton's Right been pulverized but the Center also looks lost. 
Bard's grey coats counterattack driving the enemy back...
but are put to the sword by Roundhead cavalry.
Skirmishing continues in Cheriton Woods.
Hopton's Right is gone and Center is in disarray.
Waller controls the field.
With word reaching Hopton that enemy cavalry are seen moving up to exploit these multiple successes, Hopton sees the writing on the wall and orders the remnants of his army to disengage.  For Hopton, this battle is over.
Roundhead cavalry coming up in support.
Hopton orders his army back.
With a score of 9-2 remaining on the Army Breakpoint Clocks in Waller's favor, Chris and David concede the battle.  The battle ends in a major Parliamentarian victory.  Congratulations to Mark and Tony for a battle well fought.  Fine play by all but there is no question as to the victors.  The action on this day was the most decisive of the quintet.  Very fun to watch this battle unfold and the way in which the Roundheads handled their troops.  Impressive guys!     
What have I learned from these five games?  For starters, Cheriton looks a tough ask for the tabletop Hoptons just as it was for their historical counterpart.

After five games, time to put away the ECW armies and contemplate a new challenge.  Next up will see a return to another civil war with a look at an early battle in the American Civil War, Western theater.

Thursday, September 5, 2024

Cheriton: Bledsoe vs Freitag

Yes, another battle report in the growing series of refighting Cheriton on the table.  In fact, this week has seen two refights of the ECW clash between Hopton and Waller.

The first game this week took place on Sunday.  Sunday's contest was the first game in a very long time that I hosted a F2F contest.  The gaming table looks a little foreign without webcams on either side of the table, a big screen TV at the far end, and another person in the room!

Today's opponent was Jake from Dartfrog's Adventures in 6mm.  If my memory is correct, it has been since before COVID that I last saw him.  Boy, how time flies and life intervenes.  Since Jake has been away from the table for so many years, much of our time was spent exchanging stories and catching up.  The rules, themselves, have evolved since Jake last played, too, so the game was really a training exercise and a chance to push lead across the table after a too long absence.  Jake opted to take command of the Royalists while I stepped into Waller's shoes.

Since the session was as much about Jake's many travels as actually playing the game, I offer a selection of photos from the action with very brief commentary.
Waller orders his infantry down from the heights...
while Haselrigge brings his cavalry up on the left.
Haselrigge deploys in depth as Potley moves
his Roundhead infantry up in the center.
View from above Cheriton Woods looking west.
Potley's infantry moves up toward the hedge...
as Roundhead cavalry prepare for action
before smashing into Forth's cavalry.
The enemy are sent reeling back!
Commanded shot exchange pleasantries in the woods.
Waller's infantry reach the hedge first!
Potley sends infantry over the hedge
as the enemy runs to the rear!
View from above Cheriton Woods looking west
as Waller's infantry drive deep into the Royalist line.
With Hopton attached, his bluecoats give a volley
and then chase the enemy back over the hedge! 
This is too little too late!
Hopton sees the writing on the wall. 
With his center pierced and his cavalry all but destroyed,
Hopton concedes the field to Waller.
Waller victorious!
Yes, Waller racks up another victory at Cheriton but winning and losing is not important.  Getting together with an old friend is what counts.  Still, the battle was good fun and Jake is right back up to speed with the rules and I am current on what he has been up to over the last four years.

Hopefully, our next game will not be four years in the making.

Saturday, August 24, 2024

Cheriton: Freitag vs Davies

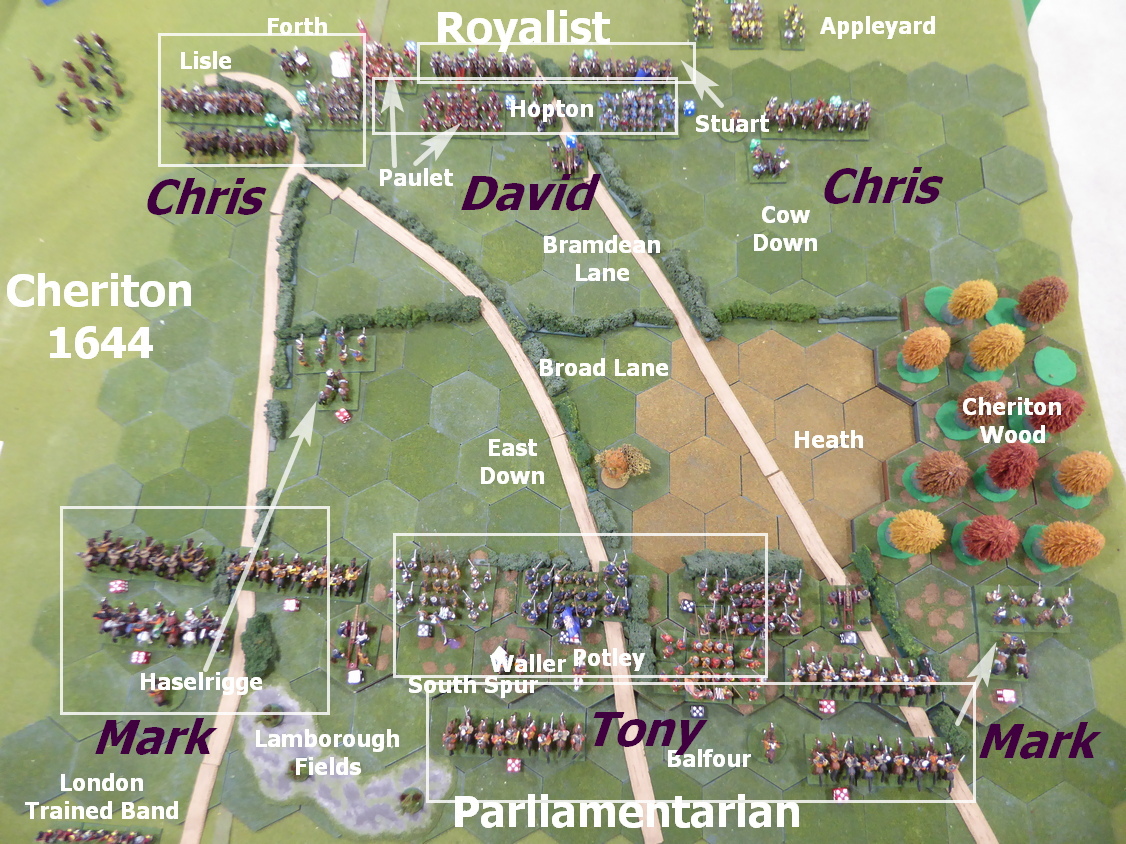
Nearly ten days ago, Peter and I sat down for the second of our two, paired refights of Cheriton.  In that first game, Peter hosted the game from his table in Melbourne.  Peter's battle report can be read here.  Using Peter's rules, I took command of the Royalist Army and came away with victory.  In today's battle, we turn the tables on both rules and host.  I host the game from Spokane with Peter Zooming in from Australia.  We will be using my rules and Peter will be commanding Waller's Army.  In an interesting twist, Peter, of grid-based gaming fame, plays his version of the Cheriton battle on an open table.  My version of Cheriton is played out on a hex-based grid system.  The battlefield and army dispositions are illustrated in the map below:

Cheriton Battlefield and Army Positions
Peter wrote up a superb accounting of this battle.  His version of battle along with his thoughts and battle plans can be found at Battle of Cheriton 1644-Remote Game Rematch on his blog.
Peter looking on from afar
 at his pair of webcam views of the battlefield.
Since Peter recounted the tale so well, I provide a captioned pictorial of the action to augment Peter's report.


Waller's Army deploys along the South Spur anchored
on Cheriton Woods on the right and Cheriton on the left. 
Hopton's Army deploys opposite to South Spur
with Lord Forth on the right
.
Both armies step off toward the enemy's line.
Waller marches down from the heights to engage the enemy.
The two armies seem intent on reaching
 the hedge-lined lane to their fronts, first!
Hopton's yellowcoats outmarch the enemy to the hedge.
Waller's dragoons work their way into Cheriton Woods.
If the yellowcoats advance, the dragoons will be on their flank!
Hopton reaches the hedge row first.
Now, let Waller come to him!
Waller sends Haselrigge's horse forward on the left.
View from Hopton's left...
as Potley's infantry cautiously close the range.
Haselrigge's cavalry charges forward.
Countercharged, the Cavaliers are driven off.
Roundhead cavalry fall back to reform
 behind the safety of more of Haselrigge's cavalry.
Seeing his right weakened by Roundhead cavalry charges,
Hopton orders Stuart's cavalry to move to cover the right flank.
Waller's artillery drives the yellowcoats back from the hedge. 
As Bard's greycoated foot crosses the hedge to attack the dragoons,
Potley drives a redcoated regiment back from the hedge in the center.
The dragoons cannot stand under such pressure and recoil.
Now outnumbering Lisle's cavalry on the enemy right,
Haselrigge sends two cavalry brigades forward.
Leading the charge, Haselrigge scatters the enemy horse.
Cavalier cavalry not destroyed in this clash
 fall back toward the center to reform.
As infantry are locked into a firefight in the center,
Balfour brings his Roundhead cavalry over to the left
to reinforce Haselrigge's success.
With the supporting cavalry to his right vanquished,
Bard puts the hedge between his infantry and the enemy. 
Assuming the hedge offers a protective barrier,
 Royalist bluecoats are surprised when attacked.
Led by Potley, Waller's bluecoats crash into Paulet's bluecoats.
Unable to stop Potley with a crippling volley,
the Roundheads crash into the Royalists. 
In a lengthy push of pike, the Royalist foot is scattered.
Roundhhead bluecoats drive the redcoats back in disorder.
Potley's infantry has effectively cut the Royalist army in two.
Has he over-extended himself?
Hopton thinks that the isolated infantry may have.
Two Royalist foot turn to deal with this intruder
while one of Stuart's horse shores up the right.
Balfour sees an opportunity and attacks!
Bypassing Stuart, Balfour crosses the hedge
and rams into one of the redcoats in flank.
The redcoats scatter.
In a series of cavalry charges and countercharges,
first Potley's bluecoats are destroyed, then Balfour's horse scatters.
The Royalist center is devoid of enemy troops.   
Despite Roundhead losses to the north of the hedgerow,
 Waller continues the fight.
Balfour's horse takes on an enemy gun and destroys it
before recalling back to the safety of the spur. 
On the opposites end of the battlefield,
another of Balfour's horse drives off a wavering Royalist.
With those two losses, Hopton's will to fight evaporates.  Even though Waller's Army has been worn down to near exhaustion from its efforts, Hopton's Army can take no more.  This battle is over.  Waller sees victory!

Congratulations to Peter for a well-played game and a well-deserved victory on the battlefield.  Cheriton was a challenging battle for Hopton and I hope it provided sufficient challenge to Waller.

Having played two, two-player games at the head of the Royalist Army, both games ended in a similar fashion.  That is, Waller concentrated enough cavalry against the Royalist right to first overwhelm and then destroy that wing before turning inward.

Early on, I figured that advancing to and deploying along the east-west hedgerow would offer a solid defensive position.  Hopton did manage to reach this obstacle first, forcing Waller to batter his army trying to assault the position.  While this tactic initially showed promise, Parliamentarian cavalry turned the position and made defending this line untenable.  Once the Royalist right was vanquished, I suspect that the writing of this tale was already on the wall.

Great job, Peter, and thank you for countering every short-lived success I saw.  One of these days, I may actually win a battle on my table.  After many games, one conclusion we both reached is that we tend to see victory on enemy ground but rarely see victory on our home turf.  I need to work on that!

There!  I think I am all caught up on battle reports.