Tuesday, February 28, 2023

More Spanish Infantry

Despite a steady run of games, I am still maintaining progress at the painting desk. Keeping the WAS/SYW focus, two more Spanish regiments muster out.  Foot figures are Old Glory, mounted officer is Eureka, and flags by Not by Appointment.

When I mentioned I was planning to field Spanish infantry, David (the generous fellow that he is) set to work on flagsets for a handful of Spanish regiments.  I have six Spanish flagsets in hand now.  Rumor has it that he may be working on flags for some Piedmontese infantry that I am working on.  No hurry.  My first tranche of Piedmontese will likely call to arms without colors but that is fine.  Flags from the quartermaster will likely catch up to them some day.

The two, 23 figure Spanish regiments in today's offering are Regiments Galicia and Zamora.  A third pair of Spanish infantry is in work.
Regiment Galicia
Regiment Zamora
As mentioned, two more Spanish infantry are on the painting desk along with more SYW infantry.  Following the next Spanish infantry, I expect to see French Grenadiers de France and the first Hanoverians.  After these, maybe more Piedmontese.  Lots of WAS/SYW infantry coming up.

On the order front, it seems like the Royal Mail has unjammed itself from the problems it faced at year-end.  Orders placed in December to Lancashire Games and QRF arrived this week as did the January sale order from Newline Designs.  Yippee!  One last minute, second order was sent off to Newline Designs making it just under their sale cut off.  Whew!

Gaming this week saw me lead the Americans to victory in 1944 France against a strong German counterattack on Monday.  Thursday sees a return to Montebello for another match.  This time, I get the luxury of commanding one of the armies.  Saturday may see either Napoleonics or Ancients.   

Saturday, February 25, 2023

Flank Attack!

photo courtesy gridbasedwargaming

To allow the EEF in Peter's WWI Palestine campaign (see Grid based wargaming) a chance to regroup, Peter offered up another game using his D3 OHW rules.  

Which period of conflict this time?

Samurai battles in Feudal Japan!

Peter has developed yet another variant of Neil Thomas' One Hour Wargame (OHW).  I have lost count how many he has but I recall playing at least three versions.  Each variant offers a distinct flavor with slightly different twists to the original OHW game engine.  I leave my commentary and assessment of Peter's rules for another time as there is much to consider.  For now, let's recap the latest remote battle between Peter and me.

The OHW scenario selected for this contest was Scenario 6: Flank Attack (1).  In OHW, the flank attack map looks like this:
Scenario 6
copyright Thomas OHW.
With Peter's handiwork, the rather bare bones, minimalist map shown above is transformed into the work of art seen below:
Scenario 6 Flank Attack
Copyright Peter Gridbasedwargaming
Quite a transformation!  I marvel at and envy Peter's talent.

Peter chose the defending Red Army and deployed his first three units into Red Zone A.  Seeing Red Army place two Ashigaru and one skirmisher into Red Zone A, the two Samurai units and the two remaining Ashigaru units must deploy into Red Zone B.  Knowing the Red Army's deployment, I quickly formed a plan of attack.
Blue Plan
My plan for Blue was simple.  The skirmishers on the left would advance to pin the enemy within the village while the bulk of the Blue Army attacked vigorously straight up the road and (hopefully) off table for victory.  Two units of Ashigaru would be sent to screen Blue Army's right and hinder Red Army's flanking force from intervening.  It might be a foot race but I thought my chances good.

Did this plan survive contact with the enemy?  Please read on.
Blue Army advances north coming into range of enemy.
Opening volley sees one unit out of ammo!
The Blue Ashigaru alongside opens fire.
It too is out of ammo!
Blue will have to take the fight to the enemy.
Red failed an activation thwarting much of its turn's moves.
Red responds with volleys from its blocking position.
Blue suffers casualties but holds firm.
Red flanking force finally begins to move out.
Blue screening force places itself into blocking positions.
This ought to slow down Red reinforcements.
Now, Red must be defeated at the exit
before Red's flanking force can intervene. 
Taking advantage of a tactical card,
Blue attacks, falls back and attacks again.
Red Ashigaru astride the road is destroyed!
With fighting escalating on Blue right,
Blue Samurai horse finds itself boxed in by the woods.
It must retire and make its push up the road.
Blue Samurai foot attacks Red skirmishers repeatedly
 (playing a second tactical card). 
The skirmishers scatter. 
Having held up Red's flanking force,
Blue main force advances toward the exit.
Red Samurai horse works its way around the woods
 and is poised to attack.
Is this too little too late?
Red cavalry attacks and is driven back!
Blue Army completes the exit of three units
 off of the north board edge for victory!
Did Blue's simple plan of pinning, screening, and then everyone else up the middle work?  It sure did!  Of course, Blue was helped by a couple of early activation failures by Red Army but we both suffered from activation failures.

When I saw that Red Army placed all of its powerful units into the flanking force, I figured the outcome was heavily in Blue's favor.  Blue really only had to fight through two Red units (one of them skirmisher) before the road north was open.

Great game enhanced by Peter's variations on the rules and scenario.

This is a scenario that would be fun to swap sides and replay now that the rules' nuances are fresh in mind.  I reckon we may be back in Palestine next, though.

Thanks for another great game, Peter.  Very fun!

Wednesday, February 22, 2023

Climbing to New Heights

After many years of solid service, the French colonel blogger avatar image is moving into retirement.  In its place is a fine piece of artwork from Tim at Tim's Miniature Wargaming Blog.  Not only does Tim keep himself busy with wargaming activities but he is also an avid cyclist (see Tim's Bike Blog) and talented artist (see Tim's Art Blog).

Last fall, Tim made a call-out for participants in his October Critters on Bikes Drawing Challenge.  In this challenge, Tim stated that he liked drawing critters, bicycles, and critters on bicycles but sometimes lacked inspiration to put all of these details together.  That is where his selected participants came in.  Armed with some information, Tim would set out to draw 31 bicycle-riding friends during the month of October.

For ideas to help trigger his artistic inspiration, he asked three questions and my answers were:

  • If you were a critter of some sort, what would you be? Mountain goat.  I like to climb.
  • What is your favorite bike to ride? Specialized Roubaix.
  • What do you wear while out riding it?  Many choices but I simply submitted what I wore on that day's ride.
Well, without wasting a minute's time, I asked Nancy to snap a photo or two from a recent ride with me in my kit and bike and off the email went to Tim.

After a few weeks, Tim posted the result of his efforts based upon his interpretation of photo and answers.  The result can be seen at Jonathan as Mountain Goat and in the photo above.  This link also shows some of Tim's in progress sketches.

Here I am as an anthropomorphic mountain goat riding my trusted Roubaix.  Great stuff, no?

Tim, thanks for an outstanding caricature that will maintain a special place.

Sunday, February 19, 2023

Remote Gaming: Flash in the Pan?

The Great Wargaming Survey, 2021 edition, included two questions on remote gaming for the first time.  In examining the survey results (see: Remote Gaming in a Changed World), I concluded that remote gaming seemed more mainstream than I thought.  With a 39% participation rate, initial response was encouraging for a continuation of this gaming model.

Given that the 2021 survey still saw much of the world in either lockdown or under restrictions, I wondered if the 2021 participation rate may prove optimistic in the long run as the world opens back up and Face-to-Face (F2F) gaming returns.

Also considered was whether or not remote gaming represented a transitory means of gaming.  Would remote gaming fade quickly after F2F restrictions were lifted?  Would remote gaming quickly be shuffled off into the dust bin of history once the world returned to normal?  I had a year to ponder such questions while I awaited results from the 2022 survey.

Let us turn to the results from the 2022 survey to look for answers to these questions.

Participation Rate:
The 10,872 survey responses captured in 2022 showed a drop in participation from the 11,172 in 2021.  Of these, 478 respondents failed to answer the question on remote gaming participation so the usable total count dropped to 10,414.  Of this total, 27% answered that they tried remote gaming in 2022.  This percentage was down significantly from the 39% responding in the affirmative in 2021.  
Table 1
Continuation:
With a drop of remote participation rate from 39% to 27%, does the survey suggest that continuation of remote gaming will wane as well?  Of the 27% of respondents admitting to remote gaming in 2022, how many wargamers plan to continue gaming remotely? If a quickly fading fad then, perhaps, continuation would see an equally dramatic drop-off in expectations.  Table 2 suggests otherwise.
Table 2
Surprisingly, Table 2 shows that only 6.5% of respondents who tried remote gaming in 2022 have no plans to continue remote gaming in 2023.  This percentage is down from the 10% of 2021 respondents who answered that they would not continue remote gaming in 2022.  So, 93.5% of respondents trying remote gaming in 2022 plan to continue gaming remotely in 2023. 

While there may have been a segment of this market that tried remote gaming in 2021 and did not return in 2022 (39% participation rate v 27% participation rate), can one infer from the decrease in percentage of those not planning to continue that a cadre of remote gaming is solidifying?  I suppose, time will tell but those wargamers sticking with it seem more likely to continue.

I plan to touch on the remote gaming topic again to look at the relationship between gaming frequency and remote gaming.  From my own experience, gaming frequency continues at a brisk pace since my discovery of remote gaming more than two years ago.  I know others find themselves in similar situations.  As others did for me, I introduced more wargamers to remote gaming who in turn are introducing even more gamers.  For me, this is a growing and rewarding facet of the hobby as my wargaming universe expands. 

I end with a few questions to ponder.
  • Does remote gaming represent a Big Bang in gaming expansion as more gamers are added into the universe or simply a flash in the pan that will fizzle out over time as F2F gaming returns? 
  • Have you tried remote gaming and plan to continue?  If not, why not?
  • Does remote gaming add value to your wargaming hobby?
As always, very interested to read about your experiences and evaluations of remote gaming. 

Until next time.

Thursday, February 16, 2023

Back to Palestine!

A fortnight ago, Peter and I met upon the remote plains of Palestine to continue the WWI campaign.  Peter's account of the action can be found at, WW1 Palestine Campaign T4G4.  For completeness, I offer up the tale from the Turkish perspective.

As a brief refresher, Peter is refighting the WW1 campaign in Palestine using his D3 variant of Neil Thomas' One Hour Wargames (OHW).  This variant extends the base rules to include some interesting twists including using a D3 die and unit activations.  The unit activation mechanism introduces variability and decision making into the game which enhances play markedly over the original.  Well, in my mind anyway.

In the two preceding contests, the EEF attacked Turkish defenders set in standard OHW scenarios.  This action is no different but Scenario #8 Melee is used a second time.  Peter mixed the terrain up a bit but the ground was familiar.  Orders of Battle were changed up too with the addition of an armored train and a tank.

Anyway, on to a captioned account from the Turkish perspective.
With Turks on the heights with gun and machine gun,
fire into the oasis is not very effective
 as the enemy comes on. 
Turkish reinforcements on the way!
As the EEF advances and deploys,
Turkish support comes under heavy fire.
The hilltop defenders retire slowly off from
their exposed positions on the hill.
The supporting unit of Turks is quickly dispatched.
Armored train arrives with infantry moving along in support.
Unfortunately for the Turks, the supporting infantry
is brought under fire from both gun and rifle. 
The EEF swings around to threaten the heights.
Infantry advancing under cover of the train take a pounding.
They are not under cover!
The EEF continues to advance upon the heights.
The MG on the train fires into the infantry to its front.
Enemy takes casualties but the Turkish infantry refuse to act!
In preparatory fire, the EEF lurks below the crest of the hill.
For the Turks, casualties mount.
Having seen the Turks off on the EEF right,
targets switch to the Turks detraining.
  Casualties are frightful.
A whistle blows.
Over the top! 
As the enemy crests the hill, fire erupts from the Turks.
Many fall.
The enemy emerging from the oasis scatters.
The train mounted MG continues its fire down the tracks.
An explosion is heard as a large, black plume of smoke
 rises from the enemy tank.
The tank stops and the crew bail. 
With armor gone, the enemy are caught in a deadly crossfire.
In a blink of an eye, two units disintegrate. 
Enemy guns take out another Turkish infantry moving up.
With time and resources ebbing, the enemy moves
 out from the cover of the woods and toward the hill.
They succumb to fire.
The MG fire scatters the enemy astride the tracks.
With only the EEF guns left and time expired,
 the battle is over.
Victory to the Turks,
AGAIN!
Turkish commander inspecting the burned-out tank
atop Mount Disappointment.
photo courtesy grid based wargaming.
Wow!

Another exciting game in which the action saw the defending Turks turn back yet another attack.  Three times, now, the EEF has come on in the same way.  Three times the Turks have repelled their attackers.  Will the enemy try a fourth time?  We will see.

In hindsight, the battle hinged on the untimely destruction of the EEF armor.  The Turks were taking a real pounding from enemy guns.  Failed activations hindered Turkish progress.  When the tank exploded from a failed activation, the balance of power shifted to open up the battle and turn the tide.

Great fun and an exciting match.

What comes next and can the EEF reach Damascus? 

Monday, February 13, 2023

Blogger: Under my Thumb(nail) II

A recent email from a reader asked,

Would you be able to remind me how to get thumbnails to appear again in the Blogger feed?

I remember the ‘s400’ bit of script you pointed me towards, but that no longer seems to work and I am wondering if Blogger have changed this again. I always think a thumbnail looks much nicer than just the plain text and have been meaning to ask you for the past year now.

Any advice gratefully received.

Thanks for the question, Lawrence. 

I needed to create a work-around once before when Blogger changed how thumbnails in the Blogs Followed widget displayed (or did not display) thumbnail images.  My fix at the time can be found in the post, Blogger Under my Thumb(nail).

While this fix worked as intended, about a year ago, Blogger again changed the manner in which thumbnails were displayed (or not!) in the Blogs Followed widget.  Wanting to see a thumbnail again, I set to work on another work-around.  After several trial-and-error attempts at working through this new puzzle, I again came upon a work-around.  This work-around has been working for me since the widget changed its functionality.

Like Lawrence, I enjoy seeing a blog post's thumbnail of the lead image displayed in the widget.  Of the blogs I follow, few blogs display the lead image any longer.  The blogs with an image stand out in the widget listing.

So, what is going on?

From my investigations on my Windows 11 OS laptop, it seems that the Blogs Followed widget now requires the image to be placed into a specific location on Google's server.  While the Insert Image button works to insert images into a blog post from the edit screen, these images are stored into another folder on Google's server.  This folder is not recognized by the widget.

Rather than using the Insert Image button for your lead image, drag and drop the image from your photo viewer into the blog post. Then, modify the 's400' script as before.

To see the problem and my solution, try the following steps:
On this screen, no thumbnail images displayed here.
Insert Image from toolbar

Once image inserted, switch to html view.

Html shows image copied to Google server under 'b'.

Now use the drag and drop method
from your photo viewer.
Once image inserted, switch to html view.
Html shows image copied to Google server under 'a'.
Different path from Insert Image button!

As a safety precaution,
change image size to square ('s').
Thumbnail appears!
If you miss not seeing your blog post lead image appearing in the Blogs Followed widget, give this work-around a try.  Report back if you try it and it works.  Actually, report back if it fails too.

Hope this little tech support diversion is useful.

Saturday, February 11, 2023

Franconians: Figures Finished and Flagged

Work at the painting desk has definitely switched to an emphasis on fielding units (and armies) for the SYW/WAS project in 18mm.  These latest efforts take a look at 2 x 23 figure Franconian regiments from the Reichsarmee.

Seeing David's handsome Franconian flags (see, Not By Appointment), I knew I wanted to field a couple of these regiments.  The two Franconian regiments chosen first are Regiments Cronegk and Ferntheil.  Figures are Blue Moon foot led by a Eureka mounted colonel.
Regiment Cronegk
Regiment Ferntheil
Despite a flurry of twelve games played in January which may be a record for me, painting was brisk as well.  January saw 164 figures painted.  That also represents a very good month at the painting desk.  So, 2023 starts out with a bang.  Will February see similar levels of activity?  Perhaps not.
What next?

On the gaming front, looks like three games on this week's docket if schedules align.  Hopefully, time to slip in a few meaningful painting sessions too.  On blogging, several posts are either in work or under consideration including another look at the Great Wargaming Survey, thoughts on Double Jeopardy, rules' revisions, and possibly a battle report or two.  Finally, one curious reader asked how to return thumbnails back to the Blogs Followed widget.  I think a brief tutorial may be forthcoming on this topic too.

OK.  Back to the painting desk!

Wednesday, February 8, 2023

Battling Known Unknowns at Montebello

Over the last two Mondays, the 1859 Battle of Montebello has been raging over my gaming table.  The combatants were six members of Postie's Rejects in the UK.  Montebello represents the third remote battle hosted for these fine fellas.  Two of the participants' perspectives on the battle can be found at Lee's BatRep, Richard's BatRep Part 1, Richard's BatRep Part 2.  I suggest reading through my account before hopping over to read each of these individual accounts. 

The Rejects enjoy fighting battles with a heathy dose of fog of war.  I obliged.

Each army was provided with a briefing outlining the general situation, a map, its OB, and objectives for carrying the day.  Objectives were kept vague as were enemy dispositions and enemy objectives.  Neither army knew enemy strengths or reinforcement timetables. 
The Battlefield
General Briefing
On 9 May, Austrian FZM Gyulai’s uninspired offensive in Piedmont ground to a halt without ever contacting the enemy.  Concerned that the French would attempt to turn his left flank by advancing upon Piacenza, FML Stadion’s V Corps was ordered (20 May) across the Sesia River and move on Casteggio and Voghera.  This reconnaissance-in-force was determined to discover French dispositions, interdict the Voghera-Piacenza Road, and thwart these perceived threats.

As the Austrians approached Casteggio, they ran into Sardinian cavalry screens. The Sardinian mission, deployed east of Voghera, was to act as an early warning system to prevent surprise attacks from the Austrians.  The Sardinian light cavalry were to hinder any enemy movements westward buying time for the French army to come up, if needed.  The only means of crossing the River Coppa in this area are via two bridges: the bridge at Casteggio and the railroad bridge to the north of that town. Running from Genestrello north, the Fossa Gazzo can be crossed everywhere but with difficulty.  The railroad bridge at Casina Nuova and the bridge near Genestrello are the best places to cross the Fossa Gazzo.

Being heavily outnumbered, the Sardinians traded space for time as they slowly gave up ground to the approaching Austrians.  After reports arrived detailing the action earlier in the day and the fall of Casteggio, Forey’s division of the French 1st Corps quickly marched on Casteggio.  In the meantime, Stadion had taken first Montebello and then Genestrello as the Sardinian cavalry retired.

Austrian Briefing
It is now 2pm.  Urban occupies Genestrello, Montebello, and Casteggio with Schaafgotsche’s Brigade.  Baum advances on the rail bridge at Casina Nuova.  Hesse’s wing is marching upon Lungavilla from the north. Paumgarten’s Center Wing is spread out north of Casteggio with Bils and Gaal’s Brigades hurriedly marching to the front. Sonnaz’ Sardinian cavalry have fallen back across the River Coppa and vacated both Montebello and Genestrello.  They can be seen deployed in the vineyards and cultivated land north of the Voghera-Piacenza Road and between the River Coppa and the Fossa Gazzo.

Reports suggest that the French are rapidly bringing Forey’s Division forward to contest Austrian gains.  Forey has two brigades of infantry in route to Genestrello and Casina Nuova to secure the bridges.

FML Stadion, your objective is to hold the gains made this morning.  Deny the bridges at Casina Nuova and Genestrello to the enemy.  Hesse will be arriving from the north to threaten the French left as it drives east.  If Forey is defeated, drive on Voghera to complete the victory.  If faced with overwhelming odds, fall back slowly, challenging ever meter, to take up positions on the east bank of the River Coppa.  Do not allow the enemy to cross the River Coppa.  Allowing the French to take Casteggio opens the road to Piacenza and jeopardizes the whole army’s position in Piedmont.  Your corps must remain a viable fighting force.

French Briefing
It is now 2pm. Sonnaz’ Sardinian cavalry have fallen back across the River Coppa and vacated both Montebello and Genestrello.  They are deployed in the vineyards and cultivated land north of the Voghera-Piacenza Road and between the River Coppa and the Fossa Gazzo protecting the French left.  Sonnaz reports that the enemy occupy Genestrello and Montebello.  Estimates are that the enemy are in brigade strength to the west of the River Coppa.  Stadion appears to be commanding the Austrian Left Wing from Montebello.  An Austrian column is approaching from the north toward Lungavilla.  Reports suggest that this enemy body is the Austrian Right Wing under the command of Hesse.  Hesse has the potential to turn Forey’s flank if not countered.  Enemy are seen advancing upon Casina Nuova to the south of Sonnaz’ cavalry.

Beuret’s Brigade is within sight of Genestrello.  Blanchard’s Brigade is advancing eastwards to the north of Beuret toward Casina Nuova and the railroad bridge.

General Forey, your objective is to push the enemy out of Genestrello and Montebello, and advance upon Casteggio.  The bridges over the Fossa Gazzo and River Coppa should not be allowed to remain in Austrian hands.  Push the enemy back across the River Coppa.  Taking Casteggio and moving east toward Piacenza would make the Austrian position untenable.


These briefings are all that is known of enemy dispositions until battle is joined.  When battle is joined, this is the view greeting the armchair generals.
Situation at start
Let's see how the battle played out. 
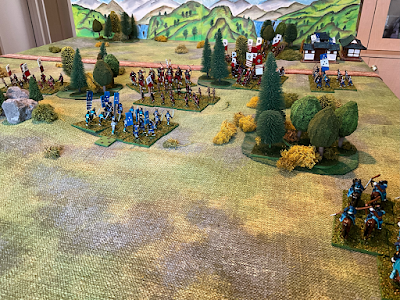
Sardinian cavalry occupy the central position
between the Fossa Gazzo and River Coppa. 
Urban's Austrian wing deployed among the
 towns along the Voghera-Piacenza Road.
Skirmishing erupts near Genestrello
(background) as the French arrive.
As Blanchard's French Brigade crosses the stream
at the rail bridge at Cascina Nuova,
 Beuret attacks Genestrello.
General Forey leads the assault.
First assault repulsed!
Hesse's Austrian wing arrives at Lungavilla and
is immediately attacked by Sardinian cavalry.
Austrian reinforcements are brought up as Urban
orders Baum to advance west along the rail line.
With fighting in the north, Sardinian cavalry are sent
reeling while Austrian reinforcements stream across the Coppa.
Austrians pay a heavy price for the deep push along the rail.
Blanchard strikes quickly catching one battalion
 in column and overrunning two guns.
Austrian morale sags.
Forey and Beuret attack Genestrello a second time. 
This time, the French attempt encircling the village.
In the north (background), Hesse dispatches remaining
 Sardinian cavalry and shifts his attention toward falling
upon Blanchard's exposed left flank. 
As the Austrian center gels, the French take Genestrello.
Losses are heavy.
Austrians pour over the Coppa winding their way
 behind Montebello.
Paumgartern plans to make a stand on the heights.
With Beuret making limited progress along the main road,
 Blanchard finds himself in a bowl surrounded by the enemy
after the Sardinians have been scattered.
Blanchard (French masses along railway)
is in a precarious position.
Blanchard dispatches two cavalry squadrons
 north to stabilize the situation. 
At Genestrello, still, Beuret is having great difficulty
pushing the Austrian light infantry back.
Casualties mount and valuable time is lost.
Austrians form a solid, defensive arc
from Montebello stretching north to Lungavilla.
Situation midafternoon and at end of Session #1.
Although the Austrians facing Blanchard look heavily damaged,
the French change strategy following the one-week interlude. 
Faced with seemingly overwhelming odds,
 the French pull back to consolidate.
Having recovered from the earlier debacle in the center,
 the Austrians push out light infantry to harass the French.
  In the south, the Austrians fall back upon Montebello
 as Beuret works his way around Genestrello.
Coordinated French attacks go in against the
defenders of Montebello.
More Austrians rush up to plug any gap in the line
 and to replace wavering units.
Working around Montebello from the south
 will be a difficult challenge.
French casualties are heavy.
The French attackers at Montebello are driven back.
The Austrian defenders stand firm.
The Austrian left is solidly anchored upon Montebello.
With the attack on Montebello repulsed
and the French center under increasing pressure,
 General Forey orders a withdrawal from battle.
The battle is over.
Battles's end.
The French retire.
Victory to the Austrians!  Congratulations go out to Steve, David, and Lee as the Austrian wing commanders. Richard, Ray, and Surjit (as the French) put up the good fight and made for an enjoyable contest.  Well played by all.

While an Austrian victory may have appeared imminent at the time of French withdrawal, looks can be deceiving.  Urban's Left Wing had suffered heavy casualties and both brigades (Baum and Scaafgotsche) were each perilously close to breaking.  A hit or two here or there would have forced Urban to retire from the field.  Urban's retirement may have opened up gaps in the Austrian defenses.  Defending while simultaneously allowing friendly units to retire through, may have been a tall order for Paumgarten's wing.  That question remains unanswered.

Confronted with a handful of known unknowns, each army was forced into making decisions based upon incomplete information.  Had the French known how close Urban's wing was to collapse, they likely would have pressed on from their early success along the railway.  For their part, the Austrians did not know the strength of the enemy they faced nor its combat effectiveness.  In response to early attacks against Urban, the Austrians made haste in bringing up reinforcements to screen and protect Urban from catastrophic harm.  The Austrians never knew how close Urban was to breaking until the game ended.  There was a collective sigh of relief.  Were more French reinforcements on the way to the battlefield?  Yes!

For me, this produced a very interesting battle to watch unfold.  This result did not match the historical account but the Austrians were not saddled with their historical counterparts' command lethargy.  Also, Austrian reinforcement arrival was compressed to allow all three Austrian commands to have meaningful forces on table at the start.

Would I have fought the same way?  Perhaps not but I am viewing this action with 20/20 hindsight and face my own preconceptions.  I reckon I will give this battle a try on my own while still set out on the table.  Will my results differ?  Possibly.  For me, the unknowns are now known. 

Besides enjoying stage-managing half-dozen gamers in a large battle, one of the benefits of these repeated, multi-player games is to see the rules in action.  Many times, odd situations arise that catch me off balance.  Situations not seen before or not remembered.  When you have six players, each with their own ideas and tactics, unexpected combinations surface.  Following each game, I take my notes, carefully review the situations, and then adjust the rules as needed.  This game was no exception.  Every playing advances the rules, sometimes only marginally, but always with benefit.  Well, sometimes it is two steps forward and one step back.  Repetition brings clarity too.

The participants play a big role in this process.  I thank them.

Now, please go read Lee and Richard's battle accounts.