Tuesday, January 31, 2023

Refighting History, In Miniature

In a recent blog post (When is a Historical Wargame Historical?), the author puts forward the question of whether attempting to recreate a historical battle on the wargaming table can attain the desired goal.  As an example, the recent Battle of Auberoche, fought between Peter and myself, was sited.  My account of the battle can be re-read at Battle of Auberoche.  Did this game recreate the battle faithfully?  If not, can this action be classified as an historical wargame?  Refighting Auberoche provided an exciting contest which came down to the wire but was this really Auberoche?  

For those wargamers who enjoy refighting historical battles, the gaming objectives and approaches are many and varied.  I suppose one question to ask is what is the desired goal in refighting a historical battle.  Why do we do it?  Does choice of rules matter?  Does type of game matter when viewed along the Game vs Simulation spectrum?  Do game constraints such as time, space, figures available, number of players,etc. affect these goals?
I admit that my preference leans toward refighting historical battles.  Even given great care in preparation and research, are we still fighting an historical battle once the maneuvers and shooting begin?  For me, these attempts at historical recreations are exercises in decision-making.  Always keep in mind that the historical outcome may be one of a number of possible outcomes.  The historical outcome is singular.  Any historical battle may hinge on a single decision point, a singular battlefield occurrence, or a string of such events.  Same holds for a wargame.

A well-designed, historically motivated wargame attempts to place players into the boots of their historical counterparts.  The wargame may begin from the historical situation (or at least the author's representation of the historical situation) but as the game evolves, so does the narrative.  Must the wargame necessarily follow the historical narrative?  Of course not.  We want to encourage the table general to make his (or her) own decisions without following the choreographed decisions made by the historical counterpart.  If the situation and objectives are set properly, one might expect to see generally, historical results in repeated trials.  That is, if the historical result represented the most likely outcome.

As GM, I want players to consider the choices made within the confines of the historical situation faced on the gaming table in miniature.  When wargaming, I want to make meaningful decisions on the path toward accomplishing the goal laid before me. I want to gain insight from the experience.
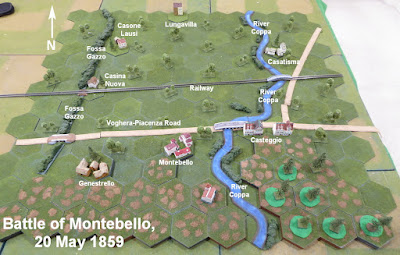
Consider as a case in point the game currently on the table.  On the table today is a recreation of the Franco-Austrian War Battle of Montebello.

Each player or team of players received a battle briefing beforehand containing a brief generalization of the situation and a specific assessment of known intel.  The general briefing read,
On 9 May, Austrian FZM Gyulai’s uninspired offensive in Piedmont ground to a halt without ever contacting the enemy.  Concerned that the French would attempt to turn his left flank by advancing upon Piacenza, FML Stadion’s V Corps was ordered (20 May) across the Sesia River and move on Casteggio and Voghera.  This reconnaissance-in-force was determined to discover French dispositions, interdict the Voghera-Piacenza Road, and thwart these perceived threats.

As the Austrians approached Casteggio, they ran into Sardinian cavalry screens.  The Sardinian mission, deployed east of Voghera, was to act as an early warning system to prevent surprise attacks from the Austrians.  The Sardinian light cavalry were to hinder any enemy movements westward buying time for the French army to come up, if needed.  The only means of crossing the River Coppa in this area are via two bridges: the bridge at Casteggio and the railroad bridge to the north of that town.  Running from Genestrello north, the Fossa Gazzo can be crossed everywhere but with difficulty.  The railroad bridge at Casina Nuova and the bridge near Genestrello are the best places to cross the Fossa Gazzo.

Being heavily outnumbered, the Sardinians traded space for time as they slowly gave up ground to the approaching Austrians.  After reports arrived detailing the action earlier in the day and the fall of Casteggio, Forey’s division of the French 1st Corps quickly marched on Casteggio.  In the meantime, Stadion had taken first Montebello and then Genestrello as the Sardinian cavalry retired.

This common background was augmented by battle specifics for each player outlining OBs and force objectives to help steer the players into a recreation of the events driving the historical battle narrative.  In the interests of providing an engaging, multiplayer game, decisions had to be made to accommodate the number of players and the method of play (remote).  In a multiplayer game, having players watching in while they await their command to enter the table as reinforcements would not do.  Reinforcement timetables had to be compressed to allow all players to get meaningful commands into action almost immediately.  Does this change or alter the historical framework?  Perhaps not if the pieces can be molded in a manner to maintain the historical context.

Will this work?  The first gaming session is in the books.  Only time will tell as one more gaming session is needed to fight this battle to conclusion.

How would you answer the question of when is a historical wargame historical?  I look forward to your insights.

Saturday, January 28, 2023

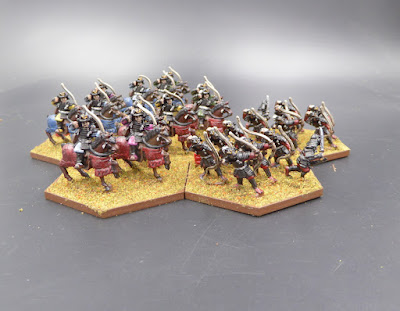
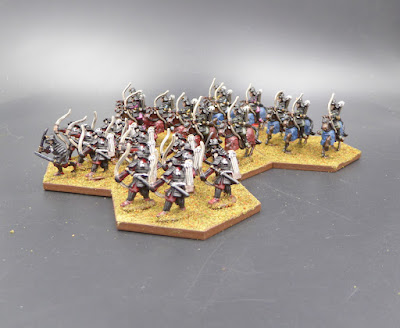
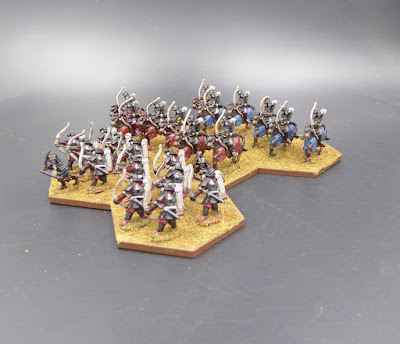
Samurai Archers

Inspired by the recent Samurai battle of Mikata Ga Hara, the remaining bowmen from last year's Museum Miniatures' sale were dug up from The Lead Pile and pushed into the painting queue.  Strike while the iron is hot, right?  Whoops.  Check that.  More Museum Miniatures' Samurai came up in a follow-on dig.  In this latest tranche, there appears to be enough archers to field one more Samurai foot archer unit.  In addition to the Samurai archers, there are enough figures to field two Samurai teppo units.  I knew the teppo units were in there.  These fellows are planned to hit the painting desk later.  Perhaps inspiration will strike again after another Samurai battle?     
Off the painting desk today are 26 figures split between one unit of Samurai foot archers and two units of Samurai horse archers.  With these three bow units, there ought to be sufficient numbers to field any Samurai needed for any Samurai Battles' scenario.  I know.  Famous last words.  With Museum Miniatures' annual January sale winding down, time remains to slip in a small order if needed.
Next week on the gaming front will be a busy one.  Five games are on the week's gaming docket including my 15mm Franco-Austrian War Battle of Montebello on Monday.  Montebello is set for a six-player remote game.  I will see five games in five different periods using five different rules.

Wednesday, January 25, 2023

Turkish Delight

photo courtesy gridbasedwargaming
After beating back the EEF in Peter's ongoing solo campaign set in WWI Palestine in the Battle Fought In Two Years (see: First (and Last) Game of the Year), Peter asked if I would be interested taking a command in the next game of the campaign.  Of course, said I! 

OHW #11
map courtesy gridbasedwargaming

In this encounter, the EEF is still trying to breakthrough the Turkish defenders to continue the campaign.  Using Neil Thomas' Scenario #11, An Unfortunate Oversight from OHW, the Turks are defending a village protected by a wadi.  The goal is to hold Hill 12 by the end of the game.  Looks like a good situation for the defenders.  No?  Unfortunately, the defenders have overlooked a break in the wadi far out on their left.  Of course, this is where the attackers will breach the position.

To read Peter's battle account, please visit, WWI Palestine Campaign Turn 4 Game 3.

Let's see how the battle played out from the Turkish perspective.

The Turks begin the battle with all of their forces deployed close to the village.  It is a long way to reach the gap in the wadi.

Turks deploy around the village.
EEF deploy with five units at the wadi gap
 and two infantry facing the village.
Per-game bombardment shells three defending units.
The artillery and MG infantry take a severe pounding
 each suffering three hits.
With a firefight at the village anchoring the right,
the defenders move out to occupy Hill 12.
EEF counterbattery knocks out the Turk guns
almost before the battle begins.
This could be a tough fight!
Turks continue advancing toward Hill 12.
The attackers sweep through the wadi gap
 while artillery provides support.
Attackers exploit the gap and the defenders' oversight.
Lead Turkish elements reach the hill
 wary to remain behind the crest.
Mounted infantry attempts to sweep around the flank
 as the main attacking force moves up. 
Infantry near the wadi takes fire from the armored car.
As the two forces close, the firefight escalates.
Now in range, Turks on the hill are scattered by heavy fire.
The best Turk infantry destroyed in a blink!
Attacking the position is not so easy, though.
As Turkish reinforcements reach the hill,
 an EEF unit moving up is destroyed.
Casualties are mounting for the EFF.
Taking sustained fired from the Turk armored car,
the EEF guns are forced to limber and move away.
Fighting intensifies.  Mounted infantry is destroyed
while the EEF guns extract revenge against the armored car.

EEV guns continue shelling the defenders without pause.
Turks in the valley pull back attempting to escape the shelling.
Turks work around the hill to bring the attackers into a crossfire.
The attackers withdraw from their exposed position.
With time ebbing, two EEF units advance upon the hill.
Caught in a deadly crossfire, infantry in the center is scattered.
The ever-present EEF guns destroy another Turk!
With only one mounted infantry remaining,
the EEF pushes up on the hill
and takes out another Turk.
The Turks have only one unit remaining
but the attackers have run out of time.
With the EEF mounted infantry having sustained heavy casualties and the clock ticking down to Turn 15, victory has slipped away.  Another game goes down to the wire and another victory for the defending Turks.  Hoorah!

Having repulsed EEF forces in back-to-back attacks, the campaign is winding down for the EEF.  They will need to scavenge a victory soon if they are expected to win this campaign.

Great fun! 

Saturday, January 21, 2023

Year in Review: Figures Painted

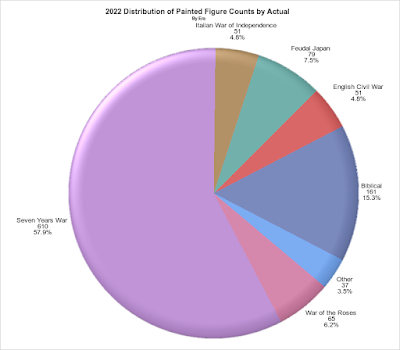
The counts are in for the 2022 Painting Campaign.  While the total figures painted were fewer than in 2021, the totals were not much less.  2022 total figures painted clocked in at 1,055 while 2021 saw 1,103.  Seeing consistency is good. 

While I did not proclaim a figure count goal for 2022 (I avoided the same pitfall in 2021 too), I expected a total of near 900 figures would be a reasonable objective.  Given an expectation for a continued stream of remote gaming to keep my hobby time occupied, an average of 75 figures painted per month seemed attainable.

In the 2021 Painting Log recap see: Painting Log 2021), I set out for myself the following goals:

  • Finish enough Sumerians to field two armies.
  • Build a SYW French army in 18mm to complement my Prussian and Austrian armies.
  • Expand the Biblical armies with additions to Hittites, Egyptians, and Babylonians.
  • Expand the Samurai armies to include foot and mounted Samurai bowmen.
  • Given the figure size mix from 2021, try to paint more 15/18mm figures than 25/28mm figures. 

Let's see how I did!

Figure 1

When looking at painting production by era, Figure 1 illustrates that SYW and Biblicals did see most of the attention at the painting desk.  The SYW project did see the mustering of a new French Army.  I even got this army into battle more than once.  The Biblicals were concentrated in the Sumerian project.  On the 2021 goals, WotR and Feudal Japan projects also saw gains.  No additions to the Hittites, Egyptians, or Babylonians, though.  Good additions to the 30mm ECW project too.  That was a surprise.

Figure 2

Breaking painting totals down by scale, Figure 2 shows that 15/18mm projects dominated my efforts.  One of the 2022 goals listed above highlighted changing the figure mix from 25mm/28mm to 15mm/18mm.  In this regard, I stuck to plan having 70% of all figures painted falling into the 15/18mm bucket.  Another success!

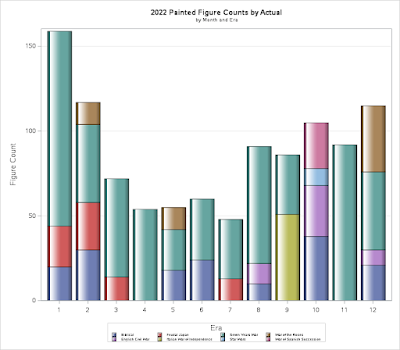
Figure 3
One goal of time spent at the painting desk is to even out the fluctuations in monthly output.  Figure 3 illustrates that my monthly painting production maintains a seasonal tendency or pattern.  Notice that SYW painting dominates most months' painting output.  I have examined this before (see Seasonality in Painting Production 2020).  Perhaps, I should update this analysis to include the most recent two years of data? 

What can I expect on the painting front in 2023?  Where should I spend these efforts?  Below are a few of my thoughts for the New Year:

  • Continue expansion of the 18mm SYW/WAS project to include more armies.  In addition to Spanish and Piedmontese, field a British/Hanoverian army.
  • Build a 15mm Prussian Army to allow expansion of the Franco-Austrian War collection to the Austro-Prussian and Franco-Prussian Wars.
  • Continue work to expand the 25mm Biblical armies including Sumerians, Hittites, Egyptians, Assyrians, and Babylonians. 

While there are other projects contending for my time at the painting desk, the list above will help to provide some focus.  This exercise seemed to work well for 2022.  I ticked off a number of the 2022 goals.  2023 looks set to be another year of concentrating on 15mm/18mm projects.  A potential 25mm Trojan War project still lays in wait ready for me to begin.  Maybe 2023 will see the start of this project?

What are your painting plans for 2023?

Wednesday, January 18, 2023

Tokugawa's Wild Ride!

Yes, Game #5 in the series refighting the 1572 Battle of Mikata Ga Hara proved an exciting battle.  The result left no doubt that an inferior army can defeat a larger one.  Convincingly too.  Unfortunately, I was on the losing end of this contest and took a sound drubbing.
Initial battle deployments
With Game #4 seeing an equally convincing victory for Takeda (Pascal) over Tokugawa (me), I figured I had a chance at victory when we swapped sides and played again.  Wrong!  Wrong, indeed!  The battle went so terribly wrong for the Takeda almost from the start.

How did an inferior army handily defeat a superior one?  Please read on to see.

As seen from the initial battle deployments, the Takeda army is caught by surprise with elements of the army somewhat isolated from the bulk of the army.  Having the advantage of ambush, Tokugawa forces have as many as two turns to maneuver as long as the Tokugawa do not trigger any response from the Takeda by attacking or entering an enemy ZOC.   
Takeda longbowmen isolated and facing the enemy alone. 
After closing the distance between the two armies, Tokugawa attacks!  Leading with Samurai spear, these infantry charge into the Takeda longbowmen.  The longbow gets off a volley of missile fire before the Samurai can close.  The incoming arrows disorder the Samurai.  Still, the Samurai carry on and cut down many bowmen before the bowmen retreat. 
Tokugawa attacks!
With the lead longbow unit retiring, the pursuing Samurai plow into the adjacent unit of longbowmen.  Having no time to get off an effective shot before contact, these bowmen break and run for the rear.  Casualties are heavy.  Facing fresh Takeda Samurai cavalry if they continue, Tokugawa Samurai foot stop to reorganize.   
Takeda archers are put to flight!
In a one-two punch following up on the success of the foot Samurai, Tokugawa Samurai cavalry charges forward to hit the retiring bowmen.  Already wavering these archers scatter and run.  The charging cavalry carries on into the waiting Takeda cavalry.  In a brief but sharp clash, the Takeda cavalry is driven back.  Reining left, Tokugawa Samurai cavalry catches the retreating longbowmen in the rear.  They are cut down where they stand.  A path to the Takeda command tent is open and, perhaps, ripe for the picking.
Destruction of the Takeda center
Seeing the entire center of the Takeda line either destroyed or in disarray, these hard charging cavalry veer off to the left.  Wheeling about, they bring a new, unsuspecting target into their sights.  That target?  Takeda Samurai horse archers caught from behind!  

Caught in the rear and no place to run, the Takeda horse archers scatter.  Still, the Samurai cavalry comes on.  Charging up the hill, these horsmen contact a unit of Ashigaru spearmen. 
Samurai horse on a rampage!
Tokugawa commander pleased with his efforts!
After a long melee, the horsemen are victorious but exhausted.  They have done all of the damage they can do this turn.  The damage inflicted was astounding.  In these devastating attacks, Takeda Army Breakpoint dropped from 22 to 10.    
Rampaging Samurai cavalry finally halt.
Tokugawa commander still smiling
 as the Takeda Army Clock drops. 
While the battle continued until the Takeda Army Breakpoint clock tolled zero, I end the battle narrative here.  The remainder of the battle waged for several more turns in jockeying for positions, mopping up exercises, and isolated attacks.  Still, for the Takeda to mount a serious counterattack with its right obliterated and its center heavily damaged was unlikely.
Watching the series of Tokugawa charges and subsequent pursuits unfold was awesome even though I was on the receiving end.  Takeda never had a chance to recover from those early attacks.  Those early, knock-out punches stunned the Takeda army from which it never recovered.
Game #5 produced an exciting battle with drama and tension on every move and every roll of the dice.  Especially in defeat, I admire the skill used to gain positional advantage.

Well played, Pascal!  Thank you for a very enjoyable game.

For now, the battlefield of Mikata Ga Hara has been cleared from the table.  A new battle is set out in its place.  A battle for a different period, a different set of rules, and a group of different players.      

Monday, January 16, 2023

Mikata Ga Hara, 1572

Over the last two weeks, the gaming table has featured the Battle of Mikata Ga Hara between Takeda and Tokugawa clans on a hex grid.  The scenario is based upon the Samurai Battles' scenario. 

Four games have been played with Game #5 scheduled for later today.  All games have been contested remotely.  Thus far, the four games have yielded two victories apiece.  Tokugawa won the first two playings.  Takeda won the second two games.  No matter the outcome in Game #5, one great army will win three of the five contests.

Battle of Mikata Ga Hara 1572
As Takeda Shingen moved his army south into Totomi Province, Tokugawa Ieyasu dismissed the advice of his generals and prepared to intercept the Takeda Army. Defeating Tokugawa was not the Takeda Army’s primary objective. Shingen was content with simply passing through the province on his way to bigger spoils. Still, outnumbered by Takeda Shingen’s army, Tokugawa Ieyasu would not permit Takeda to pass through the province unchallenged. To prevent Takeda’s passage, Ieyasu drew his army up on the high plain at Mikata Ga Hara. Although outnumbered in both foot and horse to Shingen, Ieyasu figured an early strike against the Takeda vanguard might catch the enemy by surprise and put the Takeda army off balance.

The stage is set for battle.
Order of Battle – Each army has three commands.
Tokugawa– Ieyasu (Army Breakpoint = 18)
4 x Ashigaru Spear (FL VBU=5, I=2, VD=3 Long spear)
1 x Ashigaru Teppo (T VBU=4, I=0, VD=2 Harquebus B)
2 x Ashigaru Bow (T VBU=4, I=0, VD=2 Longbow B)
2 x Samurai Foot (FP VBU=6, I=3 VD=3 Long spear)
2 x Samurai Bow (FL VBU=6, I=3 VD=3 Comp Bow)
1 x Samurai Horse (CP2 VBU=7, I=4, VD=3 Spear)
1 x Samurai Horse Archer (CM VBU=6, I=4 VD=3 Comp Bow)
3 x Generals

Takeda – Shingen (Army Breakpoint = 22)
4 x Ashigaru Spear (FL VBU=5, I=2, VD=3 Long spear)
1 x Ashigaru Teppo (T VBU=4, I=0, VD=2 Harquebus B)
3 x Ashigaru Bow (T VBU=4, I=0, VD=2 Longbow B)
2 x Samurai Foot (FP VBU=6, I=3 VD=3 Long spear)
2 x Samurai Bow (FL VBU=6, I=3 VD=3 Comp Bow)
1 x Samurai Horse (CP2 VBU=7, I=4, VD=3 Spear)
3 x Samurai Horse Archer (CM VBU=6, I=4 VD=3 Comp Bow)
1 x Command Tent
3 x Generals

Rules: Basic Impetvs 2.0+E
Figures: 15mm
Table: 4 inch hex grid
First Player: Tokugawa Army

Special:
Command Tent
It is garrisoned by one, intrinsic Ashigaru Spear unit (FL VBU=5,I=0 Long spear). General may not leave tent unless tent is captured. Tent ignores retreats. Considered difficult terrain.

Ambush
On Turn 1, only the three Tokugawa command Activation Tokens may be drawn for activation. When a Takeda unit is attacked either through fire, melee, or in an EZOC then that Takeda command may activate next. Once activated, Takeda Activation Tokens remain in play as normal. At the start of Turn 3, any Takeda Activation Tokens not in play are put into play and may be drawn for activation.

Time Limit: If time limit reached before one army destroyed, use the following ABC differential to assess victory:

0-2 Draw 3-6 Minor 7+Major
Which side will manage to be victorious in three out of the five contests?  Stayed tuned for results following the game. 

Friday, January 13, 2023

WotR Somerset's Battle

After seeing 2021 kick off with a goal of beginning a War of the Roses project, six Battles were fielded in 2021.  While having six Battles (big B) is sufficient force to field the required numbers of troops for many WotR battles (little b), one minor goal for 2022 was to continue adding to the project.  Another goal was to see these armies in action once enough retinues were mustered.  

Having spent much of 2022 expanding the 18mm SYW collection with the start of a French army, thoughts of fielding another Battle for the WotR kept getting pushed back into the painting queue as other projects came to the fore.  Concentration on the French was not all for naught, though.  Not only did I field enough French for a gameable force but saw them in battle several times over the course of 2022.  Besides French for the SYW, the 25mm Sumerians (also started in 2021) saw significant additions too.  Details of all of my 2022 painting activities will be presented in a future painting review post.

In an attempt to stick to one of the WotR goals (I failed to get these armies out onto the table), December saw work on the seventh retinue in the project.  Completed just before year-end, Somerset's 52-figure Battle mustered out from the painting desk.  Figures are Perry Miniatures in plastic.  Flags by Pete's Flags.

Perhaps one 2023 resolution ought to include fielding this collection in battle?  Seems reasonable especially since the figures are finished.  Maybe I can squeeze in one more Battle into the painting queue before year-end?

Next week is shaping up to a busy one at the gaming table. As the schedule stands, it looks like five games in five days beginning on Sunday.  Wish me luck.

As a bookkeeping note, this is post number 1,500!

Tuesday, January 10, 2023

Location, Location, Location?

In a recent look at wargaming period preference (see: Period Preferences for Wargamers), one reader asked if gamers' location contributed to period preference.  While a tendency for location to influence select preferences was noted in other analyses, the relationship between gamer’s location and wargaming period choice remained unexplored.

Should location or geographic region influence interest or demand for gaming a particular period?  In today's installment of exploring WSS' Great Wargaming Survey results, the role of location on wargaming period preference is examined.   

Periods by Location

As seen in previous analyses assessing top choices of wargaming periods, World War II gaming is the most popular.  A breakdown by region (Location) shows that World War II gaming is the top wargaming period of choice across all regions (see Figure 1).  Looking at the other favorite periods within each region shows that the various Fantasy/Sci-Fi periods claim the next several ranked places.   

Two general observations from Figure 1 appear.  These observations are:

  • UK/Ireland and Australia/New Zealand tend to play more historical wargaming periods than the rest of the world.
  • Wargaming preferences are very similar for UK/Ireland and Australia/New Zealand gamers.

What drives these two tendencies?  Is it age related (survey data suggests age could be a contributing factor)?  National characteristics? Something else?  

Figure 1
With all of the assorted periods compressed into a very colorful graphic, it is difficult to identify any tendencies across locations within a particular period.  To better visual the data from this perspective, the data needs to be turned on its head.

Locations by Period

Transposing the data to show location by period provides more insight into any differences between regions.

Figure 2 aggregates the top three wargaming period choices and ranks these periods in order of descending popularity.  That is, World War II is the most chosen period and 19th Century Other is the least chosen.

Since the UK/Ireland and USA/Canada regions comprise the largest percentage of total survey responses, tendencies and generalizations will be kept to these two dominate regions for this exercise.

Figure 2
In a brief compare and contrast between wargaming period choices between the UK/Ireland (UK) and USA/Canada (US) what are a few of the notable take-aways from the survey?   

  • World War II is equally popular.
  • US gamers tends to favor Fantasy/Sci-Fi periods more so than UK gamers.
  • UK gamers tends to favor historical periods more so than US gamers.
  • US wargamers prefer American Civil War much more than their UK counterparts.
  • UK wargamers prefer Pike & Shotte much more than their US counterparts.

Is there a foundation for these reported differences and do these results hold any commercial value?

Given your own geographic region, do these generalized tendencies hold for your own wargaming preferences?