Saturday, October 29, 2022

Solferino: The Finale

After two action-packed sessions, the battle reaches its final blows.

For recaps of how the game arrived at this juncture, please visit,

Solferino: Contact and

Solferino: Assault on San Cassiano

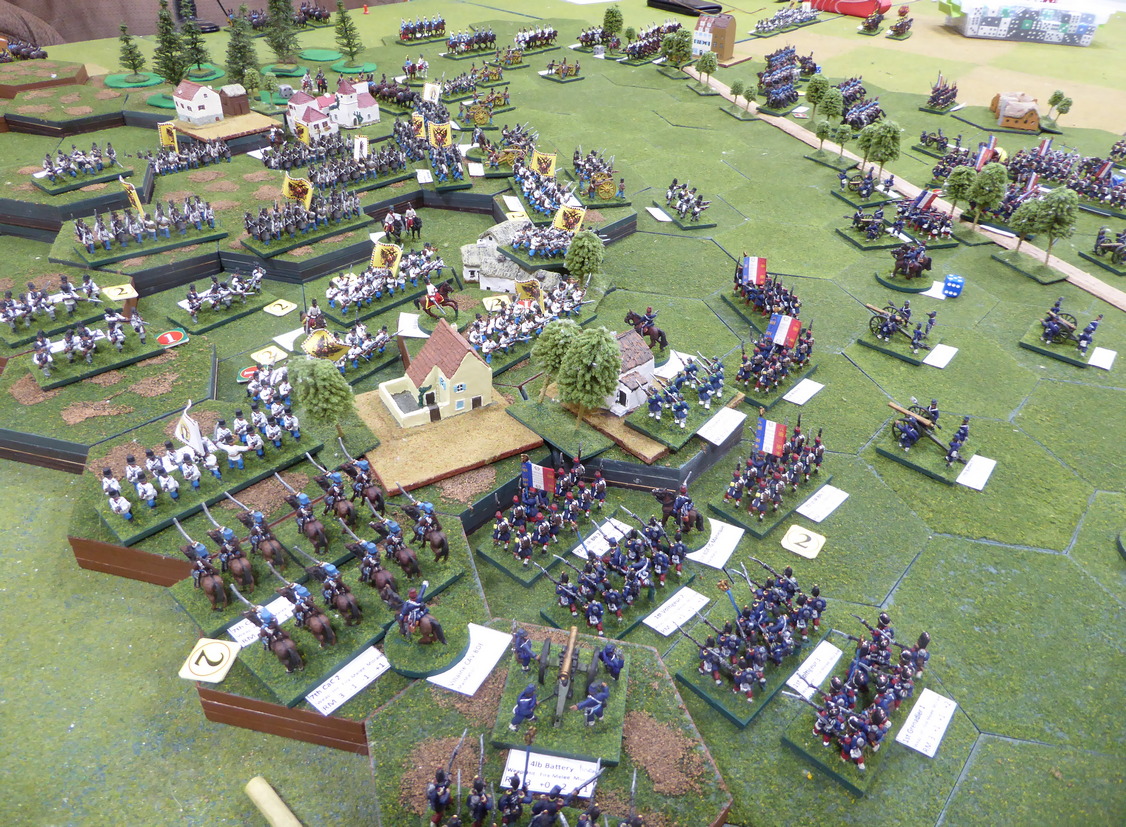
As the battle resumes, the Austrians still control much of the high ground around San Cassiano.  San Cassiano remains firmly in Austrian hands.  MacMahon is seen shifting more resources toward San Cassiano.

Situation on Austrian Right

Wherein the previous session the French showed great resolve and committed great resources in taking San Cassiano, the start of Session #3 suggested a change in French strategy.  Rather than continue to pound at San Cassiano with little effect, French movements suggest that containing and bypassing San Cassiano may be the new order for the day.

Rather than stick to the earlier French objective of taking both San Cassiano and Cavriana on the path toward victory, MacMahon seemingly switched the goal from taking vital ground to destroying the Austrian's will to fight.  With two Austrian brigades already broken, only one more enemy brigade wrecked would secure victory.  The difficulty is that the French must wreck one Austrian brigade before wrecking two of its own.  As seen from the rosters in Session #2, this task may be easier said than done!  Let's pick up the action.

French attack the heights!
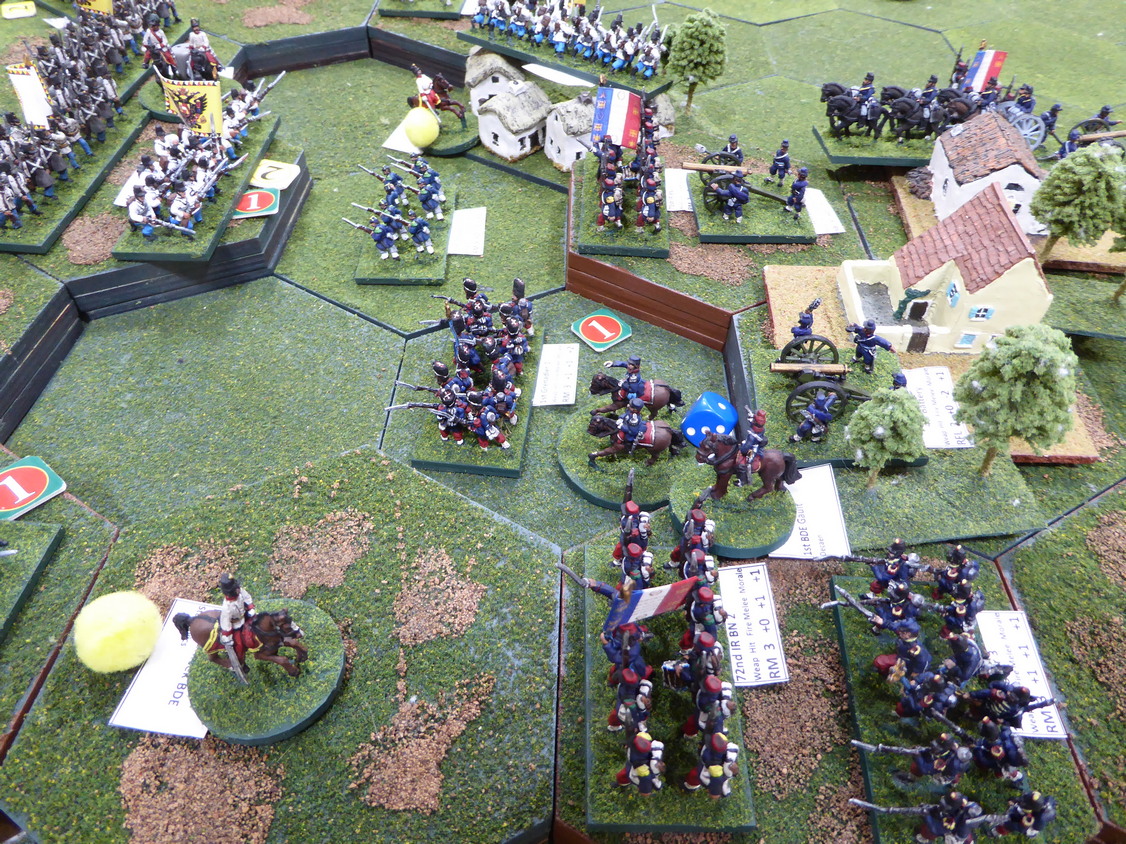
Maintaining pressure against the Austrian right, the French launch attacks toward the Austrian second line of defenses along the ridge protecting Cavriana.  The problem for the French is that these attacks must cross open ground covered by enemy artillery.  If a foothold can be gained on this secondary ridgeline, Austrian units deployed to the west could find themselves trapped.  With Stankovic's Division wrecked, Clam-Gallas will use this depleted formation as a speed bump to delay French aggressions as he prepares a defense in-depth.
Heavy fighting for the high ground.
Austrian defense in-depth.

The initial French attacks from the plain below are repulsed with heavy casualties to all as the attackers are blasted by canister.  French moving from the west bypass San Cassiano and secure a vital foothold on the heights.  Not only do the French gain a foothold on the crucial heights to the east of San Cassiano but in close combat, an Austrian battery and infantry battalion are destroyed in the fight.  The French look well-positioned to press on with the attack.
You win some; you lose some.

The western most ridge is in French hands.

Spirits are high among the victorious French but that jubilation is short-lived.  Out on the plain, two French battalions are destroyed by concentrated artillery fire.  

Austrian plays its hand on the plain.
Undaunted, the French press on with MacMahon and Gault pushing the Austrians back to the second ridgeline.  Wrecked, Stankovic's Division is melting away under unrelenting French pressure.
MacMahon leads the attack!
In the attack upon the second ridgeline, MacMahon and Gault's coordinated efforts see the Austrian line waver.  The Austrian right is showing signs of collapse.  All is not easy for the French, though.  Far from it!

In a series of cavalry attacks and counterattacks, Mensdorff's cavalry division overpower Desvaux's remaining cavalry.  In the back and forth action, casualties mount and Desvaux' division breaks!  In the confusion, Desvaux is killed.

With Desvaux' formation wrecked, the next army to suffer a brigade failure must retire in defeat.  Which army will blink first?
Attacks against the Austrian left and right.
Desvaux breaks!
Desvaux is killed.
Seeing the Austrians fall back from repeated French attacks against the Austrian right, French hopes for victory are high.  Those hopes are dashed when the French take the high ground overlooking Cavriana.  Looking down onto Cavriana, the French are met with the unpleasant sight of seeing Montenouvo's Division preparing to defend the village in strength.
Montenuovo defends Cavriana
as the French press on.
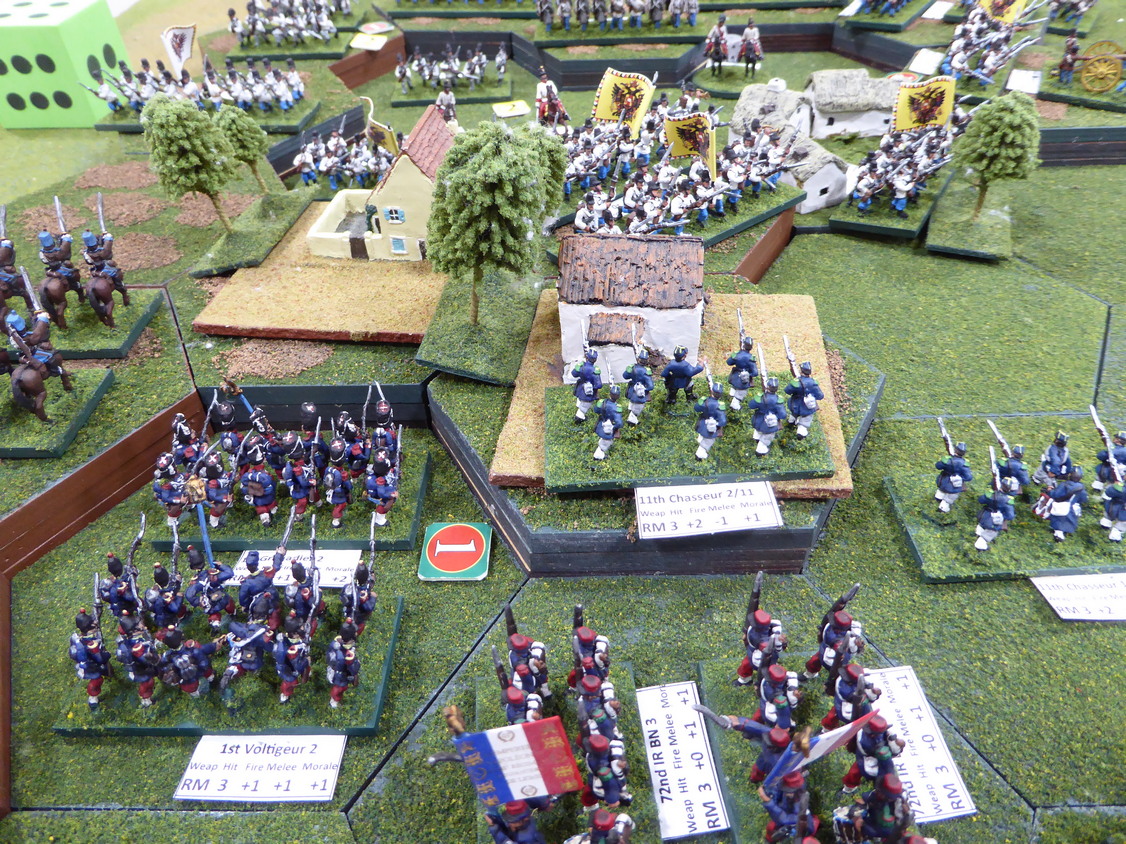
Processing the positioning of the Austrians around Cavriana, the French redouble their efforts to wreck the Austrian army.  An overwhelming attack against an isolated battery supported by grenz sees the destruction of both guns and grenz.  Still, not enough to force an Austrian capitulation.  Even though the attacks are successful, these efforts further weaken the attackers.
Isolated enemy are attacked
and destroyed.
The French assaults have carried them too close to the enemy gun lines.  With little cover and weakened from the day's fighting, the pounding from the Austrian guns is enough to break General Lefevre's Brigade.  MacMahon has seen that his Corps is spent and taking Cavriana let alone San Cassiano is too great a task.  The battle is over.
The French within reach of Cavriana
while San Cassiano continues to hold out.
No place to hide out on the plain.
Yes, that is correct.  After three long sessions of fighting on this field, the battle is over.

The Austrian's score a victory by not only hanging on to both San Cassiano and Cavriana but also breaking the French army.

Congratulations to the Austrian commanders and well-played by all!

The rosters show the final dispositions of each formation.  Red losses are from Session #1, blue losses are from Session #2, and green losses are from the final Session #3.
Was the final tally close?  It sure was!

For the Austrians, both Bruner and Mensdorff's formations were only one hit away from breaking.  Pazsthory's Brigade was only two hits away from wrecking.  A slight change in the order of play or concentration on another front may have changed the outcome of battle completely.

This was a very near run thing!

For me, this was a great gaming experience.  One that I will remember for a very long time.  When memories fade, I can return to these pages to relive the event!

I encourage the players to voice their thoughts on the game.  Seeing battle from player perspective detailing the evolution of their plans and strategies over the course of the battle would make interesting reading.  Lee has already given his impressions at, Battle of SolferinoI may even tackle my thoughts on the battle and an analysis of play.

Thank you to all of the Rejects (French: Richard, Ray, David, Surjit; Austrian: Lee, Steve, John) who participated in this long, three session battle.  I reckon we put in about 12 hours of gaming, all remotely.  Hopefully, they enjoyed this exercise as much as I and will be back for more.

Wednesday, October 26, 2022

Solferino: Assault on San Cassiano

When we last looked in on the Battle of Solferino (See: Solferino: First Contact), the French army, under General MacMahon, was in motion against the Austrian I Corps.  In the western approaches to San Cassiano, Gault's Brigade of Decaen's Division supported Villaine's cavalry and Maneque's Guard. The balance of the French Corps advanced east across the Medole Plain.
French advance along two axes.
French advance on the Medole Plain.
Seeing the casualties suffered in the first gaming session and one week before Session #2, I wondered if either army's plans would change based upon the situation on the ground.  For the Austrians, their defense in depth was keeping the French at bay.  In the Medole Plain, Austrian artillery wreaked serious destruction upon Castagny's Brigade.  In fact, by the beginning of Session #2, Castagny's Brigade was already broken.  Advancing in the open against artillery is not advised.
Austrians, on the high ground, await the attack.
What about French high command?  Was MacMahon satisfied with his current plan of attack?  Perhaps, not. 

Seeing the difficulty in taking the ground around San Cassiano, the plans for the French right changed.  Instrumental in this decision were wasteful casualties suffered from concentrated artillery fire on the approach across the Medole Plain toward Cavriana.  No longer was a direct march on Cavriana considered.  Elements of LaMotterouge's Division would veer north to support Decaen's attack near San Cassiano. 
Bringing up reserves,
the French left prepares to attack the heights.
Douay's Brigade veers to the north.
Having driven back the Austrian jaegers, the French left wing prepares to push up and onto the heights.  Elements of the French right will need to pin the Austrians in place while the left attacks.  Bringing up the numerous French guns including the 12 pounders from the Reserve Artillery, the guns unlimber and open up.  The guns' goal is to soften up the defenders before launching multiple attacks.  Some Austrian line infantry fall back into the valley in search of cover to escape the bombardments. 
Defenders suffer from artillery fire
while the French prepare to attack.
Austrians, suffering from artillery and musketry,
 fall back into the valley.
The French attack!

Villaine's cavalry brigade leads off the attack, advancing over the rough ground on the hills to the north of San Cassiano.  The horsemen are driven back after only advancing a few hundred yards.  Their advance is stopped by a deadly volley from Austrian infantry positioned along the spine of the hill.  Villaine's cavalry brigade is wrecked.
On the left, Villaine's cavalry breaks.
Seeing the French cavalry scattered, French infantry respond pouring fire into the Austrian defenders from multiple directions.  Austrians positioned on the ridge suffer mightily.  Still Hoditz' Brigade holds on.  In attacks and counterattacks, the two armies wrestle for control of the ridge.  Hoditz' stout defense with support from Reznicek is throwing the French timetable behind schedule.  Without a breakthrough soon, can San Cassiano be successfully assaulted?  
Douay’s Brigade moves to support the French left.
View of battle from the east.
Despite the loss of Villaine's cavalry, Maneque's guard and Gault press on up onto the heights.  Maneque and the 1st Voltigeurs take the farm on the ridge while the 11th Chasseurs take the adjacent farm complex.  Maneque falls.  MacMahon, himself, rides over to take direct command of this offensive.  The French have a foothold on the heights above San Cassiano! 
The French attack!
Austrian casualties are heavy
in the firefights among the farms.
With the French now on the heights, superior firepower sends the Austrians tumbling back into the valley.  Caught in a deadly crossfire, 1st Battalion 16 IR is destroyed.  Reeling from mounting casualties, first Hoditz and then Reznicek's Brigades break.  Among the chaos, 2nd Battalion 48 IR, with Hoditz nearby, clings onto San Cassiano. 
Austrians waver as pressure mounts.
With heavy casualties and lost ground,
Stankovic's Division is wrecked.
Surrounding San Cassiano,
Stankovic's Division gives ground as it breaks.
With Stankovic's Division broken, Montenuovo orders his division to move forward to form a second line of defense in front of Cavriana.  While Montenuovo repositions, Hoditz' battery is lost from enemy assault.  The Austrians have lost control of the heights overlooking San Cassiano.  Seeing Stankovic's Division in retreat, Maneque and Gault press on against the Austrian right.  Has the Austrian right been turned?
Overhead view looking south
 as Austrian right is pushed back.
The French press on against the Austrian right.
Meanwhile, back at San Cassiano, Gault and Doauy's infantry are closing in on the town.  Still, the defenders remain firmly entrenched in the village as artillery fire and musketry pour in.  To isolate San Cassiano completely, the high ground must be taken.  Reinforcements are on the way!
French close in on San Cassiano.
Algerian Tirailleurs on the way to San Cassiano.
At this point, we called an end to Session #2.

Both San Cassiano and Cavriana remain in Austrian hands but the grip on the former is looking tenuous.  

What about the action on the Austrian left?

While there were some cavalry clashes on the plain, Austrian artillery, in great numbers, prevents any serious thoughts of making headway on this front.  That could change.

At the end of the session, each army had two brigades broken.  The French saw Villaine and Castagny broken.  The Austrians counted Hoditz and Reznicek broken.  With army breakpoints of three brigades wrecked for the Austrians against four brigades lost for the French, the Austrian cannot afford seeing a third brigade break.

What about casualties?

The rosters tell the tale.  Red losses are from Session #1.  Blue losses are from Session #2.

Compared to the Austrians, the French suffered comparatively fewer casualties in Session #2.  With two brigades broken and Desvaux' cavalry nearing that point, the situation is becoming desperate.  

As seen from the Austrian roster above, Reznicek took a real pounding in Session #2 as he tried to maintain the forward defensive line.  He went from light casualties to wrecked during the session.  Casualties are rising for both Mensdorff and Paszthory too.

One more gaming session remains as we reach for a conclusion to the Solferino battle in the next installment.  The outcome could be close!

Monday, October 24, 2022

Paint 'em or Purge 'em ?

For regular readers with a good memory, the post,
may be vaguely familiar as I wrestled with whether to either paint or purge a selection of TAG ECW musketeers.  Feedback was nearly unanimous in lobbying for painting the small pile of lead.

My decision? 

Paint 'em!

Off the painting table today are those TAG ECW figures.

Getting this handful of figures into the painting queue took nearly two months as other figures and units took priority. Finally, the figures saw some attention last week. Out from the workbench they march.
The plan is to use these figures as commanded shot, baggage guard, or possibly even a Forlorn Hope.  I will try to work some of these figures into the next ECW scenario that hits the gaming table.  When will that be?  Who knows?  At present, Reconquista clashes are seeing action on the table.
The response from readership helped to push me over the edge toward painting these figures and clearing away a small handful of orphan figures from a dormant project.  Actually, the ECW project has seen recent renewed interest with a couple of units of cavalry and commanders coming off the painting desk.  Another command stand is in work in an attempt to decrease the TAG ECW surplus.

The next Paint 'em or Purge 'em victim is in the crosshairs.

Thursday, October 20, 2022

Solferino: First Contact

The battle begins.

For a refresher on initial army dispositions, please visit, Solferino: Setting the Stage.

While the battle rages around them, the Austrian Corps positioned in between the two conflagrations wait in silence as the first reports of a French advance upon their positions drift in.  Stankovic's Division is situated on the high ground around San Cassiano.  Montenuovo's Division supports Stankovic with his division deployed around Cavriana.  Out on the Medole Plain stands Mensdorff's Cavalry division and I Corps' Reserve.

Austrian positions looking from the west.
Austrian positions looking from the southeast.

Montenuovo in support of Stankovic.
Across the plain, elements of MacMahon's French 2nd Corps can be seen approaching.  Behind these lead elements, masses of infantry can be seen marching to battle.
French advance begins.
Never-ending masses of French file toward the front.
French march across the Medole Plain.
Seeing the enemy's approach, alarms are sounded.  Jaegers quickly move forward to occupy the small farms covering the Austrian right.  They await the attacks they know will be coming as skirmish fire erupts.  Stankovic's lead brigade under Hoditz, positioned around San Cassiano, is increasingly coming under fire from musketry from Gault's Brigade.  French guns quickly begin to deploy.
Jaegers move up to occupy the farms.
Skirmish fire intensifies
as the French close on San Cassiano.
On the French right, Castagny's Brigade screens the French advance as Desvaux's Cavalry Division moves up to counter the Austrian cavalry division.  With Austrian guns already in place on the plain and firing, Castagny's Zouaves and Foreign Legion battalions receive long range artillery fire from the numerous Austrian smoothbores.

LaMotterouge's Division reaches the Medole Plain and marches behind the densely packed cavalry screen.
The French move due east along the main road.
Back on the French left, the 11th Chasseurs eject elements of the 14th Jaegers from the farm and occupy the high ground.  As the 11th takes the farm on the right, the close presence of Manegue's guardsmen forces the remainder of the 14th Jaegers to retire from the adjacent farm.
11th Chasseurs in action.
French guard forces Jaegers to retire.
On the French far left, Villiane's French light cavalry struggle to scale the heights.  Successful in overcoming the rough ground, the French horsemen reach the plateau.  In repeated charges, the Jaegers are driven off with heavy loss.  Unfortunately for Villiane, pursuit is stopped by devastating volleys from the densely packed Austrian line infantry.  Half of Villiane's Brigade is scattered not to be seen again on this day.
Jaegers driven back
but with heavy casualties to Villaine's cavalry.
Back to the French attack on the right, LaMotterouge is having difficulty sorting out his command as both Castagny and Desvaux come under increasingly heavy artillery bombardments.  Austrian artillery continues coming on line from the Reserve, Mensdorff's Cavalry Division, and the batteries of Montenuovo.  The French face a strong headwind in advancing along this axis.
Deploying is difficult in tight spaces. 
More Austrian batteries unlimber and begin to fire.
With the fight for the heights around San Cassiano seesawing back and forth in attacks and counterattacks, the French Reserve artillery begins to deploy.  The presence of the French 12-pounders is begining to cause damage to the Austrian positions on the heights.  The accuracy of the French 4-pound rifled artillery is adding to this mayhem.

All is not well for the French, however.  On the right, Castagny's Brigade is taking punishing blows from massed enemy artillery.  In the open, with no cover, Castagny's Brigade wavers under the weight of losses.    
French artillery open up on the heights.
French progress on the left.
A difficult task on the right.
Castagny's Brigade waivers
(yellow ball denotes broken brigade)
Despite increasing fire from the French attackers, the defenders around San Cassiano stand firm.  Losses are mounting.  The concern for holding these positions grows.  I Corps commander, Clam-Gallas sees the danger and orders Montenuovo to move his division forward.  Montenuovo puts his command in motion as it moves forward to occupy the second string of hills behind San Cassiano.  
Austrian positions look formidable
as the French close in.
Montenuovo moves up to form a second line.
This is where we called it a day after about five hours of play.  The seven players agreed that they would enjoy continuing the game where we left off in one week.

Casualty counts in the rosters below show where the fighting has been heaviest.  Villaine's cavalry attacking along the spine of the heights suffered greatly.  Decaen's division also saw heavy casualties. Casualties suffered not from close combat but from artillery fire.  In opening hours of battle Castagny's Brigade was wrecked.  Against San Cassiano, Gault's Brigade has seen heavy losses too.

For the Austrians, Hoditz' Brigade, the defenders of San Cassiano and the Austrian front line, suffered greatly but gave more than they took.  Hoditz's command took heavy fire on the heights but the line infantry stood firm under repeated heavy bombardments.  If the French want these positions, they will need to take them by force.  
Given the situation at present, what would your next moves be?

Next time we revisit Solferino, we explore The Assault.