Thursday, March 31, 2022

Combat at Foz d'Arouce BatRep

In the previous post, I presented a teaser for the weekly UK remote game.  As noted, it was my turn at the hosting helm and I chose to bring 28mm Napoleonics back to the table.  Turnout was excellent with six remote players taking commands.  The players were split evenly between the Anglo-Portuguese and French.  Chris, as Picton, took command of the Anglo-Portuguese with Will and Richard as subordinates.  Graham settled into his role as Ney with Ian and Phil picking up brigadier commands.  Each subordinate commander on the field had at his disposal at least one infantry brigade.

As is becoming commonplace in some of my recent hosting efforts, the number of in-game photos is quickly approaching zero.  Moving units and game adjudication leave little time for respite to snap a quick pic.  I need to work on that and make an effort to allow some time to chronicle the action.  I did manage to jump around the table to grab a screenshot or three during the game but not really enough to suit my tastes.  Even without a sufficient photo record, the game is still fresh in memory.

Off to battle. 

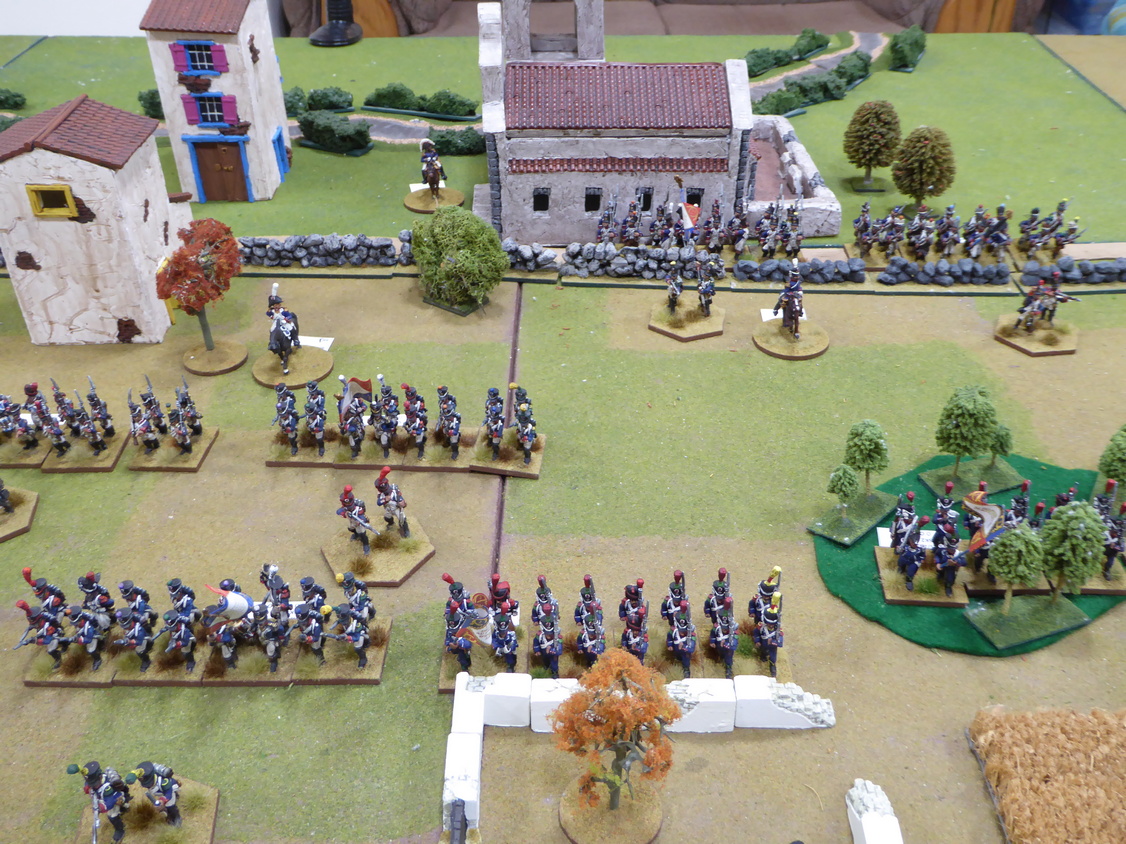
Initial dispositions and battle plans
As the attacker, Picton could activate one brigade first before the other commands were selected by lot.  Picton chooses to activate Beckwith's Light Brigade and it swings into action by a brisk advance along the British left under cover of a rocky outcropping. 

After Beckwith activates, each command's activation sequence is governed by a random die draw from a tin. 

Beckwith advances on the British left while
Mermet attacks out from Foz d' Arouce.
As the British advance slowly in the center, Mermet wastes little time in advancing quickly upon the enemy.  Menard on the French left occupies the farm before the enemy can do so while Taupin garrisons the center.  On the French right, Maucine holds Poisao preparing for the attack that he knows is inbound.

The French do not wait long.

Both Beckwith and Colville pounce upon the French deployed in and around Poisao and the fight is on.  Close range firefights erupt as Poisao is immediately under heavy pressure.  The French guns in Poisao fire but cannot discourage the attackers.  Lining up along the outer walls of the village, the redcoats pour fire into the town.  Isolated, the gunners limber-up and quickly evacuate the village while they still can flee.

The 1/6 Legere deployed in the woods on the French right are under stress too.  Harassed by fire from both the 95th Rifles and the 1st Cacadores, the 1/6 wavers.  After sending a volley into the legere, the 43rd Lights charge.  The already wavering leger are forced out of the woods and back toward the bridge.  

The British attack!
In the center, the crack 5th Foot hits the 1/50th Ligne.  Casualties are heavy and the 1/50 is forced to retire.  Coming up in support of 1/50 but a little too late, the 2/6 Legere engages the 5th Foot.  The 5th Foot is forced back but the 2/6 Leger suffers heavily too.  Maucine is in great peril but has he stabilized the French right?  The contest on the French right still holds in the balance.  For now. 

Fighting intensifies near Poisao.
On the French left, however, Menard is attempting to thrust deep into the British positions and turn their right.  Fighting escalates at the farm as each commander commits more troops into the fire fight.  Casualties mount as the combatants clash in close quarters inside the farm compound.  If MacKinnon can hold, Beckwith may gain the bridge and cut off Mermet's Division.  Ney could be bagged!

Powers arrives and Beckwith races toward the bridge.
Maucine's position on the French right collapses suddenly.  Beckwith's brigade nearly reaches the bridge before Maucine's 69th Ligne can deploy.  Is the bridge lost and Ney's command cut off?  

Through the smoke, Ney spots a dense enemy formation on the main road to Foz d'Arouce.  The English have been reinforced by a brigade of Portuguese.  The situation is worse than it seems.  Time cannot be wasted!  Ney leads one of his battalions in against the enemy to his front.  In the chaos, Ney goes down.  He does not rise.

Mermet attacks!
Seeing Ney fall, Taupin realizes he must delay the Portuguese attacks until Menard can push on into the British right flank.  If he does not hold the center, he will be overrun and the bridge taken.

Taupin heroically holds the center.

Hearing reports that Ney has fallen, Menard redoubles his efforts.  A fourth battalion is sent into the fight at the farm.  This edge in manpower tips the balance.  The 88th Foot is driven from the field as it defends the woods while both the 45th and 74th Foot are ejected from the farm.  In hot pursuit, both battalions scatter.  The British right has been turned!

The British right collapses!
Back at the bridge, the 1/69 Ligne fans out into line just before the 43rd Light attacks.  With support from the gun at the wall, the redcoats are driven back. 

Battered but not yet broken, the French hold the bridge as Picton begins to worry about the disintegration of his right.  With MacKinnon's brigade destroyed, Colville's brigade broken, and night enveloping the battlefield, Picton orders a withdrawal.  Today's fight is over but what will tomorrow hold?

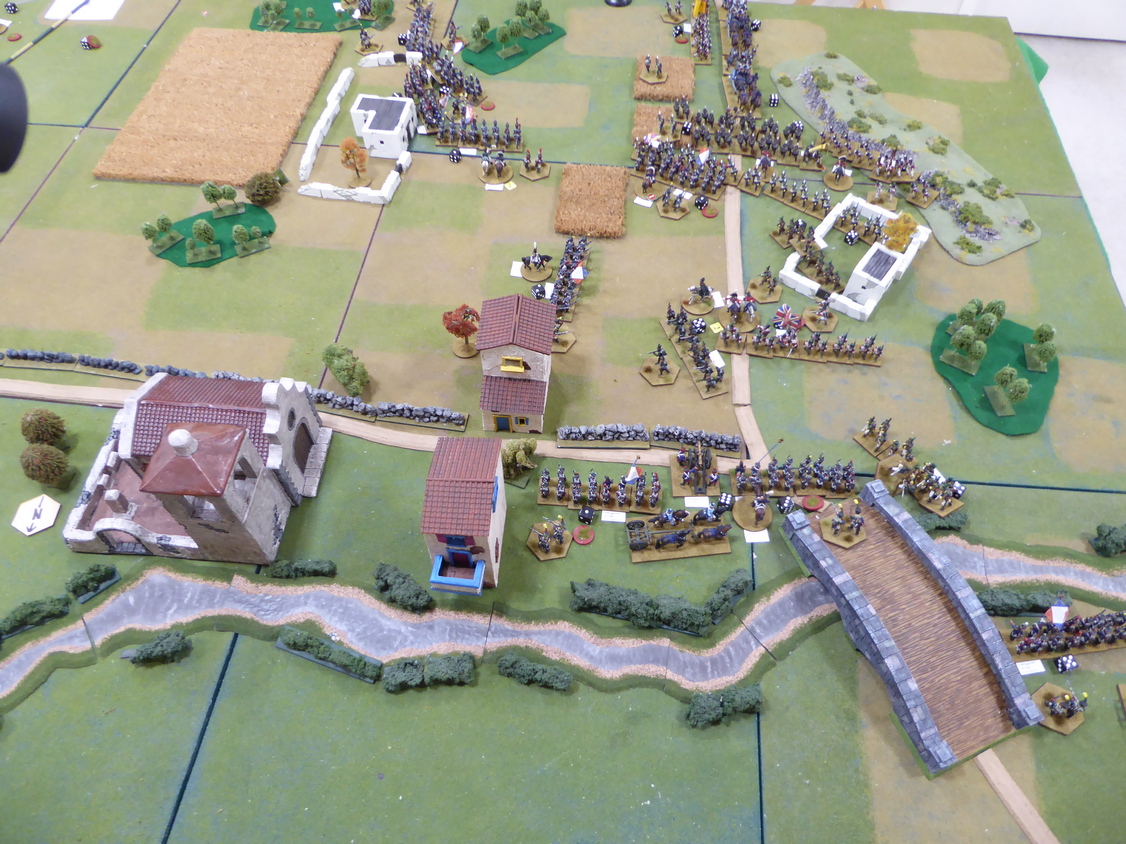
French hold the bridge.
Whew!  That was a hard-fought battle.  After a little over three hours of fighting the armies and host are exhausted. 

In the final tally, despite the loss of Ney (and the loss of many a general on this day), the French gained a victory at Foz d'Arouce.  The French maintained control of Foz d'Arouce and the bridge while suffering fewer casualties than they gave.  That was a good day's effort.  Ney fought a successful rearguard action even though he disobeyed Massena's orders.  Fortunately for Ney, he will not need to defend his actions.

With darkness on the battlefield, Massena arrives to order the bridge blown after overseeing all surviving French moved over to the north bank of the Ceira River. 

The battle's end.
As always, the players gave me much to contemplate post-game. I may put together a retrospective on the game and rules another time. In the meantime, another playing may be in the cards.

Sunday, March 27, 2022

On the Table Today is...

a Napoleonic battle.

With last week's Biblical battle in the books, I clear the decks and prepare for the next game.  Notes and photos from the latest playtest of Rein-Bow Warriors still require a review and report but moss does grow on this rolling stone that is my gaming table.  Table turn-over seems to be picking up pace.

On deck for hosting this week's MNG remote game, boxes of Napoleonics were pulled from storage and a battle set up for the session.  Last seen in December in the pair of Maida Battles, (see Rock of Maida and Maida Six, the Hard Way), the 28mm Napoleonics collection hits the gaming table again.  For a collection that has not seen much action over recent years, seeing two battles within three months strikes me as a regular rotation. Maybe I can keep this up?
I digress.
The battle for Tuesday's outing is a recreation of the Combat at Foz d'Arouce in Portugal, March 1811.  I am missing the battle anniversary be two weeks.  Close.  I ought to keep better tabs on such events.

Battle Briefing
In Massena's retreat from Spain, the French Army of Portugal made a night march on the 14-15 March 1811 to place a flooding river between itself and the pursuing Anglo-Portuguese Army under Wellington. Having safely crossed to the north bank of the flooding Ceira River, Massena allowed his troops to rest on the heights overlooking the small village of Foz de Arouce.

Ney, commanding the French rear guard, had been ordered to destroy the bridge at Foz de Arouce after having passed his troops over to the north bank of the river. With little regard for Massena, Ney disobeyed orders and kept three brigades on the south bank of the Ceira.

Held up by fog and the burning town of Miranda de Corvo, the 3rd and Light Divisions did not reach French positions near Foz de Arouce until four in the afternoon. Thinking it too late in the day for the British to launch a successful attack, Ney remained on the south bank of the Ceira. Hoping to surprise the French, Wellington launched his attack at 5:00pm.
Scenario Details
Ney's rearguard is situated on the ground south of Foz d’Arouce with Mermet drawn up in front of the village while Marchand has taken up positions in and around Poisao. Wellington has deployed Picton opposite Mermet while the Light Division advances upon the French right.

The combat begins at 5:00pm with a game length of eight turns with a variable length extension.

Only the Anglo-Portuguese Army receives reinforcements (both guns and Portuguese 9th and 21st Infantry Regiments) at Turn 3 in this scenario and no French having crossed over to the north bank of the Ceira River may re-cross. The Ceira River, swollen by recent rains may only be crossed at the bridge. Woods are light. Rocky outcropping on French right is rough.

Battlefield and deployments
Order of Battle
Order of Battle

Victory Conditions
At the conclusion of the final turn, Victory Points are awarded as follows:

  • 2 VPs each for control of Poisao, Foz de Arouce, the Cathedral, north bank of the bridge, and south bank of the bridge.
  • 2 VPs each for each enemy infantry or artillery BMU destroyed, routing, or forced to retreat into the Ciera River.
  • 2 VPs for each officer killed.
  • 1 VP for each officer wounded.
  • 1 VP for each French BMU remaining on the battlefield at game end.
  • 5 VPs if no French BMUs are on the south bank of the Ceira River at game end (Anglo-Portuguese only).
  • 5 VPs for each Anglo-Portuguese BMU in good order on the north bank of the Ceira River at game end.
The player scoring 7 or more points than his opponent wins the day. Otherwise, the battle is a draw.

Examining the situation and OB, several strategies emerge for attempting to secure victory.  Which strategy will the players choose?

Will Ney be able to withstand Wellington's attacks in the fleeting Portuguese light of day?

Friday, March 25, 2022

Sumerian Battle Cart plus more

SumeriaBatleCart01_01.JPG
No, this is not a photo from the playtest of Rein-Bow Warriors mentioned in the last post.  That battle was fought but details are yet to filter back to HQ for analysis, conclusions, and thoughts on wargame design.  I will state that the battle witnessed significant casualties for the Egyptian Army.  Hittite chariots dominated the field and skirmishers proved their value on the field.  By the end of the day, most Egyptian chariots were in the Dead Pile and skirmishers had been scattered to the winds.  Very bloody contest.  More on this action awaits another time.  Yes, I am slipping behind in chronicling a variety of topics.   

In the meantime, the painting desk gives up the first of three Sumerian battle carts and crew.  Figures are 28mm Newline Designs.  With a steady stream of SYW French marching out from the workbench, I interjected something different.  That something different sees a return to the Sumerian project, albeit briefly.  More SYW French are making their way through the production line with all three arms making progress.  Next off the painting desk expect another pair of French infantry regiments.

Having set out the Biblical armies for a playtest this week, I expected to leave the table in situ.  I figured I may get more than one playtest session in the books before packing it all up to prepare for the next game.  Well, that next game comes faster than expected.  With Graham and Richard out of the hosting rotation next week, I will be hosting the remote, UK MNG game on Tuesday.

A battle needs to be decided quickly, briefings prepared, and table set out before Tuesday.  This does not provide much lead time but I have some thoughts on topic and battle.  A return to Napoleonics in 28mm with a Peninsular War action seems appropriate.  The battle will likely entertain a near-anniversary battle.  Hmmm.  I wonder what it could be?

Another anniversary battle is planned for Mid-April but from the War of Austrian Succession.  With a victory under his belt at Moys and having survived his first remote wargame, David will be back for more.  I may tempt others in too.

I made it out on the bike Thursday to put another 31+ miles into the legs.  The temperatures were cool (almost 50F) but sky clear.  Unfortunately, I picked up a big speck on the camera during the ride so most of the photos are not worth sharing.  An example of the splotch below as I make my way through one of the railroad cuts.  With a good weather forecast, I expect to be out again on Friday.  This time, sporting a clean camera lense.  I need to drop some winter weight in time to tackle the Going-to-the-Sun Road in late May.

By the way, since fighting began in Ukraine, I have had ZERO spammers.  Coincidence?

Monday, March 21, 2022

On the Table Today Is...

Egypt (foreground) v Hatti 

Biblicals.

After clearing off the gaming table from a multiple week engagement of the SYW Battle of Moys, the table is set for a return to Biblical gaming in the Levant.

Late last fall, the Biblical armies saw an increase in exercise as playtesting for Ian's Rein-bow Warriors commenced.  "Increase in exercise" is a vast understatement.  These Biblical armies had rarely been seen on the gaming table and the newly-raised Hittites had never seen action.   My recollection is that at least a half-dozen games were seen in fourth quarter.  That is a lot of concentrated gaming in one period.  Necessary, though, to get me up to speed on the rules and design philosophy.  We made good progress in refining the mechanisms and processes.  Last seen on the table in December, we return for a few more playtests this week.  

Battle lines drawn up
The upcoming playtest session will focus on skirmishers and their interaction with other troop types on the battlefield.  In prior battles, skirmishers tended to hang out on the extreme wings, skirmishing with one another.  Being relatively weak, skirmishers typically are not long for this world.  Other topics to test include Commander's Mettle and Army Breakpoints.  

In this battle, skirmishers are deployed front and center as a screening force to the main battle line.  Since skirmishers interact with chariots differently than close order units, will the skirmishers be able to muster an effective screen or will they be run down where they stand?  I suppose we will find out.  While these are relatively large armies deployed for battle, the testing session may not make it to the point of contact with the two main battle lines.  Handling more than a half-dozen chariots takes time and finesse.  Since the session will be played remotely with two UK players, I must remember to take some game photos in the heat of battle.

In other gaming news, Commands & Colors: Ancients in 6mm hit the kitchen table this past weekend. The Battle of Caralis was refought twice with Rome losing both battles.  Game 1 was a close win for Carthage.  In Game 2, Carthage came roaring back from a 4-0 deficit to win handily at 8-4.  Miraculous.  The Carthaginian heavy infantry advanced in the center and destroyed much of what lay in their path.  Shocking to witness this well-coordinated attack.  Oh, I played Rome in both games.  I went 0-2 for the weekend on my home field.  I think Kevin has been practicing.

On the painting table, continued work on SYW French, Samurai archers, and the sight of a few more Sumerian battle carts.

Friday, March 18, 2022

More SYW French and Out on the Bike

Work at the painting desk continues on my SYW French "bender."  Inspired by both a number of interesting looking WAS scenarios on the Honours of War forum and David's flags, the painting queue shows no sign of easing up yet.  Following these two battalions, I expect to see another pair of French infantry regiments and French artillery hitting the painting desk next.  After those batteries muster out then time for some French cavalry, I think. 

Out from the painting desk today are two more French battalions.  This time we see Regiments Condè and Rohan Montbazon.  Each 23-figure battalion has 22 Old Glory infantrymen led by a Eureka mounted officer. 

Regiment Condè
Regiment Rohan Montbazon
This week sees a light schedule on the gaming front.  Only one F2F game planned for Saturday.  Back by popular demand, my 6mm ancients will see action again at the Battle of Caralis using Commands & Colors Ancients in a rematch. 

I did manage to replay the Combat of Moys, solo, this week.  The results ended up much like the first battle (see Combat of Moys) with the Austrian juggernaut stomping Winterfeldt's precariously placed Corps.  Taking a page from Norm's recent manifesto, I played the game for the joy of the game, itself.  No photos and no chronicling of the events.  I lined up the troops and set-to rolling dice and not taking names.  Well, I will relay that the Jackelsberg held out a little longer for me than in Game #1 but not much longer.  The Prussians, again, could not get reinforcements up to the redoubt before it was lost for good.  

With two playings of Moys in the books and results the same, I propose that the historical outcome of battle was the most likely.  Winterfeldt simply cannot counter the overwhelming superiority of the Austrian Army.  Could the Prussians see a tactical victory?  Yes, it is possible but Prussian losses were high (again!) in Game #2.  With that question answered, time to clear the table and move on to other battles.  I hear the distant call of more SYW battles.

What is coming up on the gaming table?  Well, there are rumblings of a return to playtesting Rein-bow Warrior on the plains of the Levant.  At least one more playtest is formulating in anticipation of seeing the game return to the Tuesday UK remote group in the near future.

Also on tap is an anniversary battle of Mollwitz.  Mollwitz has seen action on my table before so this will be familiar ground.  I expect a new cast of players, though.  Mollwitz is smaller and more open than Moys so the battle may lend itself more readily to group games.

On the cycling front, finally, weather on the Palouse has warmed enough to detach the bike from the indoor trainer and return for an outside ride.  It has been a long winter and it was very good to get outside in the cool air to once again dodge potholes and cars out on the open road.  There remains plenty of grit and debris on the roadways until the spring sweeping of the streets begins.  Spring is a hazardous time brought about by road conditions and the need for motor traffic to acclimatize to seeing cyclists back out on the road.

Below is a sampling of shots from a recent outing.  Hopefully, this is just the beginning of a fine cycling season.  Besides, I have some winter weight to shed.  A 31-mile roundtrip is a good start...


 Until next time.

Tuesday, March 15, 2022

Radio Silence

No, not for the Palouse Wargaming Journal.  Still much to chronicle on this front.

We have, however, seen a casualty on the blogging front.  This week, Norm (Battlefields and Warriors blog) announced that he is suspending service on his fine blog.  With constraints on time and other priorities, Norm reckoned it time to cease operations.  For now.

Norm has been a stalwart of the blogging community for many years.  His easily recognizable long-form blogging style with in-depth reviews and battle reports will be missed.  If his writing content, alone, was not worthy of praise and support, Norm's engagement with the wargaming blogging community was second to none.  Always a positive and insightful comment from Norm's keyboard.  For me, his absence leaves a vacuum in the blogosphere. 

OK, this is beginning to sound like a eulogy.  Enough of that!

Over the last year or two, those following Norm's blog saw him first pare down his board wargaming collection to a few, core, series titles.  Last fall, he jettisoned all of his miniatures' collections with the exception of a few 28mm collections.  These moves all seemed headed toward simplifying and reducing his wargaming footprint.  In a seemingly, natural evolution, suspending service on his blog does not come entirely as a surprise.

Is this a sign of the times and an indication that blogging as a media form is dying out?  Big Lee at Big Lee's Miniature Adventures recently published a video on just this topic.  Big Lee's conclusion? It depends!  

In a bit of irony, just as Big Lee laments the decline of blogging, one of his fellow Group-mates starts a blog!  Richard's blog can be found at, My Wargaming Habit.  Go on, show Richard some support as he strikes out on a new venture.  Tell him, I sent you.

I recommend popping over to Norm's blog to read his last post and then following up with Big Lee's video.

After that, I would enjoy seeing your thoughts on the demise of Norm's blog in particular and the future of blogging in general.

Will we see a return to active blogging on Battlefields and Warriors?  I would not place a wager against it.  Norm still has much to say and contribute to the hobby.

Norm, best wishes!  Your presence will be missed.

Friday, March 11, 2022

Combat of Moys, A Battle Report

Combat of Moys, 18 June 1757

Beginning as a series of emails with David (from Not by Appointment blog), in which he expressed a curiosity and interest in giving remote gaming a try, plans evolved into the recreation of a full blown, historical SYW battle.

Since I had not played Honours of War (HoW) in a few years and David was unfamiliar with the rules at all (and remote gaming), I originally suggested we step off on this new adventure with a smaller action. 

Asking for possible battles to refight, David immediately fired off a suggestion with the Combat of Moys.  Perfect, I thought.  A "Combat" is typically smaller than a "Battle" so this should fit the criteria nicely.  Digging into the OB and accounts of the battle, I quickly discovered that Moys was definitely more than what I would consider a "combat"!  With 32,000 Austrians against about 14,000 Prussians, Moys would produce a respectably sized battle. 

While most of my previous HoW battles have been fought at the scale of one infantry BMU on the table equals two field battalions, for Moys, I opted to drop the scale to one infantry BMU equals one infantry battalion.  As soon seen, this scaling produces a rather larger battle with masses of troops on the table.

Battlefield and initial army dispositions
View from behind Austrian lines
View behind Prussian lines
Austrian army arrayed in four battle lines
 with grenadiers converged on left.
Austrian army on parade.
Prussians on Der Langer Berg
Prussian grenadiers in the Jackelsberg redoubt
Prussian grenadiers in Ober-Moys.
Palffy's Austrian Grenz and hussars on the left.
View from behind Forgach's fourth Austrian line.
View of battlefield from south.

With David having a copy of Honours of War in hand and scenario details produced, we were ready to give it a try.  David chose to play the attacking Austrians.  David made a good choice since the more static and defending Prussians would provide less action on my part as I juggled GM and stage production duties.

The Austrian commander would be awarded objective points for capturing the Jackelsberg and the three parts of the village Moys.  The Prussians could slip out with a victory if they could hold Der Langer Berg for twelve turns before their army broke.  Why twelve turns?  For the first playing of the scenario, twelve turns seemed a good starting point and benchmark for later games.  Of course, if either army breaks, the battle is over. 

Prussian battle plan

As Prussian commander, Winterfeldt, my plan was to offer up a forward defense.  I hoped to contain the Austrians in the natural chokepoints between
(1) the pond and Moys (and Rothwasser) in the center.
(2) the stream and the pond on the left.
(3) the Rothwasser on the right.
If not contain the Austrians, at least slow then down to make an advance difficult.  When the situation warrants, withdraw back to Der Langer Berg and prepare for a final defense.  Unfortunately, Winterfeldt begins the game off table in Gorlitz and will not arrive to command until Turn 3.

What was the Austrian plan?  Attack more than likely!  

How did David's initial introduction to HoW and remote gaming play out?  Did the Prussian plan bring victory?  Please read on to find out.
David's view from Austrian webcam
Austrians form up smartly and ready to step off!
Prussian infantry descend from Der Langer Berg
as Austrian grenadiers prepare
to assault the Jackelsberg.
Long range artillery softens up the defenders.
Austrian grenadiers climb the Jackelsberg
and take the guns!
Bitter fighting in the redoubt
as the Austrians attack from two fronts.
Zieten's cavalry form up in the distance.
The two cavalry wings clash!
Many of the Austrian horse fall back to recover
but many of the Prussians are damaged as well.
Forgache's brigade is left in reserve.
Prussian grenadiers are ejected from the Jackelsberg!
The White Menace marches forward in the distance.
Having been ejected from the redoubt,
Bevern tries to rally his grenadiers.
Winterfeldt arrives to encourage his men.
With artillery out of range,
the Austrian commander orders the guns limbered. 
Seeing no space to deploy,
Forgach begins a long flank march. 
Overhead Austrian webcam view.
Overhead view of continuing flank march.
Prussian grenadiers attack to retake the Jackelsberg.
Austrian cavalry fall back on the right
 as Austrian infantry advances to stop pursuit.
Austrian cavalry are wearing down
while Prussian cavalry stand ready to exploit.
Prussians hold the chokepoints exactly as planned.
All quiet on the Austrian left.
My view of the action with Big Screen in background
 and grenz in the foreground
showing view from one of the webcams.
Austrian musketry is deadly.
Prussians fall back in disarray
both from the center and Jackelsberg.
Austrian heavy artillery makes it way to the front.
The Prussian line wavers.
Those guns look big!
Firefight continues at the foot of the Jackelsberg.
Prussian grenadiers are not giving up
 but not making progress either.
Progress?  The Prussians are repulsed again!
Austrian guns unlimber and pound the Prussian infantry.
The Prussians reel back.
The center is breaking.
As a last hope, Kleist sends in his grenadiers
against the Austrian right.
The Prussians are overwhelmed by musketry
and fall back.
The battle is over.
Prussian Dead Pile.
Austrian Dead Pile.
It is all over but the crying.  The Austrians force the Prussian army to break!

Well done, David! 

After about seven hours of play (with breaks) over two gaming sessions, the Austrians emerge victorious.  History repeats.

Casualties as seen from the two Dead Piles are completely lopsided.  I am at a loss for words as to how this happened.  While the Prussians lost the Jackelsberg early on, I figured the Austrian advance had been contained at the chokepoints.  Until it wasn't!  The Prussian Army remained intact for eleven turns.

Great job by David in both commanding the Austrians to victory and in tackling remote gaming.  This was another very enjoyable and rewarding battle recreation.  Great fun, actually!

Looking forward to giving Moys another try.

I may keep the SYW armies out on the gaming table for a while longer, I think.