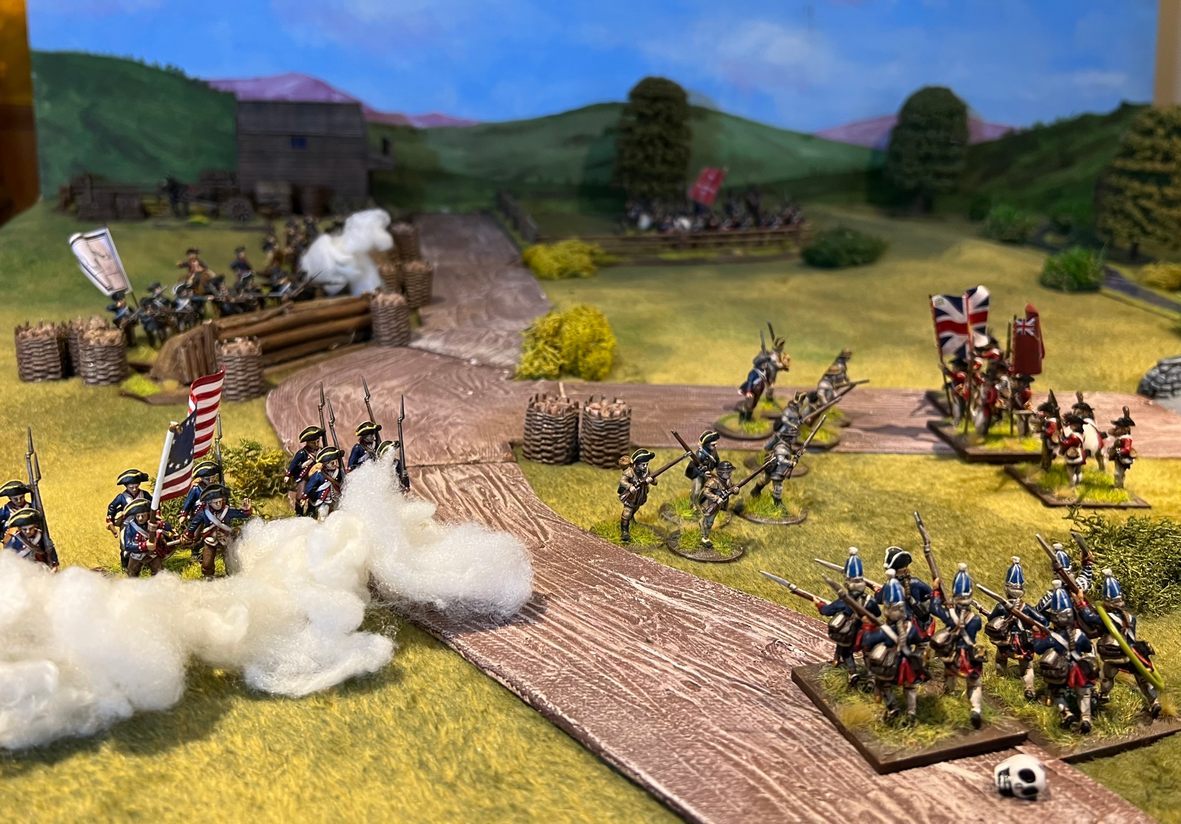
Showing posts with label 28mm AWI. Show all posts

Monday, February 10, 2025

6 Games in 7 Days

Cooch's Bridge
photo courtesy Matt from wargamesinthedungeon

Last week saw heightened activity at the gaming table.  Action was fast and furious with six games played over the last seven days.  That is a lot of gaming in one week!

Despite the heavy gaming schedule, I managed to get some painting sessions in too.  There will be some new units mustering out from the workbench soon.

Anyway, a quick rundown of the games played this past week.

Monday saw Postie's Rejects hosted in two remote, Old West gunfights in 25mm.  The first game is chronicled at Rejects at Adobe Wells.  The second game awaits its rip-roaring write-up.

Thursday saw three CCA refights of the Battle of Po River in 6mm.  Kevin joined in for an afternoon F2F session featuring a trio of games preceded by a lunch stop.  For this session of three games, we swapped sides from our previous outing.  As in the first triplet of Po River games back in January, Carthage managed to squeeze out two victories to Rome's one. Scores were 7-4, 1-7, 7-4.  With Kevin and I knotted at three victories apiece, a third, tie-breaking session may be needed!


Finally, Sunday witnessed a return to Matt's long running AWI campaign.  The campaign is up to 1777 and the Battle of Cooch's Bridge.  With most of the Americans either dead on the field, captured, or running away, few Rebels remain to tell the tale from the American perspective.  Even the American commander managed to lose his head!  I leave it to the victors to write this history!  After a very long hiatus, good to get back to the table with Matt in a remote game.    
Cooch's Bridge
photo courtesy Matt from wargamesinthedungeon
Cooch's Bridge
photo courtesy Matt from wargamesinthedungeon

It was a busy week on the gaming front.  This week looks a bit more subdued.

Tuesday, July 30, 2024

A New Project and a Game

Given that June saw good production at the painting desk with nearly 150 figures crossing over to the "Painted" side of the ledger, July has been a letdown.  With games, planning for games, research, scenario development and summertime activities, painting production took a precipice drop in July.  I did manage to complete one, three battalion regiment of Prussian infantry, though, and I started a new project.
Well, "New" in the sense that I have finally overcome the inertia of expanding my 1859 project to bring in Prussians for the 1870 conflict.  These 48 figures represent the first of hopefully a serious attempt at fielding a small Prussian Army for the FPW.  The figures have been in The Lead Pile for years.  Time to do something productive with them.  The problem is that I have not felt much like painting of late.  I keep getting distracted by other calls for attention. 
Anyway, these figures are 15mm Lancashire Games.  Great figures that paint up quickly when I sit down at the painting desk for a meaningful painting session.  The regiment still needs to collect its flags.  Perhaps I can find some suitable flags on the internet?  In July, those meaningful painting sessions were few and far between.  With luck, August will see a pick-up in productivity.  At least this is a start to a Prussian Army!
Cheriton Battlefield
Photo courtesy Gridbased Wargaming
On the gaming front, I joined Matt on Sunday to resurrect our AWI campaign.  A nail biting and unexpected finish.  I am sure Matt will provide an accurate chronicle of the action at Fort Anne.  The first game in Peter and my home-and-away series of Battle of Cheriton replays is on deck for later this week.  Peter is hosting (see Remote Game Preparation) the first round and then I will host the second.  Both games will be played remotely using different scenarios and different rules.  We completed a similar exercise before with Lake Trasimene.  It was great fun and we both learned a lot about the battle in these refights.  I wonder what insights might come out of our Cheriton refights?  Research for my game is still in progress.  Battle layout nears completion.  I am sure I will pick up some useful tips after having played Peter’s interpretation of Cheriton.

Tuesday, November 15, 2022

Bloody Bound Brook BatRep

Bound Brook Table
photo courtesy wargamesinthedungeon

Matt and I returned on Sunday to our long-running AWI campaign using Rebels & Patriots.  This campaign has been in action for two years running.  On the docket for this day was a recreation of the action at Bound Brook in 1777.  Matt provided a battle briefing showing the situation and the initial Rebel dispositions.  The action opens with the Rebels guarding Queen's Bridge and the Old Stone Bridge from British advances.  The main British advance is across the causeway through the marsh to Old Stone Bridge.  Hessian Grenadiers approach across the Raritan River forcing their way across Queen's Bridge.  The Rebel objective is to prevent being overrun and giving up this strategic position.  Matt pointed out that, historically, once the Hessian grenadiers were seen storming across Queen's Bridge, the colonials panicked and fled.  Battle over in a few minutes.  Looking at my situation as the American commander, I felt my chances were equally slim.

With two skirmish units, one guarding at each bridge, they may only offer speed bumps to the superior Crown Forces once the enemy come onto the table.  Having to overcome two narrow avenues of approach, the Americans would need to contain the enemy while not sustaining too many casualties.  I asked if the Americans only needed to hold out for three turns to declare victory.  Matt laughed but warned that I ought to be careful in not allowing my skirmishers to be overrun on Turn 1.  Noted! 

Let's see how the battle played out.

Shadow animals or battle briefing?
British column arrives marching on Old Stone Bridge.
American skirmishers fall back from Queen's Bridge
while the Rebels shift their positions near the crossroad.
Rebel reinforcements arrive!
Skirmishing at both bridges
Hessian grenadiers cross Queen's Bridge under
skirmish fire from the Rebels.
American reinforcements fan out as militia
reinforce the skirmishers at Queen's Bridge. 
At Queen's Bridge, skirmishers fire and fall back as the
 grenadiers are caught in a crossfire from both cannon and musket.
Casualties are heavy.
Compelled to take a morale check from all of the fire,
the Hessians break and run!
I recall the Hessians rolled a double one! Rout!
Coming up in support, a second Hessian
grenadier unit crosses Queen's Bridge.
It, too, is welcomed by a hail of cannon and musketry!
At the Old Stone Bridge, the skirmishers fire
and retire as the odds against them mount.
In all of the commotion and traffic jam at Old Stone Bridge,
 the Jaegers take friendly fire (double one) from the rear!
The jaegers are forced to retire. 
The British guard charges over the Old Stone Bridge
 but comes up short of the skirmishers.
Stopped short from reaching the skirmishers,
 the guard falls to intense fire from multiple directions. 
In an attempt to relieve pressure, Hessians charge over
 Queen's Bridge toward the skirmishers.
They, too, are caught in a murderous crossfire.
Both must make morale checks.

Double ones!  Again!
The guard in no-man's land on the Rebel side of
 Old Stone Bridge routs

The Hessian grenadiers fare no better.
They turn tail and run away!
The victorious rebels scatter the opposition
photo courtesy wargamesinthedungeon
After only a few turns, the British commander 
throws in the towel and calls off the attack.

A major American victory!

Another fantastic game packed with lots of action.  Unfortunately, Matt picked up where we last left off with handfuls of terrible morale check dice rolling.

And, the Americans actually did only need to hold on for three turns although the outcome was not the expected result.

Stay tuned for Matt’s version of the action with loads of close up photos.

Thursday, March 3, 2022

Battle of Millstone, 1777

Redcoats on the march. 
photo courtesy wargemsinthedungeon.blogspot.com

Matt and I return to our long-running AWI campaign as we fight our way through the war.  After the battles of Trenton and Princeton, combats center on small skirmish actions while both armies are in Winter Quarters.  Up this time is one of the actions from the Forage War.  For historical background and Matt's excellent battle account, please visit, 

The Forage War, 1777: Battle of Millstone 

While Matt presents his version of the action with superb battle photos, I attempt to recount my rendition of the action from the Rebel perspective and from afar.

Let's take a look at this battle from the American chroniclers.

The battlefield with the long British column
 marching toward Millstone River Bridge.
A Hessian detachment guards the bridge.
photo courtesy wargemsinthedungeon.blogspot.com
British column marches toward the bridge.
The Rebels arrive out of nowhere to challenge the column
but the Rebels fail to attack both flanks.
Gunshots ring out as contact is made
 at the rear of the column.
Threatened from beyond the mill and from the town,
 itself, the Redcoats are forced to split their command
 to deal with each threat.
The Rebels advance upon the lead elements of the column
 while the rear guard is attacked from both directions.
The baggage train stalls.
A withering opening volley from the town
sends the British back toward the bridge.
Surprised by seeing enemy both fore and aft,
 the British unit scatters.
Hoorah!
British infantry line the fence as the Rebels close in.
The firefight intensifies as the Hessian jaegers scurry
 across the Millstone Bridge to aid their comrades.
Musketry from the Americans drives off the Hessian gun. 
The Hessian jaegers arrive to thwart the Rebel attack.
photo courtesy wargemsinthedungeon.blogspot.com 
One Rebel skirmisher has seen enough and disperses.
The baggage train is making little progress.
In the firefight, first the lead British regiment breaks
taking Abercrombie away with it.
  They scamper toward the bridge pell mell.
Seeing their commander carried away in flight,
the second British regiment breaks.
First one Hessian jaeger company is destroyed 
and then the second disperses.
As the Americans close in on the column,
 not much remains to protect the train.
The lead wagon is attacked as the British rear-guard
continues suffering casualties at the hands of their pursuers.
With the route to the bridge blocked and the baggage
 train under heavy attack,
the remaining British infantry skedaddle. 
The rebels are victorious!
Well!  That was a quick and sharp little action.

The Rebels attacked quickly and gave the British a very bloody nose.  Crown forces experienced a spate of untimely and unseemly Morale and Rally tests.  So many catastrophic morale failures occurred, the likes of which are not often seen.  If it were not for bad luck, the British may have had no luck at all.

While there will be fewer places set at the British mess tent this night, the Rebels will be eating well with lamb on the menu.

Great game and great victory to the Rebels!

Tuesday, January 18, 2022

Battle of Princeton, 1777

Washington's Attack
Photo courtesy 
wargamesinthedungeon

Matt and I convened for the next in our, now, long-running AWI campaign.  The battle on the game docket for this day was the Battle of Princeton.  For a complete review of the game, historical overview, and close-up battle photos, please visit Matt's blog at, Battle of Princeton.

In a change from typical engagements, the Rebels are on the attack across open ground against the British deployed within favorable terrain.  As we have seen in numerous games before, attacking is a hazardous proposition in Rebels & Patriots.  Will it prove so today?  Let's see.

The battlefield
Photo courtesy wargamesinthedungeon
The Americans enter from one side of the table and must cross the table and secure both the bridge at the top of the table and the road entry at the barn near the bottom.  The Rebels hold about a 2-to-1 advantage.  Will this be enough to overpower the defenders?  Can the Rebels accomplish their task?

Washinton arrives
Since I could only see part of the battle on the main camera,
I switched to the dual camera view to keep an eye on my left.
British dragoons rush forward to slow the advance.
View from the camera on the left.
Dragoons rush to the fence while Washington advances.
British artillery near the bridge opens up on skirmishers.
Rebel skirmishers give fire to the dragoons
while the British gun at the bridge turns its
attention on Mercer's formed infantry in the field.
American light gun joins the skirmishers
 in bringing the dragoons under increasing fire.
Mercer's infantry is taking a pounding from artillery.
Firefight with the dragoons intensives as
Mercer's infantry on the left is decimated.
Mercer's infantry retreats broken
while the dragoons suffer the same fate.
Firefight develops all across the battlefield
as the Rebels reach the orchard.
Washington's green troops fall back from the orchard.
As the grenadiers lose nerve and fall back,
the 55th Foot arrives.
The dragoons are harassed by artillery as they retreat.
With the battle raging all around,
the dragoons fire into their own 55th Foot.
Stunned, the 55th Foot breaks and runs.
The dragoons follow. 
Bogged down at the orchard,
 Washington tries to outflank the enemy position.
As the Rebels close, they are hit with volley after volley.
The skirmishers absorb most of the fire.
As the Rebel skirmishers withdraw,
Rebel muskets and cannon return the favor.
Rebels in the orchard are assailed from multiple directions
as the grenadiers join into the fray.
British defenders are driven back, broken on the right
 while American reinforcements arrive on the left.
The long lines of American reinforcements marching up
 the road on the left are stopped dead in their tracks.
  Artillery fire is too overpowering,
and the entire column is thrown into disarray.
While progress is being made on the right, Washington sees that the bridge will never be taken.  Mercer's attack on the left never made progress.  Mercer's entire brigade was held up and undone by a lone British section of artillery and a handful of skirmishers.  The green Rebels troops were reluctant to fight, failing many an activation roll.  Without the two American gun sections on the right, Washington, himself, may not have made much progress either.

Despite some moments of fortune smiling upon the Rebels, Washington realizes that attacking is hard under the current rules of engagement.  The attack is called off.  This was a bridge too far.

Another enjoyable, remote game hosted by Matt.
Thanks, Matt!  I will get you next time.