Sunday, January 30, 2022

Is a Project EVER Finished?

Is a project ever, really finished?

I may never know.

In a post from July 2020, (see The Last Samurai?), I postulated that the Samurai Battles project was finished with the exception of, perhaps, fielding a few markers and some odds and ends.  Well, that statement was only good until I started gaming with the figures.

When GMT released a new version of Commands & Colors Samurai Battles, I noticed a number of new scenarios out on the support website.  What I also noticed was that new troop types were included in some of the scenarios.  Into the mix were added Samurai horse archers and Samurai foot archers.  Some of the alternate scenarios laid claim to these new troop types.  If I wanted to play the new scenarios with miniatures, I must return to the painting desk.

With that, mustering out from the workbench, these 24 horsemen (in four BMUs) trot out just in time to take part in the Sunday game.  While all of my figures for this collection are 15mm Peter Pig, Peter Pig makes no mounted Samurai archers.  What to do?  I discovered Museum Miniatures.  I quick order arrived last week and I set-to in fielding a few units for the game.  While larger than Peter Pig, the sculpts are gorgeous.  On the gaming table, these size differences will disappear.  

The game for today?  I turn back the calendar and refight the prequel to the Second Battle of Azukizaka fought earlier.  That battle is the First Battle of Azukizaka in 1542.  Oda vs Imagawa clans fight for domination again.

Today's table looks like this:
Yes, I need to paint Samurai foot archers too...

Thursday, January 27, 2022

Battle of Bosworth Redux

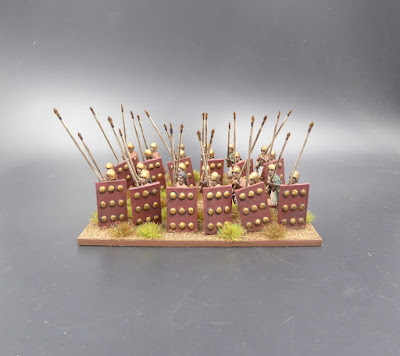
William Stanley - Kingmaker

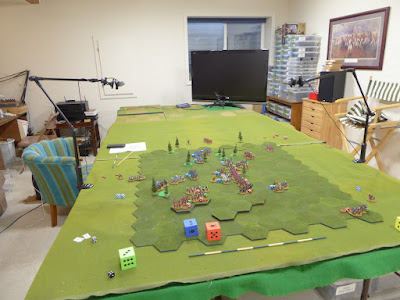
Following the Battle of Bosworth played three weeks' ago (See Battle of Bosworth), there was discussion and much interest in a refight.  On Tuesday, Richard presented an encore presentation of his Battle of Bosworth game. 

In the first game, I took the role of Henry Tudor.  I would not be reprising that role in the second battle.  For this battle, Richard (the host) appointed to me the role of Richard III.  Richard III met an untimely fate in the first battle at the hands of an ambush by a French and Welsh rabble.  I would try to avoid that demise and attempt to reverse history.

Richard (the host, not the King), offered several pre-battle decisions that Richard (the King not the host) needed to weigh.  He opted to keep Lord Strange alive as a bargaining chip and to fight dismounted with his Household MAAs in conjunction with his Battle.  Henry would have choices to make too.  Having played Henry in Game 1, I was curious to see which course the new Henry would take.
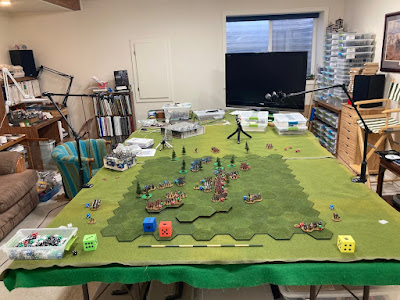
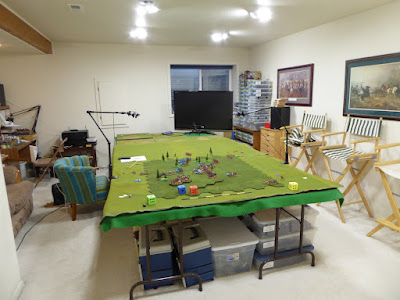
On to battle!

In the van, Norfolk marches to meet the enemy.
Henry crosses the stream to join Stanley.
Richard's army marches on to battle.
Oxford arrives as Henry pushes on.
Henry's artillery splashes across the stream.
Henry seems to be trying to escape!
Richard moves to cut him off.
Norfolk closes in on Oxford's rear.
Seeing Oxford form up,
 Henry countermarches back across the stream.
Norfolk forms up as Richard maneuvers
 to cut Henry's route to Stanley.
Oxford's archers let loose into Norfolk.
Richard's artillery finds Henry as he recrosses the stream.
Norfolk and Oxford exchange volleys of arrows. 
Henry's guns open up against Richard
 as the battle escalates.
Henry's Battle suffers heavy casualties
and is forced to withdraw.
William Stanley remains motionless.
Oxford and Norfolk collide as Stanley moves off the hill.
Henry returns to the fray.
As Norfolk and Oxford clash,
Henry's Battle again absorbs great casualties.
Richard takes artillery fire too
but the Tudor guns are not so sharp today.
The bombardment against Henry continues.
Richard and Stanley crash into one another.
The fight is on!
Melees continue as losses climb.
Henry wheels as he prepares to aid Stanley against Richard.
Will Henry arrive before battle is decided?
As Henry swings around, more artillery pounds his Battle.
Tudor counterbattery reduces
 the effectiveness of Richard's guns. 
With heavy losses, Stanley is driven back up the hill.
Richard pursues.
Henry wades into the marsh to relieve Stanley.
Henry continues taking artillery fire.
Leading from the front,
Richard is surrounded and captured.
Oh No!
Watching helplessly as Stanley has their King executed,
 Richard's troops lay down their arms, demoralized.

With Richard dead, the battle ends.  Henry will be king.

Wow!  That was an exciting contest.

While Norfolk was holding his own against Oxford, Richard was beating the stuffing out of Stanley.  Northumberland never made it into the fight.  Had it not been for two very low probability die rolls, Richard could have been King.  

History is not reversed and Richard still winds up in a car park.  

Monday, January 24, 2022

Sumerian Spearmen

Painting focus remains with fielding Sumerians.  Good progress of late as the armies grow!  Today, two, 12 figure stands of spearmen march out from the workbench.  Each stand has a front rank wielding the large shield and a second rank wearing the protective, studded cloak.  Figures are Wargames Foundry picked up during a recent sale.  Excellent figures and a pleasure to paint.  Still a lot more of these spearmen to field. 
For the Sumerian project, three battle carts, crew, and runners are beginning work at the painting desk.  It may be a while before work begins in earnest on these vehicles.  The cars have been assembled and given a coat of primer so that is a start.

Why the delay?  Well, I made a pledge to myself to push more 15mm figures into the production queue in 2022.  I lead off this pledge by moving the goal of fielding a SYW French army higher into the queue.  With infantry taking priority, let's see how many bags of figures I can turn out onto the table before I switch to something else.  

Why add French to my huge Austrian and Prussian armies?  Well, I have been following Andrè's (blog: Wackershofen Anno Domini) many scenarios and battle reports for both the War of Austrian Succession and the Wars of Polish Succession at Honours of War Forum (login required).  Many of these actions are fascinating and, of course, I need some French troops to recreate these actions.  Naturally, I may need some Spanish and Piedmontese too but first things first.        
On the gaming front, two games scheduled this week.  Both are on Tuesday's docket!

First up is a remote replay of the Battle of Bosworth seen a few weeks ago.  Rather than reprising my role as Henry Tudor, this time I switch sides and take on the role of King Richard.  Game 1 saw Richard III wounded and beaten.  Hopefully, I can avoid that same fate in the rematch.

The second game is also a replay.  In the second of the doubleheader, the Second Battle of Azukizaka is refought.  This battle is a remote rematch with Peter (Grid-based Wargaming) with sides reversed.  Peter will be commanding the Imagawa Clan while I step into the role of Nobuhide of the Oda Clan.  Should be fun.

On the Great Wargaming Survey analysis, time to draft up another study from the 2021 survey.  I lean toward taking a look at spending tendencies in 2021.  Something to work on this week after Tuesday's doubleheader is over.  

Friday, January 21, 2022

Game Room Clean-Up

The game table looks reasonably tidy, no?  Trust me, it does not always look like the photo above.  In fact, any unused portion of the gaming table seems to collect all manner of gaming detritus.  This 'stuff' piles up quickly, too, and has a tendency to overtake all empty space.  

With my focus primarily on hosting remote games of late, I have been trying to limit the playing area to no more than 6' x 8' so that the webcams can capture the entire play from behind each player's side without swiveling cameras during the game.  By utilizing only a portion of the table, the unused table space soon becomes a repository for all sorts of material including a use as a staging area.

The hex board in the foreground is from the recent Second Battle of Azukizaka and takes up only about 4'x6' footprint.  Perfect size for remote games.  Notice the webcams positioned behind and over each player's side of the table and the 48" TV used as a monitor for coordinating players and webcam views for Zoom games.  That large TV may have become a permanent fixture to the game room and game table.  If I go back to using the entire 12' of the table for larger games, I may have to consider mounting the TV on the wall. 

Where was I?  Oh, yeah.

With stuff piling up on the gaming table, the scatter on the table finally became too much and I made an effort to clean up the mess.  What began as a thought to simply tidy the table soon devolved into a repositioning of a lot of items as the effort gathered momentum.

What mess? How bad could it be?  Well, the photos below offer a hint.

Does not look so bad from this end of the table.
Upon closer inspection.
Painting station in the corner.
View from the other side of the table.
Stacks of figures lurk under the table and along the wall.
A large portion of The Lead Pile in the cabinet,
some spilling out onto the floor.
Not only did the table get a clean-up but the room saw some adjustments as well.  The small bookcase near the painting station holding mostly rulesets was moved upstairs into my office.  The stereo moved from the opposite wall to behind the painting desk. The 'hideous' barrel chair (Nancy's assessment, not mine) stayed.  This chair was bequeathed from my grandmother, perhaps 30 years ago.  Despite the upholstery, I love it. 

After.
I made no progress on tidying either the painting desk or The Lead Pile.   I will save that for another time.

Tuesday, January 18, 2022

Battle of Princeton, 1777

Washington's Attack
Photo courtesy 
wargamesinthedungeon

Matt and I convened for the next in our, now, long-running AWI campaign.  The battle on the game docket for this day was the Battle of Princeton.  For a complete review of the game, historical overview, and close-up battle photos, please visit Matt's blog at, Battle of Princeton.

In a change from typical engagements, the Rebels are on the attack across open ground against the British deployed within favorable terrain.  As we have seen in numerous games before, attacking is a hazardous proposition in Rebels & Patriots.  Will it prove so today?  Let's see.

The battlefield
Photo courtesy wargamesinthedungeon
The Americans enter from one side of the table and must cross the table and secure both the bridge at the top of the table and the road entry at the barn near the bottom.  The Rebels hold about a 2-to-1 advantage.  Will this be enough to overpower the defenders?  Can the Rebels accomplish their task?

Washinton arrives
Since I could only see part of the battle on the main camera,
I switched to the dual camera view to keep an eye on my left.
British dragoons rush forward to slow the advance.
View from the camera on the left.
Dragoons rush to the fence while Washington advances.
British artillery near the bridge opens up on skirmishers.
Rebel skirmishers give fire to the dragoons
while the British gun at the bridge turns its
attention on Mercer's formed infantry in the field.
American light gun joins the skirmishers
 in bringing the dragoons under increasing fire.
Mercer's infantry is taking a pounding from artillery.
Firefight with the dragoons intensives as
Mercer's infantry on the left is decimated.
Mercer's infantry retreats broken
while the dragoons suffer the same fate.
Firefight develops all across the battlefield
as the Rebels reach the orchard.
Washington's green troops fall back from the orchard.
As the grenadiers lose nerve and fall back,
the 55th Foot arrives.
The dragoons are harassed by artillery as they retreat.
With the battle raging all around,
the dragoons fire into their own 55th Foot.
Stunned, the 55th Foot breaks and runs.
The dragoons follow. 
Bogged down at the orchard,
 Washington tries to outflank the enemy position.
As the Rebels close, they are hit with volley after volley.
The skirmishers absorb most of the fire.
As the Rebel skirmishers withdraw,
Rebel muskets and cannon return the favor.
Rebels in the orchard are assailed from multiple directions
as the grenadiers join into the fray.
British defenders are driven back, broken on the right
 while American reinforcements arrive on the left.
The long lines of American reinforcements marching up
 the road on the left are stopped dead in their tracks.
  Artillery fire is too overpowering,
and the entire column is thrown into disarray.
While progress is being made on the right, Washington sees that the bridge will never be taken.  Mercer's attack on the left never made progress.  Mercer's entire brigade was held up and undone by a lone British section of artillery and a handful of skirmishers.  The green Rebels troops were reluctant to fight, failing many an activation roll.  Without the two American gun sections on the right, Washington, himself, may not have made much progress either.

Despite some moments of fortune smiling upon the Rebels, Washington realizes that attacking is hard under the current rules of engagement.  The attack is called off.  This was a bridge too far.

Another enjoyable, remote game hosted by Matt.
Thanks, Matt!  I will get you next time.