Friday, November 30, 2012

15mm Second Italian War of Independence Project

November finished with a flurry of work on the 1859 project.  Five Austrian battalions of infantry passed across the painting table with one battalion finishing up today.  Each battalion is 18 figures strong.  Added to the Austrian and Sardinian artillery, and the Sardinian heavy horse completed earlier this month, November ended up as an '1859' focus month.


The only other 'non-1859' figures painted in November were 36 6mm auxilia for Commands and Colors.  For the month, 170 figures were completed along with 8 guns.

Not a bad month!

While I have more 1859 figures primered and ready for the paint brush, my attention will be diverted, slightly to a new period.  A new period?  Well, yes.  After the great fun I had with Samurai Battles and Jake's 15mm figures, I picked up a few packs of Peter Pig samurai as a test.  The first unit of Ashigaru foot should be finished this weekend.   

Monday, November 26, 2012

Hex Hills For Commands and Colors

Having converted Commands and Colors: Ancients from boardgame to miniatures game, I needed a satisfactory method of terraining the game map when the battle was not fought on the typical plain.  Since my game map has 2 inch hexes, I used a combination of 50mm hex and 40mm round wooden bases from Litko from which to construct the hills. 

Figure 1 shows the stages of creating one hill for my 6mm ancients game board.

 This is a very simple activity and produces a dozen or more hills in little time.  The steps in the process are:
  1. Gather one 40mm round and one 50mm hex.
  2. Using wood glue, affix 40mm round to center of 50mm hex.
  3. With dry wall spackle, cover the surface to eliminate abrupt edges and to produce a more rounded hill.  Let dry.
  4. Paint. 
  5. Flock - flocking used for the hill matches the flocking used for the figure bases.
  6. Spray clear matt to reduce any gloss and help affix flocking to terrain piece. 

The finished product is seen below in the set up for the Lake Trasimene scenario.

To my eye, these hills are both aesthetic without overpowering the game board and add a functional, yet minimalist approach to enhancing the game.  The water feature is a JR Miniatures' river section.    

Sunday, November 25, 2012

French & Indian War Action

Only the initial two moves of the Thanksgiving Day game were completed before we moved upstairs for hors d'oeuvres, final dinner preparations, and dinner.  After meal discussions meant we never made it back downstairs to complete the game.  

While the French were content to hold their initial positions, the British begin their advance towards the stream.  On the British left, one coy of the 1st Royals exit the woods and form up at the edge of the clearing.  Advancing through the woods on the right, the militia struggle to keep formation and progress is slow.  Wisely, the frontiersmen were pushed out ahead of the militia main body.
La Reine Rgt in line


La Reine Grenadiers in reserve

1st Royal Rgt of foot

Colonial Militia

Royals begin advance
To counter the British advance, the French move one company of La Reine across the stream and prepare for the attack while the coureur des bois attempt to outflank the British light infantry on the British left.  In the center and right, native warbands take up positions in the brush along the stream.
Warband lurking in woods
As the frontiersmen push towards the stream, a war whoop shatters the tranquil advance and one warband emerges from the brush to contact the frontiersmen.  Fortunately, the frontiersmen spot the attackers before the warband closes.  Unfortunately, their musket fire is ineffective and fails to stop the attackers.  Both combatants take casualties in the initial clash but the woodland cover and loose formations result in a close range skirmish with no decisive outcome.
Irregulars skirmish
In the center, rangers are pushed to the stream bank to cover both the advancing militia and the right of the Royals.
Rangers advance to cover center
With the British advance continuing to plod towards the French positions, British light infantry must focus on the outflanking maneuver that the coureur des bois are attempting to pull off on the British extreme left.  Successfully spotting the French trappers, the light infantry turn to engage.

Outflanking attempt by CdB
Turn 2 ends with the British bearing down on the French positions while skirmishing erupts on both flanks.  As the militia remain in the woods on the approach towards the stream, it will be important for the British to maintain a buffer between the natives and the vulnerable militia. To ensure both the safety of the militia and the Royals' right, the British commander joins the rangers to emphasize the importance of their role in the upcoming clash.

 The game remains set up on the table and will continue on 08 DEC 2012.  
Dispositions end of Turn 2
      

Wednesday, November 21, 2012

Thanksgiving Day Game Preparations

Bookending Thanksgiving dinner will be a small French & Indian War action using 25mm figures, half of my 6' x 12' table, and le Petite Guerre rules.  Le Petite Guerre (LPG) is geared towards small scale actions where maneuver units represent company-sized formations with each figure representing about 5 men.  Each unit has a Combat Value (CV) that can fluctuate throughout the game with a propensity for dropping rather than climbing.  No figures are removed until a unit's CV drops to zero at which time the unit is removed from play.  Ideas from many rules have been melded to produce these game mechanisms.

A rendering (converting from pdf to png lost a bit of clarity) of the QRS is illustrated below.  The QRS fits onto one side of an 8.5 x 11 sheet of paper and will be folded in half for reference during play.

Le Petite Guerre QRS
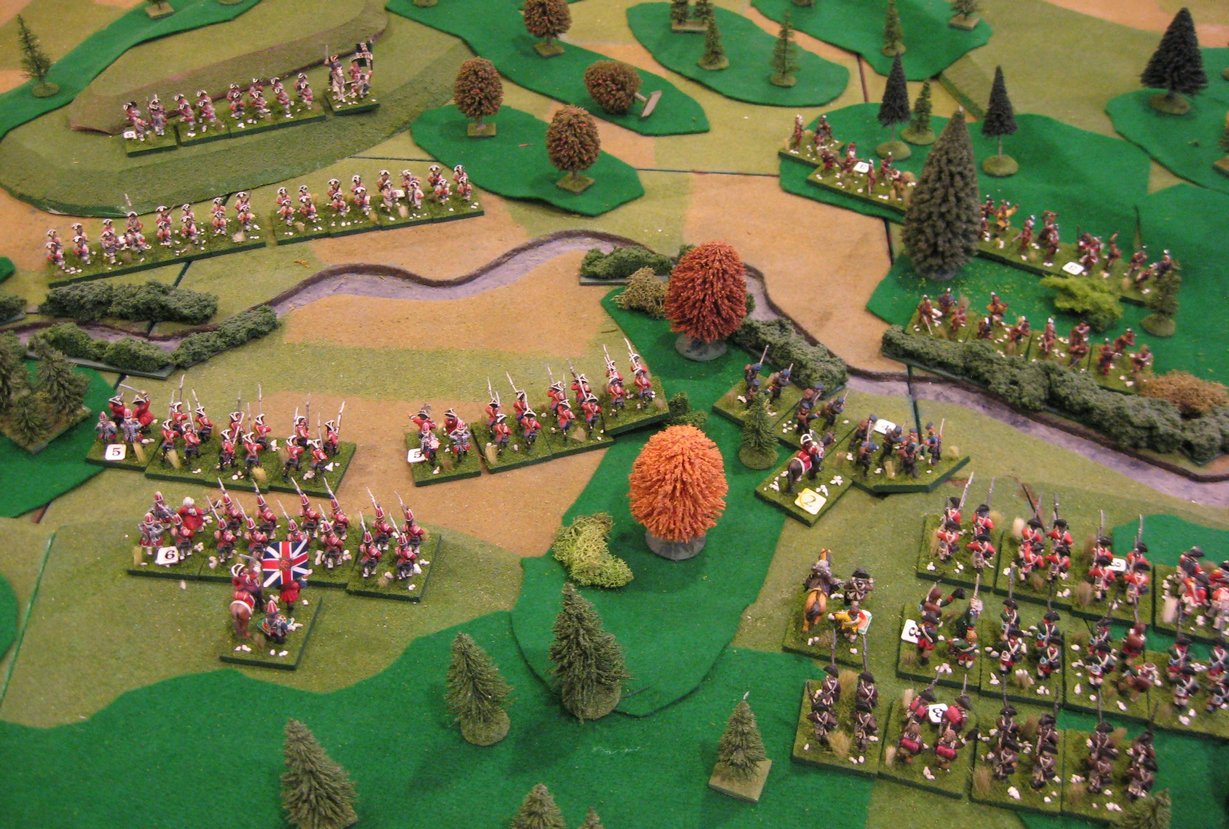
The setup for this game features a small clearing bifurcated by a stream with woods covering most of the battlefield.

Game Map 1
The French and their allies will be defending the stream while the British attempt to push the French off of the board.  British forces will be attacking from right to left (Game Map 1).

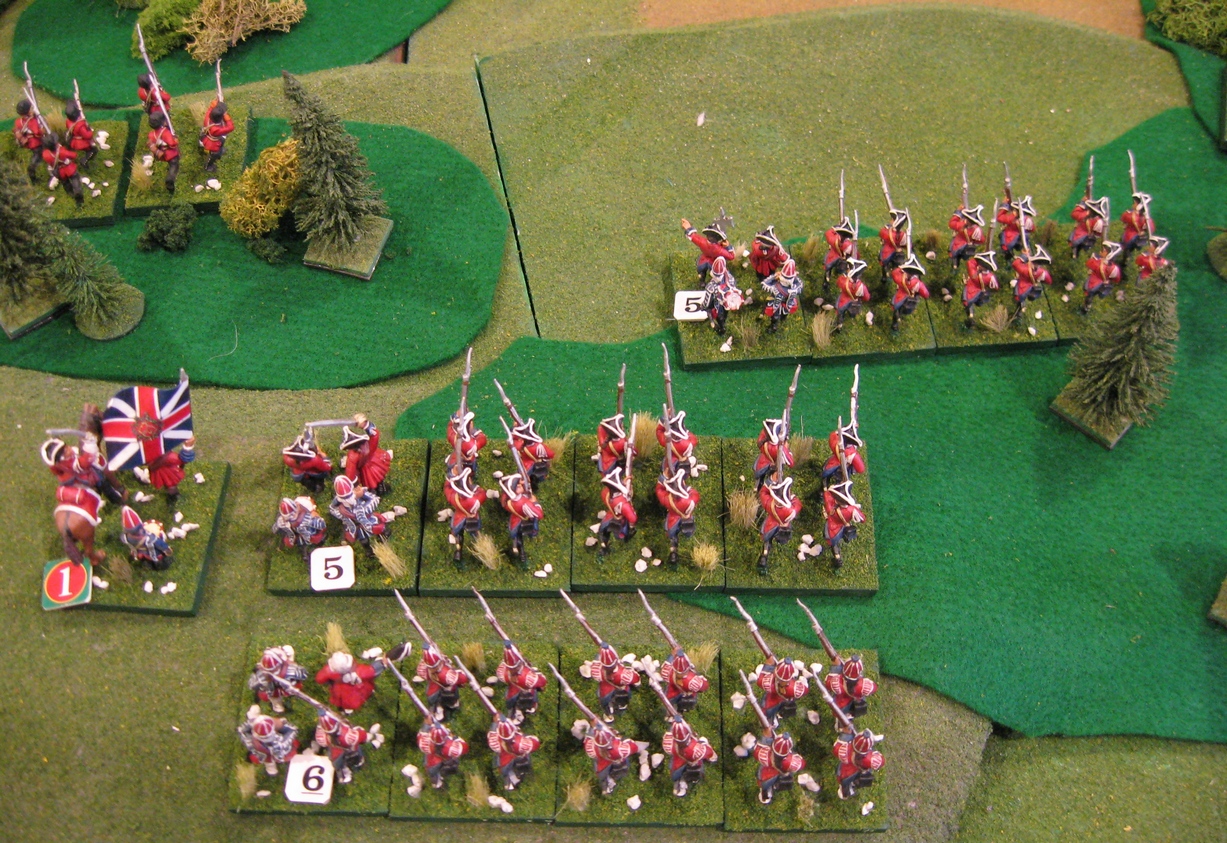
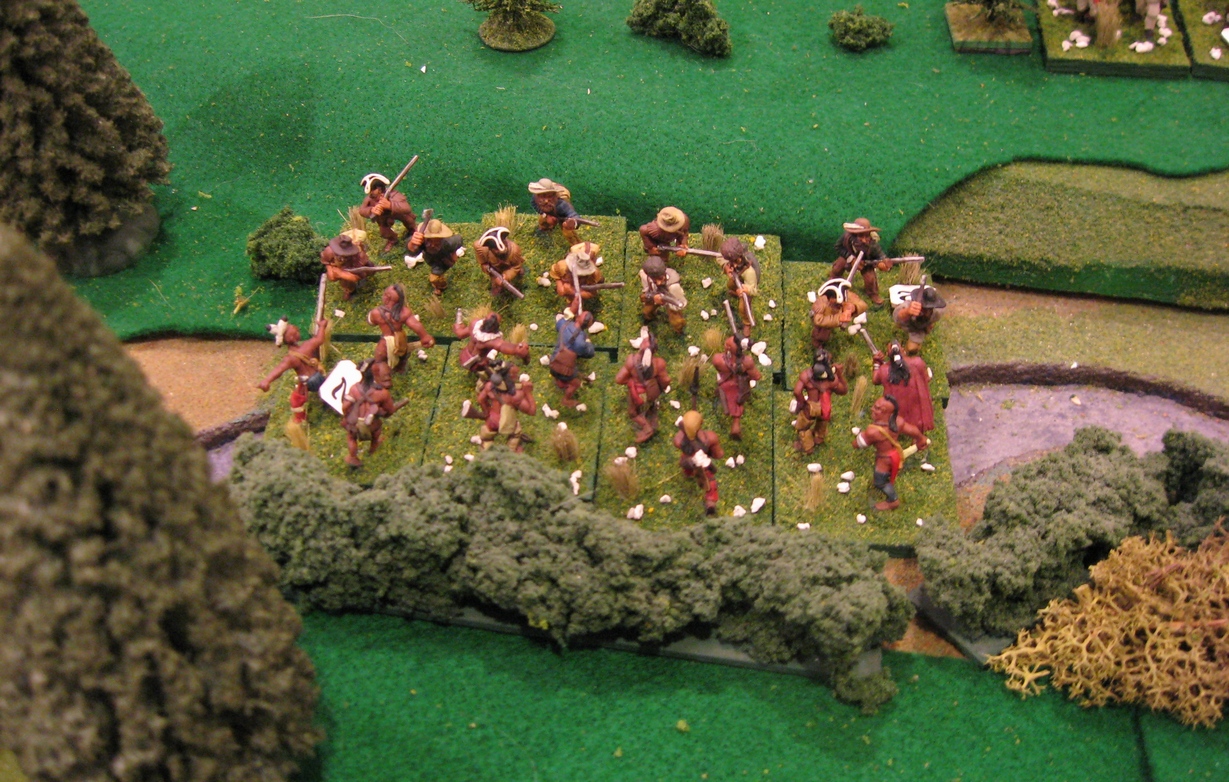
British forces include three companies of regular foot (two hat coys and one grenadier coy), three companies of colonial militia, one company of frontiersmen, one British light infantry company, and one company of rangers.  The French will be led by three companies of foot (two hat coys and one grenadier coys), one company of coureur des bois  and four native warbands.  The British will have the advantage of command with three officers present while the French only field one. 

Initial setup will be as shown in Game Map 2.
Game Map 2
In LPG, regulars will be tough to beat by irregulars in the open while in the woods, the irregulars should have the upper hand.  With terrain dominated by woods, surprise is always a real possibility.  Pity the regular officer who doesn't have irregulars out protecting (or at least warning) of potential dangers.  If the natives are allowed to eliminate a unit in combat then morale for the British should disintegrate or at least halt thoughts of any offensive actions.   

With Kevin ever the Francofile, perhaps he should command the French with Ben taking overall command of the British, n'est-ce pas?  

Monday, November 19, 2012

Commands & Colors: Samurai Battles

Jake made the trip to Spokane on Saturday and brought with him his Samurai Battles setup in 15mm.  Saturday's outing would be my first glimpse of Zvezda's Samurai Battles.  For an overview of the game and game mechanisms, visit boardgamegeek (BGG) at www.boardgamegeek.com/boardgame/122913/samurai-battles.  On BGG can be found rules, errata, and other game related goodies.

Samurai Battles can also be found as a VASSAL module.  The VASSAL module requires the latest VASSAL engine beta version (3.2.0-beta4).  A sample screenshot from the VASSAL module for scenario, First Samurai Skirmish, is shown below.
VASSAL Screenshot
Saturday's games were played on a Hotz mat with 4 inch hexes and custom terrain hexes built by Jake.  Jake also provided all of the figures used with 15mm figures based on 2 inch by 4 inch bases.  Each stand has anywhere from 8 to 21 figures.  Casualties are marked on each stand with units taking four hits before removal from the table.  

The armies Jake brought with him were a mix of Minifig, Two Dragon, and perhaps others.  Although never a great fan of Minifigs, I must confess that the Minifig figures were outstanding and delicately sculpted and looked great en masse on the stand.

As an introduction for me, we gamed the First Samurai Skirmish scenario.  The opposing forces were initially arrayed as shown in (1).  As the game began, Jake pounded the Red center with missile fire prompting the Yellow line to retrograde out of range.   
(1) Initial dispositions

With both armies jockeying for position in the center, and constant harassment from Yellow missile fire, Red launched a flanking maneuver with the Samurai horse on the Yellow right flank.  In the clash, Yellow mounted Samurai were eliminated and then the Red Samurai horse were, in turn, destroyed as Yellow brought up his Samurai foot and played a Dragon card limiting the Red horse to two dice.  Nasty ploy!  The game ended with a Red victory.  This would be my only victory from the five games played. 
     
(2) Red Samurai horse counterattack
 Assorted game photos from the other four games are included with the last photo showing that Jake winning the Takeda Pincer attack as Red 6-5.


Samurai Battles is really quite fun, adds much depth onto an already enjoyable Commands and Colors system, and provides a game with much nail-biting tension.  The addition of the Honor tokens and the Dragon cards makes for a more unpredictable game.  In fact, in all of the five games played on Saturday, I went from euphoria to despair and back multiple times.  To paraphrase Yogi Berra, the game is never over until it is over.  The variety of colorful uniforms and banners makes for a visually striking game.  I'm tempted to field a Japanese army of my own with the proviso that Jake would like focus not be lost on the 1859 Project. 

My hope is to squeeze Samurai Battles into my regular gaming rotation. 

Thursday, November 15, 2012

15mm 1859 Project Update

Good progress made on the 1859 project with both Austrian and Sardinian artillery, and Sardinian heavy cavalry being sent off the painting table.

First up, are six Austrian guns with crew.  Figures are Old Glory.  The headgear on the Old Glory artilleryman is different from both the Mirliton Austrian artillery uniform and the uniform information I have on the Austrian artillerymen in 1859.  I'm wondering if the Old Glory crew are wearing the 1866 style uniform?  Since the year (either 1859 or 1866) is unspecified on the Old Glory packaging, I'll claim these artillerymen are in the later 1866 style.   

Added to the Italians are two guns and crew

and twelve heavy cavalry from the Piedmonte Reale Regiment.

The Italian guns/crew and cavalry are Mirliton.  For horse and guns, I prefer the Mirliton figures over Old Glory but the Old Glory Italian infantry are quite nice and get the nod over Mirliton.  Now, I have only purchased the Mirliton advancing pose so my judgment may be premature.
  
Continuing the 1859 theme, two battalions (36 figures) of Old Glory Austrians are on the painting table.  These two battalions will muster out as IR59/3 and IR59/Grenadiers. The Old Glory Austrians range from good-to-excellent but some poses suffer from either an elongated neck or are prone to losing their heads.  Austrian officers are particularly susceptible to the latter affliction.

With refighting the battle of San Martino as a first goal for this project, time to take stock of my progress.  At San Martino, the Sardinians fielded, primarily, two divisions.  With the OB for the 2nd Division complete, one more division equivalent-sized force needs to be fielded.  Completing three more infantry regiments should be sufficient to field the complete Sardinian contingent.  Notice that I should have spent more thought on planning based on the San Martino OB before I began fielding painted units.  At San Martino, the 3rd and 5th divisions participated in the battle while I began by fielding the 2nd Division.

For the Austrians, I more closely followed the OB by concentrating on Benedek's 8th Corps.  The only remaining infantry units to field are three battalions from the 39th IR, two battalions of the 59th IR, and four, assorted 4th battalions.  Some of the Austrian regiments fielded less than their four battalions at the battle so I may have enough Austrians for the battle now.   

Each block represents either one battery, one squadron, or one battalion.      

1st Piedmontese DIV


4th Piedmontese DIV


1st BDE (Grantieri di Sardegna)


1st BDE (Regina)


1st Grenadier RGT


9th Line RGT


2nd Grenadier RGT


10th Line RGT


3rd Bersaglieri BN


7th Bersaglieri BN


2nd BDE (Savoria)


2nd BDE (Savona)


1st Line RGT


15th Line RGT


2nd Line RGT


16th Line RGT


4th Bersaglieri BN


6th Bersaglieri BN


8 lb Batteries


8 lb Batteries


16 lb Battery


Novara Light Horse


Alessandria Light Horse


2nd Piedmontese DIV


5th Piedmontese DIV


1st BDE (Piedmonte)


1st BDE (Casale)


3rd Line RGT


11th Line RGT


4th Line RGT


12th Line RGT


9th Bersaglieri BN


8th Bersaglieri BN


2nd BDE (Aosta)


2nd BDE (Acqui)


5th Line RGT


17th Line RGT


6th Line RGT


18th Line RGT


1st Bersaglieri BN


5th Bersaglieri BN


8 lb Batteries


8 lb Batteries


16 lb Battery


16 lb Battery


Aosta Light Horse


Saluzzo Light Horse


3rd Piedmontese DIV


Cavalry DIV


1st BDE (Cuneo)


1st BDE


7th Line RGT


Nizza Heavy Horse RGT


8th Line RGT


Savoia Heavy Horse RGT


10th Bersaglieri BN


2nd BDE


2nd BDE (Pinerolo)


Piedmonte Reale Hv Horse


13th Line RGT


Genova Horse RGT


14th Line RGT


2nd Bersaglieri BN


8 lb Horse Batteries


8 lb Batteries


Reserve Artillery


16 lb Battery


16 lb Batteries


Monferrato Light Horse


15cm Howitzer Battery


Painted


Not Painted


8th Corps: Benedek


1st DIV


2nd DIV


1st BDE


1st BDE


2nd BN, Kaiser Jager RGT


5th BN, Kaiser Jager RGT


7th Line IR


17th Line IR


6 lb Foot Battery


6 lb Foot Battery


2nd BDE


2nd BDE


2nd BN, 4th Grenz RGT


3rd Jager BN


11th Line IR


39th Line IR


6 lb Horse Battery


6 lb Horse Battery


Reserve Artillery


3rd BDE


1st Kaiser Hussar RGT


9th Jager BN


59th Line IR


Miscellaneous


6 lb Horse Battery


3rd Kaiser FJ Dragoon RGT


12th Haller Hussar RGT


4th BDE


1st Stadion Dragoon RGT


4th BN 9th IR


Artillery


4th BN 27th IR


37th Line RGT


4th BN 18th IR


4th BN 19th IR


6 lb Horse Battery