Thursday, December 30, 2021

Lord Thomas Stanley

Inspired by a number of remote War of the Roses games, one new project for 2021 was building a War of the Roses collection in 28mm using Perry Miniatures' plastic figures.  My original goal at the start of the year was to field six Battles so that I had enough units to fight many of the standard, three Battles per side, engagements.  Each of my Battles would be composed of three lines of bow, bill, and MAA for a total unit strength of 52 figures.  Could I produce six such units in 2021?  I did not know but that was my goal. 
Off the painting desk today is Battle #6 in the project.  I made the goal with one day to spare.  That was a close one!   Like the five Battles before, figures are Perry Miniatures' 28mm plastics.  I had not worked with plastic figures since my youthful days of Airfix 1/72 or HO scale figures.  Multi-part plastics?  I had never worked with such.  I found a really enjoyed putting the figures together and found the assembly somewhat relaxing.

Battle #6 is Lord Thomas Stanley's Battle.  Back in January, the project began with fielding William Stanley's Battle.  In December, the project ends with another Stanley.

Is the project finished?  No.  A few boxes remain with probably enough figures to field at least one more three-line Battle and a couple of extra MAA battle lines.  With enough units present and under arms to fight many of the battles, there is no hurry to expand.

Whew!  Made it just under the wire.  Looking forward to seeing this collection in action on the table.

Monday, December 27, 2021

Lugal in Battle Cart

While Sumerian spearmen are seeing frequent rotation at the painting desk (many of those will hop into the photo booth in due time), today the Sumerians receive leadership on the battlefield.
Mustering off the painting desk is a Lugal in battle cart protected by three skirmishers to keep the leader safe from ambush.  Figures are 28mm Newline Designs.  A second, similar Lugal stand is in work.
Also on the painting desk is the sixth Battle for my 2021 WotR project.  While the clock is ticking down to year-end, Thomas Stanley's Battle has reached the basing stage.  With four more days remaining in 2021, fielding Battle #6 is almost a sure thing even with a houseful of guests and a lot of competition for my time as Chief Cook and Bottle Washer.

Once Thomas Stanley is finished, I may gather all six Battles for a parade.

With 2022 only a handful of days away, I am not sure time remains to push one more unit through the painting queue before time expires on 2021.  Even if not, on the painting front more figures passed over the workbench than expected.  The annual Painting Log review should be interesting.    

Friday, December 24, 2021

Maida Six, the Hard Way

After Sunday's Maida fight against Matt (see: Rock of Maida), I returned units to their starting positions and prepared to host a refight.

The second battle was fought on Tuesday with the remote UK group.  Hard to believe that I have been participating in remote games for more than one year now with these fine fellows.

At game time, I had six players online.  The quick of hand grabbed the three British commanders.  Graham volunteered to take a French commander.  The remaining two French slots were filled by default.

The players and commands were:

British

  • Ian - Major General Stuart, Acland's 2nd Brigade
  • Will - Cole's 1st Brigade, Oswald's 3rd Brigade, 20th Foot
  • Chris - Kempt's Advance Guard
French
  • Graham - General de Division Reynier, Peyri's Brigade 
  • Steve - Compere'e Brigade
  • Richard - Digonet's Brigade
With players assigned, the battle could begin.
Table ready for action.
First, a word about this battle report.  Unlike many of the games I host, I try to take game photos at regular intervals and at key moments of battle.  Umpiring six players in this game, I found myself caught up in the action with moving troops and adjudicating results, nonstop.  I am afraid that I was so busy in game coordination that I did not capture as many photos as usual at the critical time.  With what I have, I try to recreate a coherent narrative.  For another battle perspective, visit Graham's report at I might have Maida mistake.  

Anyway, off we go!

1st Legere investigates the Lamato River scrub
As Reynier orders a general advance, Compere's 1st Legere uncover the Corsican Rangers lurking in the scrub along the Lamato River.  Those enemy light troops must be dealt with to secure the French left before the attack goes in against Kempt's Combined Light Infantry Battalion.
Kempt's Combined Light Infantry Battalion
As the 1/1 Legere wheels left to address the threat in the scrub, the 42nd Ligne advances toward Kempt.  Within moments, artillery fire from a four-pound section crashes into the 2/42 sending it reeling back to its starting line.  Not an encouraging omen to the start of the French attack.
2/42 heads toward the rear
 while 1/1 Legere prepares to attack!
Players seemingly deep in thought as the battle begins
(or simply bored?)
In the center, Peyri's Brigade of foreigners steps off toward the British line.  On the right, Digonet repositions the 23rd Legere as his artillery opens up.  All of Reynier's artillery (four guns) and cavalry are placed within Digonet's Brigade out on the French right.  Does Reynier plan to hammer the right to turn the British left?
Digonet redeploys the 23rd Legere before his advance. 
Digonet's artillery and cavalry in front line
Not content to allow the battle to come to him, Cole on the British left advances 1/27th Foot and the Combined Grenadiers.  His two guns limber up and move to keep pace with the advance.  With his flank secured by the 20th Foot firmly ensconced in the scrub, Cole marches boldly forward.  Cole expects Acland to move up as well to cover his right linking his own brigade in a continuous line to Kempt positioned against the Lamato.  Nervous of the cavalry facing him, the 1/27th forms into square. 
Cole takes the fight to the enemy.
Back on the French left, with Compere leading the way, 1/1 Legere gives a volley and then storms across the Lamato River crashing into the Corsicans.  The Corsicans do not give ground easily.  What was planned to bring about a quick brushing aside of the rangers devolves into a protracted firefight among the scrub along the Lamato.  Casualties mount.
1/1/ Legere storms across the Lamato
Digonet attacks!  Sending 2/23rd Legere in against the 20th Foot who were content holding the scrub line on the British left, the two formations collide.  To its left, 1/23rd Legere attacks Cole's guns. Taking the guns but at great cost, the 1/23rd falls back to regroup.
Digonet attacks!
With the 1/27th Foot in square, Digonet's four guns open up and pound the densely packed infantrymen until they can take no more.  The 1/27th breaks!  Seeing the 1/27th break for the rear and passing through the ranks of the Combined Grenadiers, the 9th Chasseurs charge.  Having little regard for forming square, the grenadiers let loose a volley into the hard-charging cavalry.  Undaunted, the chasseurs press on.  In the chaos, of intermixed combat, losses are high.  Still, the grenadiers remain firm and drive off the chasseurs.   
French guns pound the square.
Cole's grenadiers hang on
after repulsing a cavalry charge.
1/27 the driven from scrub
while Digonet sees success on the right.
In the center, Acland moves up to plug the gap between Kempt and Cole.  Peyri marches on toward the British line with the Swiss and one Polish battalion in line supported by the second Pole in column.
Peyri marches up in the center
Acland moves up to plug the gap.
Back on the French left, the 1/1 Legere evicts the Corsicans from the scrub along the Lamato.  The Corsicans have seen enough.  They retire quickly toward safety.  Having recovered from its earlier, unplanned retirement, 2/42 returns to battle.  With its sister battalion drawn up on its left, the 42nd advances under heavy artillery fire. 
Compere advances
Going in against Kempt's light infantry, the 1/42nd takes horrific casualties.  The 2/42 is faring not much better.  The British gunners keep up a steady fire as chunks are taken out of the 2/42nd.  Can the 42nd reach the British lines?  No!  The 2/42nd breaks, carrying the already wavering 1/42nd along with it.  The regiment is in flight to the rear!
The 42nd takes a pounding in the advance.
Seeing the 42nd turn tail and run after enduring sustained volleys, Kempt orders the lights to give chase.  They obey and off they go in pursuit.  The only obstacle in their way is the 2/1st Legere.
42nd runs while the Lights give chase.
Returning to the action in the center, Peyri continues his attack with his foreign troops.  Of dubious quality, the Poles advance upon Acland's equally suspect troops.  Peyri's Swiss take a stab at capturing the second British gun section of the day but are repulsed with heavy, very heavy losses.  The Swiss, while gallant, are likely done for the day.  Reynier joins the Swiss to rally them.     
Peyri attacks!
Shifting back to the left, the 1st Legere, having dispatched the Corsicans, turn attention to Kempt's Lights.  With 1/1st Legere in its rear and the 2/1st Legere to its front, can Kempt extricate himself from this vise?
Kempt caught in a vise?
We will never know.  With the hour getting late, we concluded the game to the agreement of all.  The French players figured their attack had just about run out of steam.  While opportunities may still present themselves, the French conceded that they were likely beaten.

Losses were lighter than in the previous Maida battle.  At the end of battle, each army had only lost two units.  Many of the French units remaining on table, though, were in tatters.  Those wavering units, to see action, would require time to regroup. 
Battle lines at end of the day.
Coordinating a large, remote game with six players, all having active and meaningful commands can be a challenge.  Certainly, well worth the effort and I enjoyed the game immensely.

I made it with six players, the hard way, and loved every minute of it.  Perhaps, I captured more photos than I thought?

On that note, I hope readers enjoy this battle report and I wish everyone Happy Holidays and a
Merry Christmas!

Monday, December 20, 2021

The Rock of Maida

Kempt: The Rock of Maida
While the historical Battle of Maida may have been decided in fifteen minutes, Sunday's recreation of the battle witnessed a titanic struggle for supremacy on the Calabrian plain.  When the smoke cleared, the action saw both armies wrecked from their efforts.  As in the historical fight, elements of the 1st Legere had been put to flight and General Compere lay dying on the battlefield. 

In a surprise twist, Matt, my longtime British adversary in our AWI campaigning, opted to lead the French on the attack.

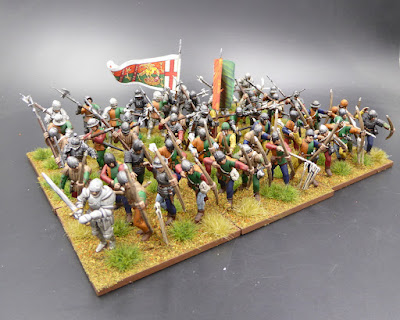
As a reminder, the battlefield is contained within a 6' x 6' playing area.  The battlefield looks like the photo below at the start of battle.  Stuart's British are situated at the top of the photo and Reynier's French positioned at the bottom.
Initial Dispositions

Before plunging into the battle account, first, a brief overview of the combatants.

British army under the command of Major General John Stuart.
Stuart fields an army of infantry and guns with no cavalry.  The flank companies from the foot regiments were stripped and consolidated into two combined elite battalions.  The light companies were combined into one battalion under Kempt on the British right.  Also in Kempt's brigade were the Royal Corsican Rangers supported by additional flank companies deployed in the scrub along the Lamato River.

The grenadier companies were consolidated into one battalion under Cole on the British left.  This meant that all of the foot regiments would be without their elite companies on this day.

In the center, Stuart placed Acland's brigade.  Acland commanded the 2/78 and 1/81, both green.  Oswald was placed behind these three brigades in reserve.  The British battle line was deployed in echelon such that Kempt's Brigade was closer to the enemy than was Cole.  If the French attacked across a broad front, the first blows would naturally fall upon Kempt.  Both flanks were protected by scrub to hinder any attempts at outflanking the position.

French army under General de Division Jean Reynier.
Reynier fielded a combined arms force of all three branches but all artillery and cavalry were on the right under the command of Digonet.  Digonet's command also contained two battalions of the 23rd Legere.  Veteran troops having seen action in northern Italy.

The French left was commanded by General Compere.  In his brigade were two battalions of the veteran 1st Legere and two battalions of the 42nd Ligne.  Both regiments saw action in the Revolutionary Wars with the 1st Legere present at Marengo.

In the center, Reynier placed Peyri's brigade of foreign troops.  Present were two battalions of Polish-Italian Legion and one battalion of Swiss.  The Poles were unreliable, reportedly having been recruited from former Austrian prisoners of war. 

Reynier wants to drive the British back into the sea while Stuart wants to brush aside these interlopers so that he can support the Calabrian insurrection.

Enough of background, on to battle!
The British wait
While Stuart is content to await the French attack,
Compere steps off on the French left.  
Kempt readies the Lights.
The French advance across the plain.
Acland and Cole move up to support Kempt.
Compere sends one battalion of the 1st Legere into the
scrub to eject the Corsican Rangers.
Compere, with three battalions,
is within striking distance of Kempt.
Skirmishing at the Lamato intensifies as the
legere contact the Corsicans.
Choosing to remain in attack column rather than deploy
 into line, Compere attacks!
Kempt's Lights give a good volley but the French push on.
The 42nd cannot reach Kempt in time to join in the assault.
In the heavy firefight, Compere goes down. 
 Dead on the field.
British guns are telling on the 42nd.
Kempt has his hands full!
Peyri advances in the center with the Swiss
flanked by the Poles.
Acland moves up to support Kempt.
Casualties mount in the fight
 between 1st Legere and the Lights.
2/1 Legere waivers and then breaks.
Kempt is not out of danger as the 42nd closes in.
Over on the French right, 
Digonet orders 2/23 Legere to clear
the scrub of the 20th Foot so that the 9th Chasseurs
 can advance unmolested.
1/23 Legere bears down upon Cole's 1/27th Foot.
Again, the French attack in column screened by a swarm of skirmishers.
In the center, the Poles are taking fire from two guns.
They begin to waiver but the Swiss press on.
On the French left, Kempt repulses the attack of the 42nd.
Before the Swiss attack,
the Poles give the British a volley.
The 2/78th breaks and runs!
Its rout is stopped by the 1/81st but for how long?
Furious firefight continues in the scrub on the French right
while the chasseurs look for an opening.
The 20th Foot is driven from the scrub
falling back in search of safety.
While the Swiss press on and drive the British back,
The French center is breaking apart.
One Polish battalion has had enough and breaks for the rear.
The 1/23 Legere reels back from artillery fire.

Kempt, the Rock of Maida, remains.
The 42nd is not finished. 
 Back both battalions go in against Kempt.
Although suffering mightily,
 the 42nd's second effort scatters Kempt's Lights.
For the 20th, there is no safe harbor.
The chasseurs catch them as it retires.
They are cut down to a man.
With the British flanks collapsing and the French center in tatters, neither combatant maintains sufficient reserve to continue the fight.  After about three hours of game time, Matt and I conclude the Battle of Maida a hard-fought draw.

The Butcher's Bill is telling.  Each participant lost in excessive of 40% of its army in this sharp conflict. 
British casualties
French casualties
The game gives me much to think about especially in how forces were deployed and fought.  I came away with some useful insights into the battle.  Before I have time to reflect, the battle must be reset for Tuesday's game.

Thank you, Matt!  That was good fun.