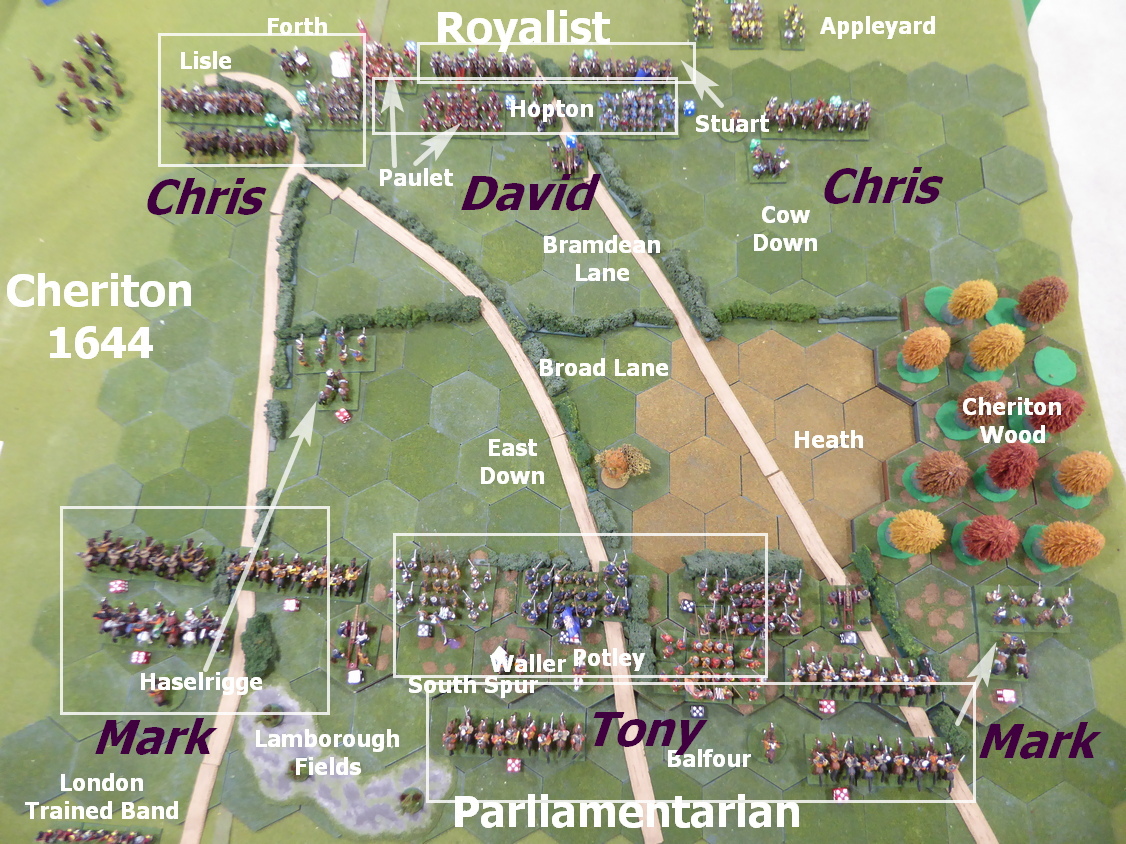
Last week witnessed the fifth replaying of the 1644 Battle of Cheriton. Game #5 saw an encore performance by most of Game #1's participants. The first game saw Mark, Chris, and the Two Daves take to the field. In the last game, Mark, Chris, and Dave B were joined by Tony to complete the foursome. The three players in the first game all swapped allegiances for the game giving each a view of the battle from both sides of the table. Army dispositions and player commands are shown on the following game map. |
| Initial army and player dispositions. |
So far in this series, Waller has seen three victories, one draw, and no losses. The single draw was awarded as time ran out. By general consensus a draw seemed reasonable. Could Hopton break this chain of Parliamentarian victories? |
| Haselrigge's Cavalry Wing forms up. |
To review the action from prior games, please see the links below,
With four games already chronicled in the Battle Log, a reasonable body of work is available as a baseline for assessing game flow. All of these previous actions saw the battle develop in a predictable manner. Well, developing in a predictable manner after we witnessed how Game #1 played out. By the way, it was Game #1 that saw the single draw. Still, that first battle developed similarly to all of the following battles.
Whereas Waller begins holding the high ground on the South Spur, in all five games, Waller orders Potley's infantry down from the heights to take the fight to Hopton. All recognized the importance of making a push toward the hedge-lined lane bisecting the battlefield while commanded shot units begin to contest Cheriton Woods.
 |
| Battle lines as the action begins. |
 |
| Both armies advance. |
 |
| Parliamentarian Center enters the "arena". |
 |
| Royalist foot push toward the hedge as well. |
 |
| View from behind Royalist Left. |
While both infantry centers make a beeline to reach the protective barrier in the center of the battlefield, Waller orders Balfour's Right Cavalry Wing to sweep around behind Roundhead lines in order to support Haselrigge's cavalry on the Left. Confined by Cheriton Woods on the right, infantry to the left, and an open yet rough heath to the front, all of the Roundhead players chose to bring Balfour over to the Left in support of Haselrigge. Now, this redeployment takes time but all make the same choice.  |
| Balfour redeploys... |


A crushing victory for Waller and bar the draw pretty much a clean sweep. Hopton does have a hard task and so it proved over the five games. It's been an entertaining series and always nice to see ECW on the table!
ReplyDeleteYes, pretty much a clean sweep. Somewhat surprising since both armies are roughly equivalent. Still, Hopton has had a very tough time at Cheriton.
DeleteA very interesting battle that I’d like to play again someday. I think the Royalists have to deal with the Parliamentary cavalry on that open flank (by matching any Roundhead cavalry gathering with their own and even shifting some infantry into better defensive positions on that flank), before going for the southern ridge. There’s no time clock to work against, so a head long forward dash by the Royalist foot is not necessary in my view.
ReplyDeleteMark, you make interesting assessments of Hopton's options. I agree with you. We will bring Cheriton to the table again to test your theories but first, other battles await. I am surprised Hopton has not done better.
DeleteWell done Jon your stamina is amazing, running the same battle for so many remote games 👍
ReplyDeleteRegular cycling helps maintain my stamina although I may be slowing down.
DeleteYep tough for Hopton. I suspect the best he can hope for is to fight a defensive battle and aim for a draw.
ReplyDeleteNeil
You may be right but then we may have no battle if Waller stands pat.
DeleteI've enjoyed all 5 games, aside from rooting for the Parliamentarians as always! It does seem a tough ask for Hopton, but as Mark has commented above, he does have a few options, but needs to neutralise the Roundhead Cavalry for sure. Loads of great photos that I really enjoyed viewing:)!
ReplyDeleteSteve! Happy to see that you enjoyed all five of the Cheriton battles. Blog interest tends to be high for Game #1 and then tends to drift lower with each successive game. Law of diminishing marginal utility in action, I suppose.
DeleteMark is a cunning opponent and a careful thinker on the battlefield. If he has ideas on how to play Hopton better, then I need to take him up on that. figuring out how not to lose the Royalist Right Wing is key.
A crushing win for the Parlaimentarians. Cheriton is a tough ask for the Royalists
ReplyDeleteCorrect on both counts!
DeleteAn emphatic victory to seal the run of games. Clear narratives and informative photos carrying the reader along.
ReplyDeleteYes, indeed! Game #5 saw little doubt as to the winner in this battle. Thanks for your encouraging words on the BatRep!
DeleteGreat battle report again sir!
ReplyDeleteThanks, Michal!
DeleteNo win for the Royalists then. It does seem like a very tough assignment for them, and playing the series of games and swapping opponents around really underlines that.
ReplyDeleteNo outright win for the Royalists. JBM reckons Hopton has a viable path to victory. We will return to Cheriton some day to test his theory.
DeleteWhat a great looking set-up! I gather (from memory) that Hopkins lost control of his army at Cheriton, that he would have preferred to wait on Waller, or else seek battle elsewhere.
ReplyDeleteCheers,
Ion
Thanks! Hopton failed to keep close rein on the situation and the battle deteriorated from there. Our refights tread much the same ground. Very insightful.
DeleteA fascinating series of games. Surprised Hopton did not get one victory in all the games.
ReplyDeleteThanks, Peter! Perhaps Hopton would have faired better if I had not played Hopton twice!
DeleteI think me being the only ‘Waller’ to get a draw was some achievement in the circumstances.
ReplyDeleteChris/Nundanket
Hmm. How are we to interpret this statement?
DeleteAnother great lookingvgame and Yay for the forces of liberty!
ReplyDeleteI do find it slightly odd that later Wallers did not learn from previous games and immediately redeploy their left wing cavalry to the right, to counter almost inevitable similar movements by their Parliamentary counterparts...the games seem to have been won by the latter overwhelming the former, in almost every iteration?
Thanks! I can only speak for myself as one of the losing Hoptons. When Waller sends Balfour’s cavalry off on their sweeping move from the Roundhead Right to Left, I figured there was time to reach the now vacant South Spur with Stuart’s cavalry and turn Waller’s Right before the hammer falls upon Forth. In my game, it ‘almost’ worked.
DeleteIt just seemed to me that the dominating presence of Cheriton Woods on that flank would preclude the effective use of cavalry by either side?
DeleteTrue but once Balfour redeployed, moving across the heath offered the shortest path to victory points placed on the South Spur.
DeleteMany thanks Jon, and exciting and beautifully staged game as ever, even if it did not go our way! I think Mark (JBM) has analyzed the situation very well, and his cavalry won very decisively on our (Royalist) right wing. We tried to push forward to get onto the south ridge, largely drawn by the extra VPs available for that, but stabilising the right wing is probably the key for Hopton. Thanks again, great game as always!
ReplyDeleteYou are welcome, David! Always a pleasure having you take a seat at the table. Seeing Mark put his Royalist plan into action might be good fun.
DeleteGreat looking game, your ECW collection is lovely, glad they made it out for this series of games. Seems like you've been vindicated as no other Hopton managed a win either! Looking forward to you as Waller and Mark as Hopton, I'm enjoying your multiple iterations of games, we get to understand the battle better as blog viewers I feel?
ReplyDeleteBest Iain caveadsum1471
Thanks, Iain! Yes, Hopton's misery loves company. With Mark's interest and planning, Cheriton will see the table again someday.
DeleteAwww, the end of a good run. Hopefully your collection will be able to carry on in another battle soon. Well reported series with some very talented players involved. I would agree with Iain 's remark about you as Waller next time.
ReplyDeleteYes, end of a good run. Glad you think the run of Cheriton games was a good one! The guys who make it to the table in regular rotation are all very knowledgeable and very skilled.
DeleteThe battle can't be too one sided if it draws the same players back to play it again; though that might have to do more with your nice set up and all around good-guy-ness. 😁😁
ReplyDeleteACW you say? Interesting that. a Fine choice.
Yes, it must be my good-guy-ness. ACW up next. We will examine the early morning attacks upon Sherman at Shiloh.
DeleteAnother great ECW game, Jonathan. Again, makes me sort of sad I sold off my stuff.
ReplyDeleteThank you, Dean! As for selling off your ECW, you could always build back better.
DeleteOh, good one! So true.
DeleteSometimes I can score!
DeleteNice to see more pike & shot. We didn't managed to play for some weeks, but will have a game (not p & s) on the weekend. It's funny that I started with the ECW when I came back in the hobby 12 years ago, although I very soon changed to the WAS. We used Perfect Captain (Very Civil Actions), which was fun.
ReplyDeletePerhaps you will return to ECW one day although your work with SYW/WAS/WPS keep you very busy. I look forward to seeing what you bring to the table next.
DeleteI think the sample size validates the conclusion--and certainly justifies the investment, as if playing five games weren't justification in itself :)
ReplyDeleteEd, you sound like an economist! The question becomes, did Hopton have not much of a chance to win on the fields of Cheriton?
DeleteA fine way to end this excellent series Jonathan. The Parliamentarian cavalry exceeded themselves in this one. Haselrig's on and off lobsters were on, on on!!
ReplyDeleteRegards, James
Thank you, James! Haselrigge's Lobsters caused much destruction in this game.
DeleteA superb series of games Jonathan.
ReplyDeleteThank you, Richard!
Delete