Following my Jacobite Rebellion game with Peter using his OHW's D3 variant (see: D3 or Not D3), we returned to his table for another remote game using another D3 variant. This time, we explore his Medieval D3 OHW variant. Really, I think it insincere to label this an OHW variant as not much is left from the original.
As mentioned, today's battle featured Peter's Medieval D3 rules with his 25mm Minifig HYW armies out on the table. The battle considered for today's contest is the Battle of Auberoche in 1345. The scenario for Auberoche is based upon Thomas' OHW's Scenario 22 AMBUSH. For battle and scenario details, please visit Peter's blog at Battle of Auberoche, 1345. Essentially, the French army has been caught unprepared and encamped besieging a castle as the English fall upon them.
 |
| Battlefield |
 |
| French deployment zone |
The battle begins with French deploying around the encampments on the table. The French begin with a 9 BMU to 6 BMU advantage but may not activate until Turn 3. That means the English enjoy three turns to move and fight before the French may respond. Before the battle began, Peter's solo play resulted in one win apiece for the combatants.
Let's see how the battle played out.
I deploy the French with two levy units closest to the English occupied woods with the third levy overseeing the castle. On Turn 6, English cavalry may sally forth from the castle so the French need a speed bump on this front.
In the second line, both crossbow units are deployed. MAA follow up in the third line. The two knights are placed in the fourth line.
 |
| French deployment begins. |
 |
| French deployed for battle! |
Knowing that the English will enjoy three turns of uninterrupted firing from their longbows before the French can react, the first three turns will be tense for the French. I expect to take a pounding early on. With a unit only able to sustain about three volleys, on average, before being destroyed, heavy casualties are expected. If all three English longbow units fire for three turns, three French units could be hors de combat before there is any chance to respond. Like clockwork, by Turn 3, two French levy units have been destroyed by English fire. Two units of French crossbow are destroyed by Turn 4 as the French army begins to respond. Already, the French are down four units and the battle (for the French) has only begun.
 |
| Two quick levy losses for the French. |
 |
| One French crossbow lost as the French begin to respond. |
 |
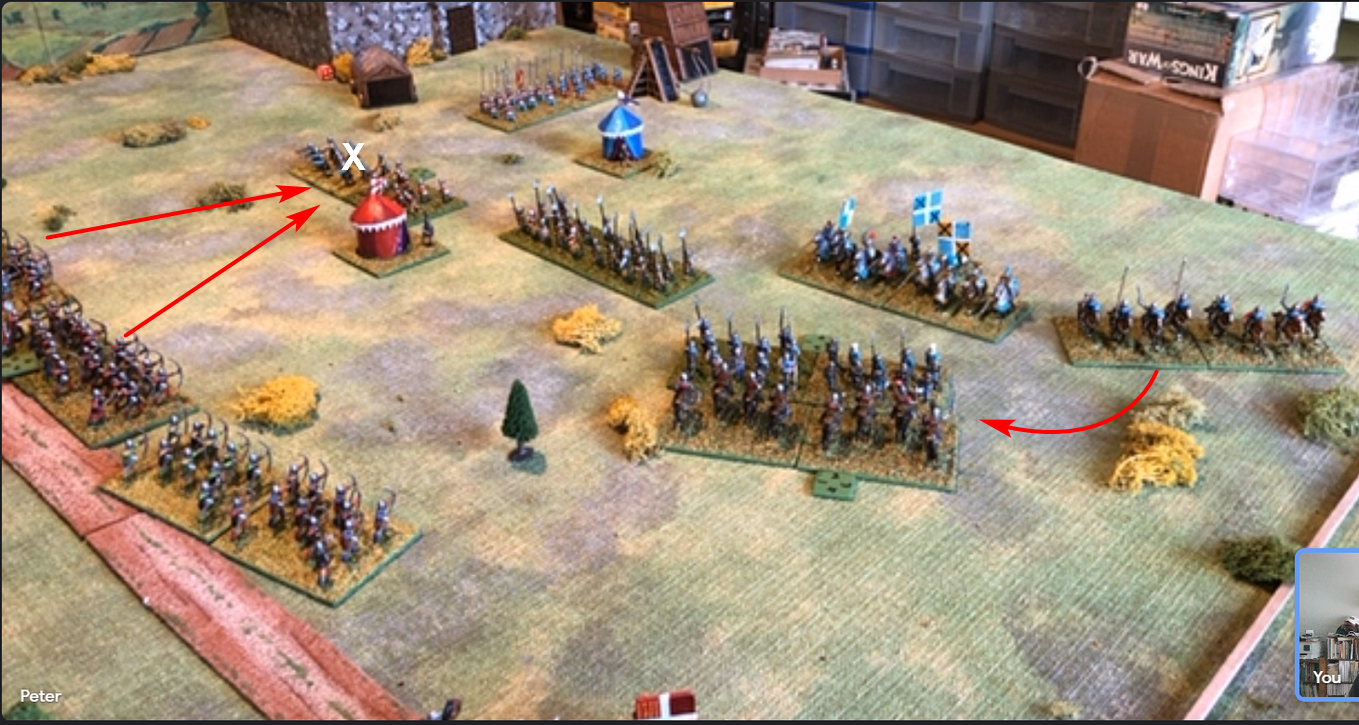
The second French crossbow is lost from archery
as English knights charge into the French MAAs. |
English knights charge into the French MAAs as the English longbowmen move forward. Having destroyed all French within range, the English are forced to move up to close the range. The French swing their cavalry out to the left. One French knight unit joins into the melee. In the melee, the French MAAs and the English knights are both destroyed.  |
| MAD in the center. |
By Turn 6, the English knights sally forth from the castle and engage the French levy. The remaining French MAAs fall back to protect the French right and increase distance from the English longbowmen. With the French left open, the French cavalry advance. |
English knights emerge from the castle
while the French redeploy. |
While the English knights take some heavy punishment at the hands of the levy in front of the castle, the levy are beaten. The levy scatter opening up the French right. The French MAAs continue to retrograde to cover the French flank and try to remain out of range of the deadly English longbow. |
| French levy is destroyed in front of the castle. |
The French MAA give the English the slip again as the English advance. On the French left, the two French knights take on the English knights. One unit of French knights is destroyed. The English commander falls with the destruction of the English knights. At this point, the French are down to only two of their nine units remaining on the field. One more French loss and the battle is over. Grim. |
| Cavalry clash on the English right. |
With their commander lost and casualties mounting, the English are having trouble activating. At the head of his remaining knights, the French commander swings around to take the English longbow in flank. They are cut down where they stand. Encouraged by this success, the French knights continue. A second English longbow unit is hit in the rear. It is likewise destroyed.  |
| One English longbow destroyed! |
 |
| A second English longbow destroyed! |
With their blood lust up, the French knights continue the rampage as the English fail to react. The last English longbow is hit in the rear as it fights the French MAAs to its front. The remaining English cavalry join into the fray. Having suffered heavy casualties earlier in its fight with the levy at the castle, the English knights are destroyed. The battle is over and the French have won! |
| One more English longbow in sight. |
 |
| The remaining English cavalry goes down swinging. |
 |
| The battle is over. |
That was a close contest. With the French teetering on the verge of loss, the French knights rampaged through the English army sowing destruction wherever they went.The key to the battle was the loss of the English commander. When he went down, most of the English units showed heavy casualties. With heavy casualties and the penalty for leader loss, the English simply could not react to the French attacks.
A great fight and one in which I thought the French had little chance for success.
Thank you, Peter!


Impressed by this as a balanced refight John. Good example of getting the balance right for the rules. In many rule sets the casualty rate of the French would have meant game over before the French knights could really get in the game but here that's not the case.
ReplyDeleteThank you, Anthony! As for play balance, kudos go to Thomas, Featherstone, and Peter for scenario and rules design.
DeleteAs noted, the scenario is straight from Neil Thomas' One-Hour Wargames Scenario #22 which, itself, is based upon Featherstone's Battle of Auberoche. A seemingly unbalanced scenario can offer a competitive contest given rules and scenario design. It is surprising what a good game can be had with only a handful of units. I was very surprised that my French could actually pull out a victory. I did not give them much hope early on. The rules and victory conditions helped me here.
Great report…and I’d just read the other report, by Peter, too…your lovely photo’s helped retell the tale of the battle very well. Thanks!!
ReplyDeleteThank you, Martin, and welcome! Great to see a new name on the commentary log!
DeleteThe game was played over Zoom with Peter in Australia and I in USA. All game photos are screenshots of the table view as seen through the lens of Peter's phone.
When I read the the first part I thought the French had Bob of been victorious having to weather all those shafts from the longbows. How wrong can one be a valiant victory for the French who took advantage of the the English misfortune in fine style.
ReplyDeleteHow wrong I could be too! When I looked at the setup and restrictions on the first three turns, I figured the French had little chance especially with the deadliness of the three English longbow units.
DeleteHaving the English commander fall late in battle was a tremendous turn-around in French fortunes.
Great AAR, an interesting and tense scenario for the French. Thankfully the loss of the English commander swung the game back your way
ReplyDeleteThanks, Neil! Yes, thankfully, the English commander fell or I reckon the French would have been beaten.
DeleteHaving forgotten to take photos for a second time, its a good job you took some photos. The French cavalry certainly shifted the momentum and ended up running amok.
ReplyDeletePeter, it is so easy to forget to take time out for a photo or two. I enjoyed the game greatly especially the "running amok" bit!
DeleteMy first proper army was French 1300AD and I sadly and foolishly sold it. As a French ally I cannot but enjoy the win of course. Nice game.
ReplyDeleteGeorge, now that you are retired, time to rebuild the lost armies!
DeleteGlad you enjoyed the game and thank you.
Wow: a very apt "Hundred Years War" slam dance of a game! Warms the cockles to see the minifigs medievals on the table (mine are long gone, alas).
ReplyDeleteYes, the French offered up some fancy footwork to snatch a victory from the jaws of defeat. Of course, having the English commander go down leaving his troops with heavy casualties and unable to act helped.
DeleteLike George and his recent retirement, perhaps HYW armies could be in your future too?
Looks like a great game. I’ve been wanting to play this scenario since reading Featherstone’s book 40 years ago.
ReplyDeleteIt was! Given this little inspirational nudge, give the scenario a try, Peter.
DeleteQuite a bloody or rather decisive system, with unit loss being 'when' rather than 'if'. It reminds me a little of the Perry firepower rules in which a unit can be expected to survive 2 - 3 turns at best.
ReplyDeleteI think I am starting to prefer system that just get things done and moving along.
Norm, there is a very good reason Thomas' rules are entitled, One-Hour Wargames! Bloody combat tables and only a handful of units gets the action over in a jiffy. This game took longer than one hour, though. My recollection is that the contest lasted about 90 minutes.
DeleteThat was an unexpected result Jon...the take away lesson seems to be, try to keep your commander out of harms way under these rules, as his loss can have a massive effect!
ReplyDeleteUnexpected to me. Perhaps, to Peter too. As long as your army has not suffered much in casualties, the loss of CiC is not critical. When casualties pile up, his loss can bring an army to a screeching halt.
DeleteA fine game and a big surprise that the French were able to turn it around, given that they were down to just two units. Most rules would have had them automatically break by then, so interesting to see them still able to fight on.
ReplyDeleteOh and being somewhat pedantic, archers 'shoot', they do not 'fire'!
With so few units, an army breaks when only one unit remains. Being somewhat pedantic is acceptable just don’t push it!
DeleteWhen learning field archery, the tutor was extremely vexed when anyone mentioned 'firing' in relation to a longbow! Mind you from the off Featherstone et al have used 'firing' for longbows etc, so it has become an accepted norm.
DeleteSuperb sounding game, can't wait to get my 100YW armies painted.
ReplyDeleteCheers
Meic
It was a fun one, Meic!
DeleteVery interesting, I have never rated the Featherstonian Auberoche as much of a scenario (despite his obvious love for it: "the Battle for All Seasons) but this seems to have worked out very well.
ReplyDeleteThe battle and scenario both worked very well. Much better than I anticipated, for sure. A lot rested on Peter’s work with rules and scenario.
DeleteAstounding turnaround! Talk about snatching victory from the jaws of defeat!!!
ReplyDeleteMiraculous turn-around, Mike! Snatching victory from the jaws of defeat is such a great feeling.
DeleteHaving to endure three rounds of English longbow firing was not an easy way for the French to commence. An interesting scenario, and a nice win to the French in the end. Good job it didn't come down to a penalty shoot-out.
ReplyDeleteFacing three rounds of longbow missiles was not pleasant. Thank God, it did not come down to penalty kicks!
DeleteAh, medieval clash!
ReplyDeleteLooking great!
Thanks! The look of the game is all Peter’s doing.
DeleteGreat sounding close run battle, shows you have to hang on in there and be lucky!
ReplyDeleteBest Iain
Some say that it is better to be lucky than good.
DeleteSounds good Jon as others have said I expected the French to go down under the arrows, good to see an unbalanced scenario working out 👍
ReplyDeleteI thought it might be a tough time before the battle began but when the three units of English longbow opened up to devastating effect, I reckoned the French had little chance. I suppose the saving grace is that the longbow ran out of units in range and had to spend one turn moving up into range of the French second line. That bought me a little time.
DeleteWow, well done. How did you track the unit hit points? I will be trying the D3 Jacobite rules remotely this week, possibly even tonight.
ReplyDeleteThanks! To track hits, Peter used Pollard Markers. Good luck in your run-out of the rules. Report back, please.
DeleteBlimey. That was quite an engagement. I thought the French were done for.
ReplyDeleteYou were not alone in those thoughts!
DeleteWhat a cracking game Jonathan! You sure are getting the games in these days.
ReplyDeleteIt was quite the comeback! Yes, getting in a lot of games.
DeleteWhat a great game! Looked the french had, had it!
ReplyDeleteRay, I thought the French were done for too.
Delete