After two action-packed sessions, the battle reaches its final blows.For recaps of how the game arrived at this juncture, please visit,
Solferino: Contact and
Solferino: Assault on San Cassiano
As the battle resumes, the Austrians still control much of the high ground around San Cassiano. San Cassiano remains firmly in Austrian hands. MacMahon is seen shifting more resources toward San Cassiano.
 |
| Situation on Austrian Right |
Wherein the previous session the French showed great resolve and committed great resources in taking San Cassiano, the start of Session #3 suggested a change in French strategy. Rather than continue to pound at San Cassiano with little effect, French movements suggest that containing and bypassing San Cassiano may be the new order for the day.
Rather than stick to the earlier French objective of taking both San Cassiano and Cavriana on the path toward victory, MacMahon seemingly switched the goal from taking vital ground to destroying the Austrian's will to fight. With two Austrian brigades already broken, only one more enemy brigade wrecked would secure victory. The difficulty is that the French must wreck one Austrian brigade before wrecking two of its own. As seen from the rosters in Session #2, this task may be easier said than done! Let's pick up the action.
 |
| French attack the heights! |
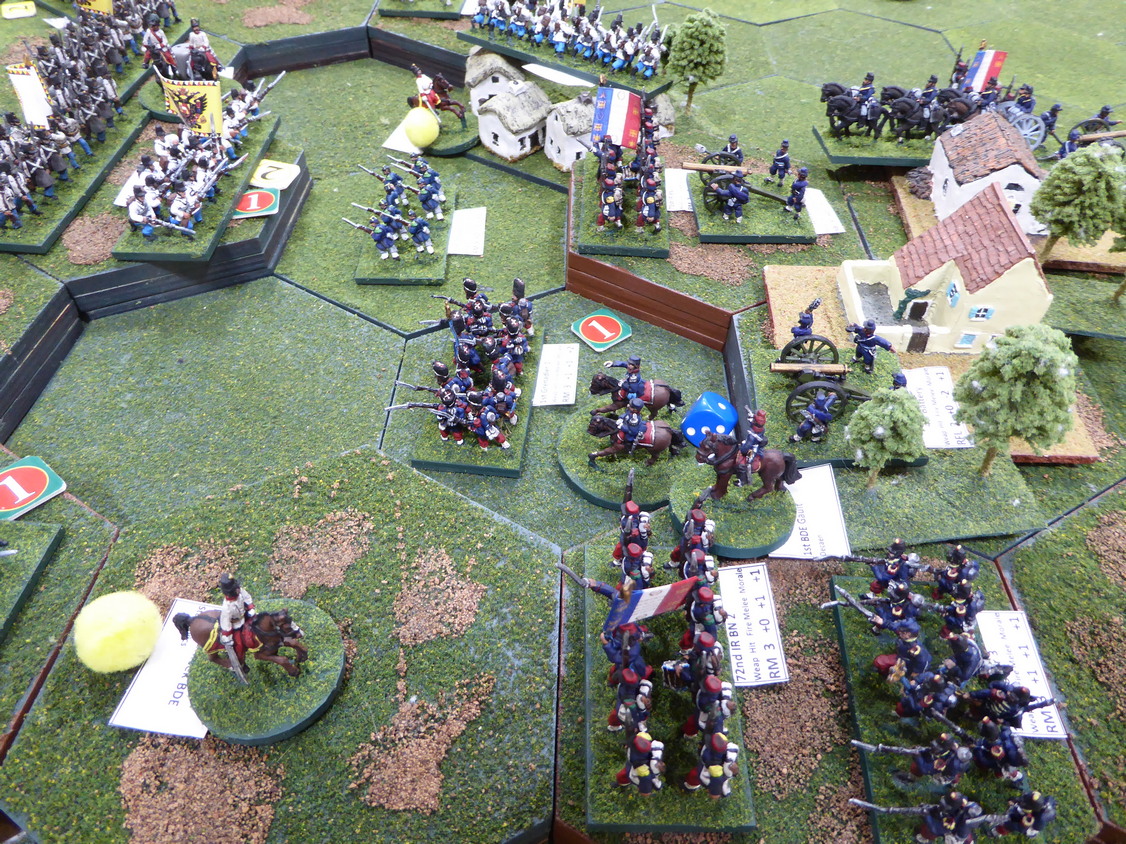
Maintaining pressure against the Austrian right, the French launch attacks toward the Austrian second line of defenses along the ridge protecting Cavriana. The problem for the French is that these attacks must cross open ground covered by enemy artillery. If a foothold can be gained on this secondary ridgeline, Austrian units deployed to the west could find themselves trapped. With Stankovic's Division wrecked, Clam-Gallas will use this depleted formation as a speed bump to delay French aggressions as he prepares a defense in-depth.
 |
| Heavy fighting for the high ground. |
 |
| Austrian defense in-depth. |
The initial French attacks from the plain below are repulsed with heavy casualties to all as the attackers are blasted by canister. French moving from the west bypass San Cassiano and secure a vital foothold on the heights. Not only do the French gain a foothold on the crucial heights to the east of San Cassiano but in close combat, an Austrian battery and infantry battalion are destroyed in the fight. The French look well-positioned to press on with the attack.
 |
| You win some; you lose some. |
 |
| The western most ridge is in French hands. |
Spirits are high among the victorious French but that jubilation is short-lived. Out on the plain, two French battalions are destroyed by concentrated artillery fire.
 |
| Austrian plays its hand on the plain. |
Undaunted, the French press on with MacMahon and Gault pushing the Austrians back to the second ridgeline. Wrecked, Stankovic's Division is melting away under unrelenting French pressure. |
| MacMahon leads the attack! |
In the attack upon the second ridgeline, MacMahon and Gault's coordinated efforts see the Austrian line waver. The Austrian right is showing signs of collapse. All is not easy for the French, though. Far from it!
In a series of cavalry attacks and counterattacks, Mensdorff's cavalry division overpower Desvaux's remaining cavalry. In the back and forth action, casualties mount and Desvaux' division breaks! In the confusion, Desvaux is killed.
With Desvaux' formation wrecked, the next army to suffer a brigade failure must retire in defeat. Which army will blink first?
 |
| Attacks against the Austrian left and right. |
 |
| Desvaux breaks! |
 |
| Desvaux is killed. |
Seeing the Austrians fall back from repeated French attacks against the Austrian right, French hopes for victory are high. Those hopes are dashed when the French take the high ground overlooking Cavriana. Looking down onto Cavriana, the French are met with the unpleasant sight of seeing Montenouvo's Division preparing to defend the village in strength. |
| Montenuovo defends Cavriana |
 |
| as the French press on. |
Processing the positioning of the Austrians around Cavriana, the French redouble their efforts to wreck the Austrian army. An overwhelming attack against an isolated battery supported by grenz sees the destruction of both guns and grenz. Still, not enough to force an Austrian capitulation. Even though the attacks are successful, these efforts further weaken the attackers. |
| Isolated enemy are attacked |
 |
| and destroyed. |
The French assaults have carried them too close to the enemy gun lines. With little cover and weakened from the day's fighting, the pounding from the Austrian guns is enough to break General Lefevre's Brigade. MacMahon has seen that his Corps is spent and taking Cavriana let alone San Cassiano is too great a task. The battle is over. |
| The French within reach of Cavriana |
 |
| while San Cassiano continues to hold out. |
 |
| No place to hide out on the plain. |
Yes, that is correct. After three long sessions of fighting on this field, the battle is over.
The Austrian's score a victory by not only hanging on to both San Cassiano and Cavriana but also breaking the French army.
Congratulations to the Austrian commanders and well-played by all!
The rosters show the final dispositions of each formation. Red losses are from Session #1, blue losses are from Session #2, and green losses are from the final Session #3.
Was the final tally close? It sure was!
For the Austrians, both Bruner and Mensdorff's formations were only one hit away from breaking. Pazsthory's Brigade was only two hits away from wrecking. A slight change in the order of play or concentration on another front may have changed the outcome of battle completely.
This was a very near run thing!
For me, this was a great gaming experience. One that I will remember for a very long time. When memories fade, I can return to these pages to relive the event!
I encourage the players to voice their thoughts on the game. Seeing battle from player perspective detailing the evolution of their plans and strategies over the course of the battle would make interesting reading. Lee has already given his impressions at, Battle of Solferino.
I may even tackle my thoughts on the battle and an analysis of play.
Thank you to all of the Rejects (French: Richard, Ray, David, Surjit; Austrian: Lee, Steve, John) who participated in this long, three session battle. I reckon we put in about 12 hours of gaming, all remotely. Hopefully, they enjoyed this exercise as much as I and will be back for more.


Fantastic AAR, well done to the players on a superb game and great to see it come down to a simple who broke first at the end
ReplyDeleteThank you, Neil! Yes, this game literally came down to the last die roll.
DeleteAmazing game supported by a brilliant report Jonathan. Really close. To think that if we, the French, had activated a different brigade at the end, we would have fired the shot that might have taken the casualty from the Austrians to seal a French victory. A marvellous testamony to the both the game design and the rules. Cracking stuff.
ReplyDeleteBy the second half of the overall game, I think we had learnt how to use our artillery and commanders better. However, I should comment that Austrian morale rolls remained outstanding despite all laws of probability. But that does not take away from their well earned triumph.
Richard! Glad you approve of the report-out!
DeleteThe battle outcome really came down to the wire, didn't it? The result could have easily tipped either way.
While Lee experienced (perhaps) more than his fair share of favorable results, war is chaos, and we never know how the final battle may play out. I think Lee's stubborn defense added greatly to the game making the French adjust their plans to accommodate changing conditions on the battlefield.
I definitely saw French tactics evolving throughout the battle. Seeing your adaptations was a joy to witness.
The game was great fun, for sure.
Thanks for playing!
Great review of the final session. I think both sides realised how close things were and the tension was palpable. Looking at the rosta's it's clear we (Austrians) took a lot of damage in this final session of the game but our pre game plan (pulling back vulnerable divisions, and using broken ones to delay the French) payed off. It bought us time to chip away at the enemy until they broke.
ReplyDeleteA great game and thoroughly enjoyable for all that took part. I think I speak for everyone when I say how much we enjoyed the game.
Thanks, Lee! Your endorsement is much appreciated!
DeleteI am glad both armies thought the battle was finely balanced throughout. Do you think the balance would have been upset had you not held on to your forward positions with such steadfastness? I think maybe not since the Austrians would have retires in goods order to the second line of defense. Regardless, your tactics and planning for the day were perfect. This is especially noteworthy since neither entered the battle knowing what opposition they faced.
What a fantastic game Jon - reads well and looks to have played out superbly. Prof
ReplyDeleteof again that that rules and format works so well for groups.
Glad you liked the battle report, Darren! This was a tough, hard fight for all. Spread over three long sessions, the battle was a marathon rather than a sprint. The rules work because once you know the basics, the rules do not get in the way of strategy and tactics.
DeleteI had put this one down as an almost certain French victory after reading the last two reports, so that was a surprising outcome. I find close games like that are often the most enjoyable which everyone seems to remember the most fondly.
ReplyDeleteI remember you picking Fance for the win in the previous installments. Turns out, it was Austria by a nose!
DeleteHotly and closely contested battles are always the most memorable, I think.
Marvellous, quality gaming time. Colour coding the casualties on the strength rosters adds a nice touch to the concluding wrap-up.
ReplyDeleteThanks, Norm! Color-coding loss of unit Combat Effective by session helps to demonstrate the ebb and flow of battle. It also shows which formations were doing the heavy fighting.
DeleteThe colour coding really was a useful touch to track how the casualties mounted over the action.
DeleteHooray! A second vote for color-coded casualty rosters!
DeleteA cracking finale to a very fine game, always good when the action could have gone either way too. Thank you for taking the time to chronicle it in such detail, coupled to the game and preparation time. A well deserved🏅in order.
ReplyDeletePhil, you are most kind. Comments like yours give me the energy to create these battle reports. Thank you!
DeleteYay for the Austrians! I must admit though, like Lawrence, I was surprised they managed to hold on....seems (from your comment to Richard, it seems like Lees fortuitous dice rolling continued to play a role, although you also note the Austrian defensive tactics were very sound, so perhaps luck played less of a role than I thought? Great looking game ans as always, your reporting is outstanding .... So please do keep it up!
ReplyDeleteAfter seeing all of the casualties suffered and the hard going for the French at end of Session #2, I did not figure the finale would be this close. The French changed tactics and began making inroads against the Austrian positions. It was a close battle but had the French not broken, throwing the Austrians out of both towns was going to be a tall order.
DeleteThanks for your encouragement to keep up with the battle reports.
Another great looking game sir!
ReplyDeletePleasure to read and watch the table!
Thanks so much, Michal!
DeleteAnother terrific report on what was a brilliant 3 evening game Jonathan. As Richard said, we changed tactics at the start of this session as we finally realised we'd never take the towns.
ReplyDeleteGutted we chose to move Dave's brigade instead of Richard's. We would have knocked a few casualties off of their cavalry brigade and with my infantry in the town behind their lines, their brigade would surely have folded. But it wasn't to be. Lived the game Jonathan, thanks again for putting up with us.
Thank you, Ray! Glad you and the Rejects enjoyed the battle presentation. Stage managing the production was great fun for me. You guys are easy to put up with in a game. In fact, it has been a real pleasure.
DeleteHad you known where to concentrate your final efforts, the outcome may have been different. That is, unless you were facing off against Lee! But then, you requested more fog of war than we saw at San Martino. You got it!
Well a close run thing indeed! Happy to see an Austrian win as they are my favourite 18thC & 19thC armies to game with, but victories can be hard to come by. Well done to all involved and good to see the French change tack as the battle developed, given that they realised they were unlikely to take the two towns. I wonder if they had ignored these and gone 'destroying' the Austrians from the start, whether this might hav eaffected things or not? It would be interesting to read your post game thoughts if you have the time and the inclination.
ReplyDeleteVery close game, Steve. Very close.
DeleteFor these mid-19th Century wars, I like commanding the Austrians equally to the French. One day, I will build Prussian armies and see if this preference holds.
The French did a good job in adapting to changing situation on the ground and their tactics began to evolve. The Austrians, equally adapted to the situation as needed. The next 1859 game may see a different approach to warfare.
All in all, the Rejects are very good generals.
Quite a game and effort by all involved and a tense finish by the sounds of it.
ReplyDeleteIt sure was, Peter!
DeleteBrilliant, what's not to love? Fantastic spectacle, a victory from the jaws of defeat and an AAR covering 12 hours of play. Bravo Sir!
ReplyDeleteI agree! What is not to love? Two excellent teams of players fighting over three gaming sessions in a hard-fought scrap. Shame that someone must win and someone must lose. If pressed, I might call it a draw...
DeleteThank you!
I'll take the draw!
DeleteA draw! Splendid.
DeleteTechnically, the Austrians met the criteria for victory but it was such a close call and both armies fought themselves to the point of exhaustion. Claiming victory here may be Pyrrhic.
DeleteA splendid and close game Jonathan…
ReplyDeleteAnd very enjoyable report
All the best. Aly
Thanks, Aly! Good to see you enjoyed the report.
DeleteAn excellent series Jonathan, but I am saddened to think that several generations of Italians have now been condemned to eat sauerkraut instead of pasta and strudel instead of tiramisu!
ReplyDeleteThanks, Mark! One benefit of Wargaming and replaying an historical scenario is that there is always another chance to rewrite history.
DeleteI'm back! Fantastic series of reports, I will certainly be revisiting these to dissect more closely, very inspirational.
ReplyDeleteCheers Meic
Great to see you back, Meic! Yes, go back and catch up on the Solferino replay.
Delete
ReplyDeleteA truly fitting finale to a splendid game! Well done to all and kudos to you Jon, for all the organising and write-ups that you immersed yourself in for the successful outcome of this game. I, too, had my money on the French but at the end of the day the Austrians emerged victorious with merit. Thank you all for sharing this great game!
Thanks so much, Mike! The players made my task an easy one. Having them engage and stick with me through three games is a tip of the cap to them.
DeleteGlad you enjoyed the reports and stuck with them through the end. Much appreciated!
Splendid result but quite the butchers bill for the victorious Austrians, the did hold both positions and broke the enemy so surely a victory, however costly. I do like your colour coded casualty chart, very clear!
ReplyDeleteBest Iain
Thanks! The battle was a real meat-grinder, no doubt about that. Yes, the Austrians clearly met the criteria for victory but it easily could have flopped toward the French.
DeleteA great looking game and a real nail biter it would seem!
ReplyDeleteChristopher
Thanks! The battle came down to the last die roll. Could not have been closer.
Delete