After planning, painting, plotting, and playing, it is time to strike the tent at Bassignana. Time to bid adieu to what has become a friendly and familiar sight on the gaming table. After five battle recreations, the ground will stick in mind for a very long time.
The Battle of Bassignana was one of the catalysts for building a SYW French Army. That building task began at the start of 2022. Enough French (and French dressed as Spanish) were painted to muster troops to complete the OB.
Before clearing the table in preparation for a new battle, I pause to give an account of the fifth and final (for now) battle.
In Game #5, Chris (Horse and Musket Gaming) accepts the role of King Emanuele III to take command of the Piedmontese/Austrian armies. David (Not by Appointment) and Mike (Dieroll Volleys) take command of the French and Spanish contingents.
With the four-game score showing three victories for the Franco-Spanish to one victory for the Piedmontese/Austrians, can Chris overcome a difficult situation in an attempt to pull closer to the Franco-Spanish lead? Let's see.
 |
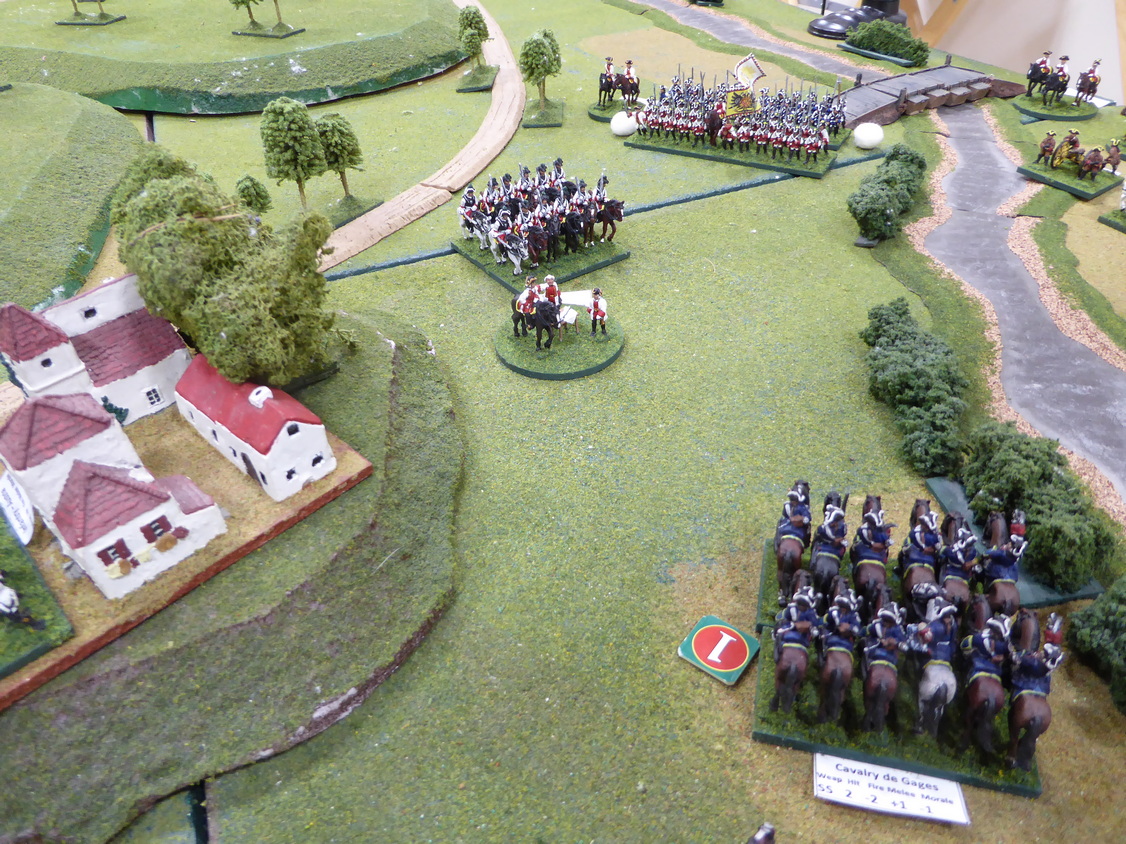
| Franco-Spanish deployed for crossing the Tanaro River. |
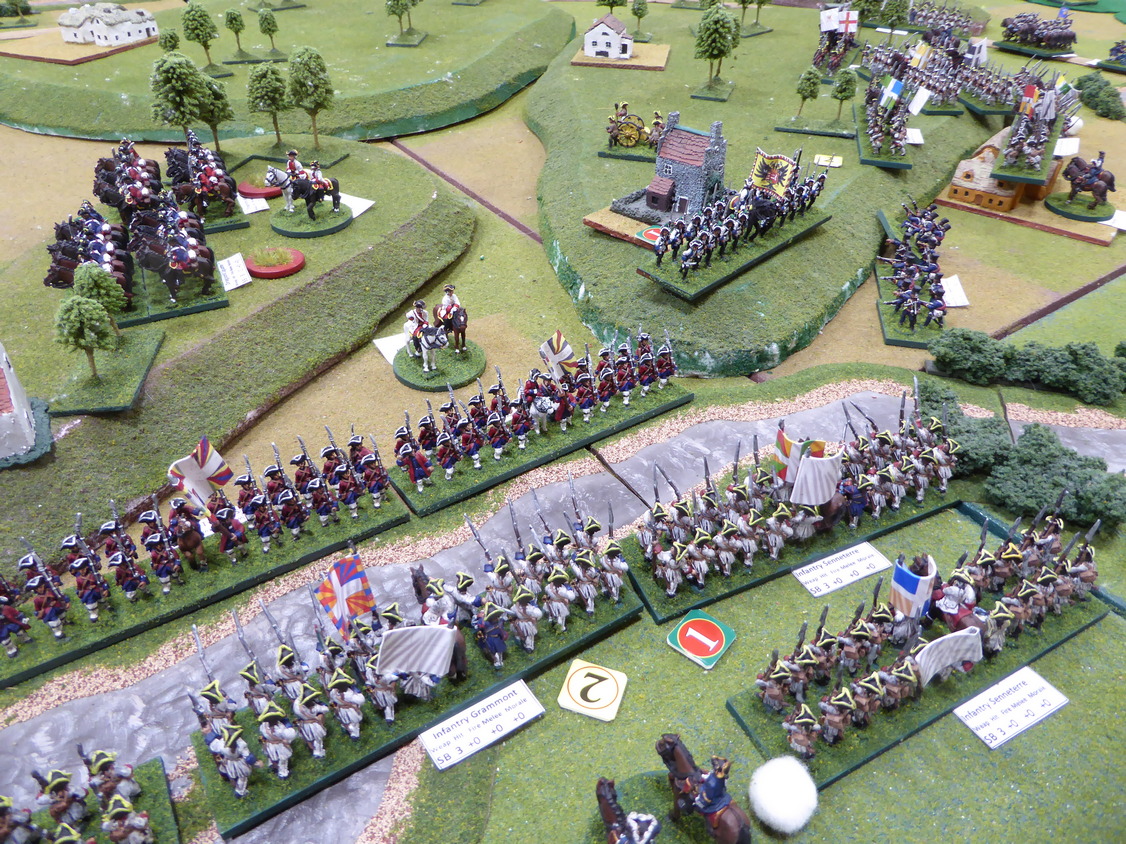
The Franco-Spanish army is poised along the Tanaro River with a goal of cutting King Emanuele's line of retreat to the west. King Emanuele III is positioned along the north bank of the Tanaro in an effort to hold out until reinforcements arrive. For a chance of Austrian reinforcements, the Piedmontese must hold the pontoon bridge across the Po River to the north of Bassignana. Holding Bassignana may be critical. On the King's right flank, his position is anchored by the strongpoints of Chiesa de San Germano and Montecastelle. Holding these strongpoints falls to his best brigade, D'Aix.  |
| D'Aix holds the Piedmontese right. |
 |
| Arambou moves up while taking fire from Rivarone. |
As Maillebois' Franco-Spanish army begins the crossing of the shallow Tanaro, Arambou's lead infantry battalions take fire from the guns at Rivarone. Arambou opens up with his light guns to cover the advance.
With Arambou set on forcing a crossing at the river bend, de la Chiesa sends an infantry battalion from Rivarone to contest the crossing. Moving into position on the north bank, de la Chiesa's infantry battalion takes fire from both guns and muskets. The Piedmontese suffer but remain firm.
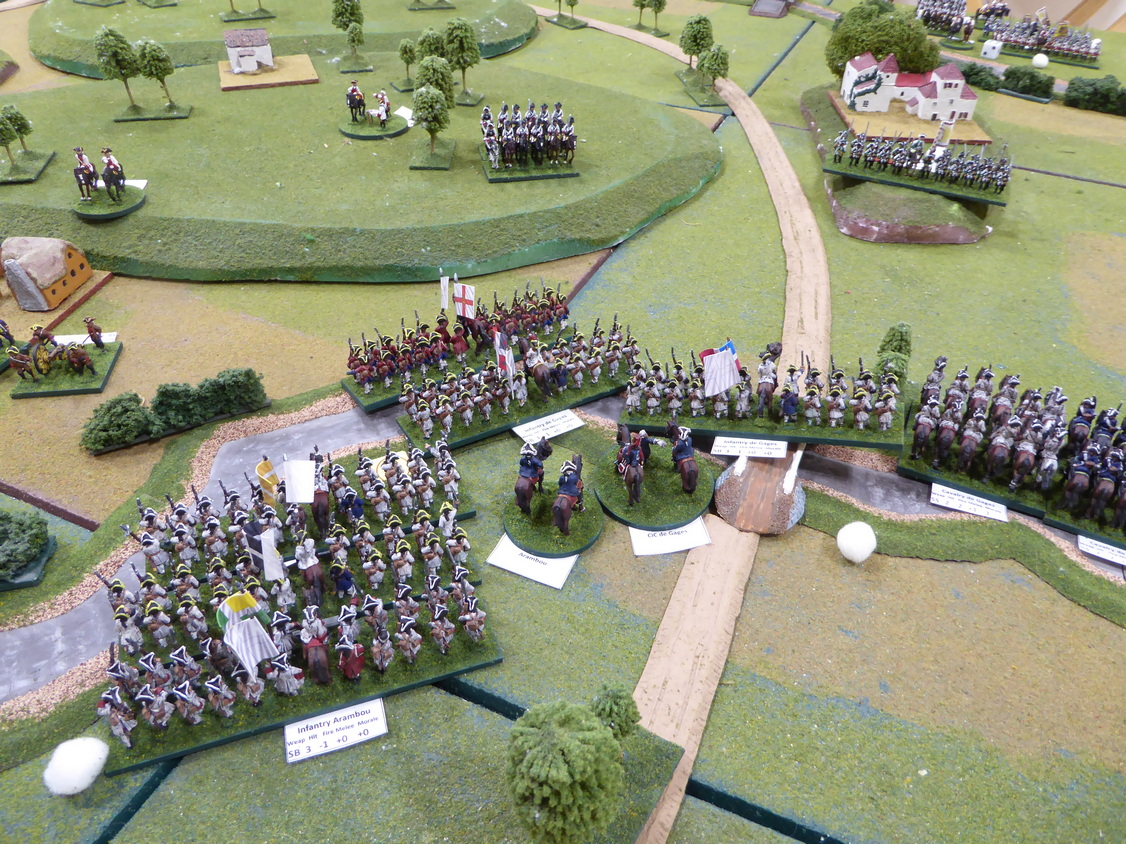
As the crossing begins, the Spanish commanders array their infantry in battalions three deep. Can anything stop this Spanish juggernaut?
 |
| Arambou begins the river crossing. |
 |
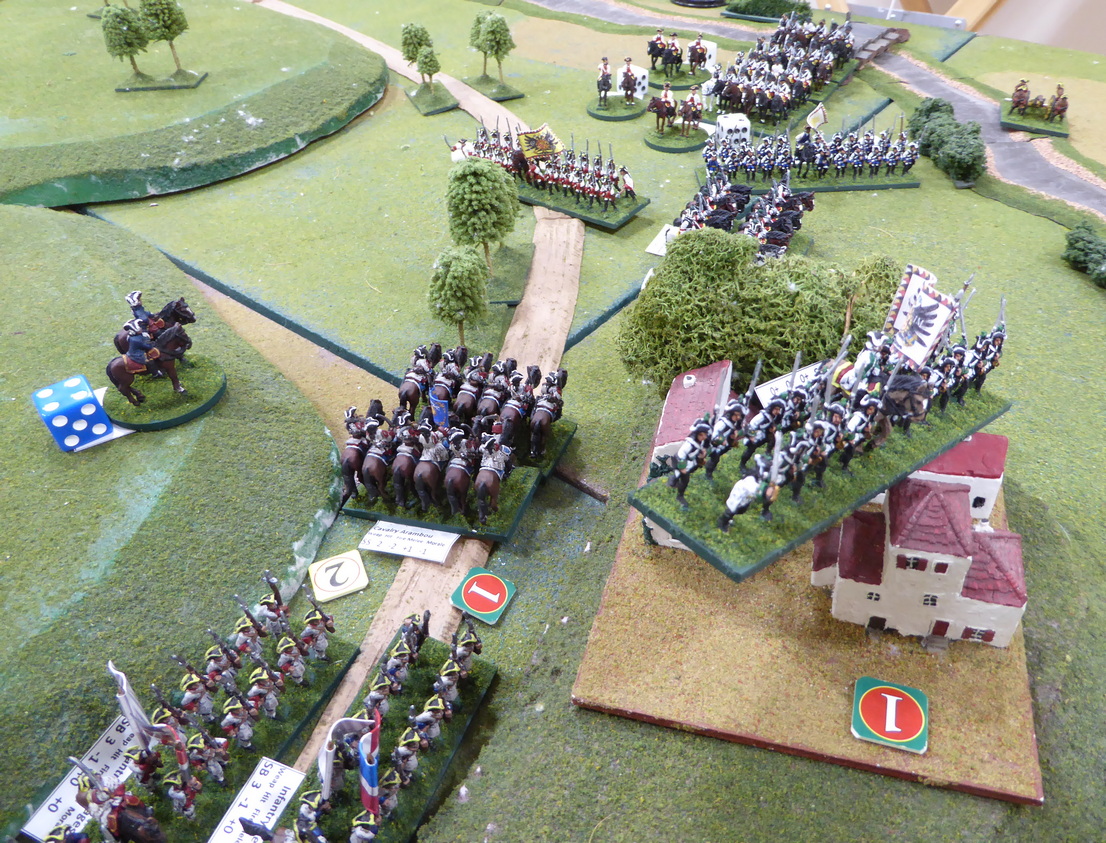
| Arambou and de Gages mass their infantry. |
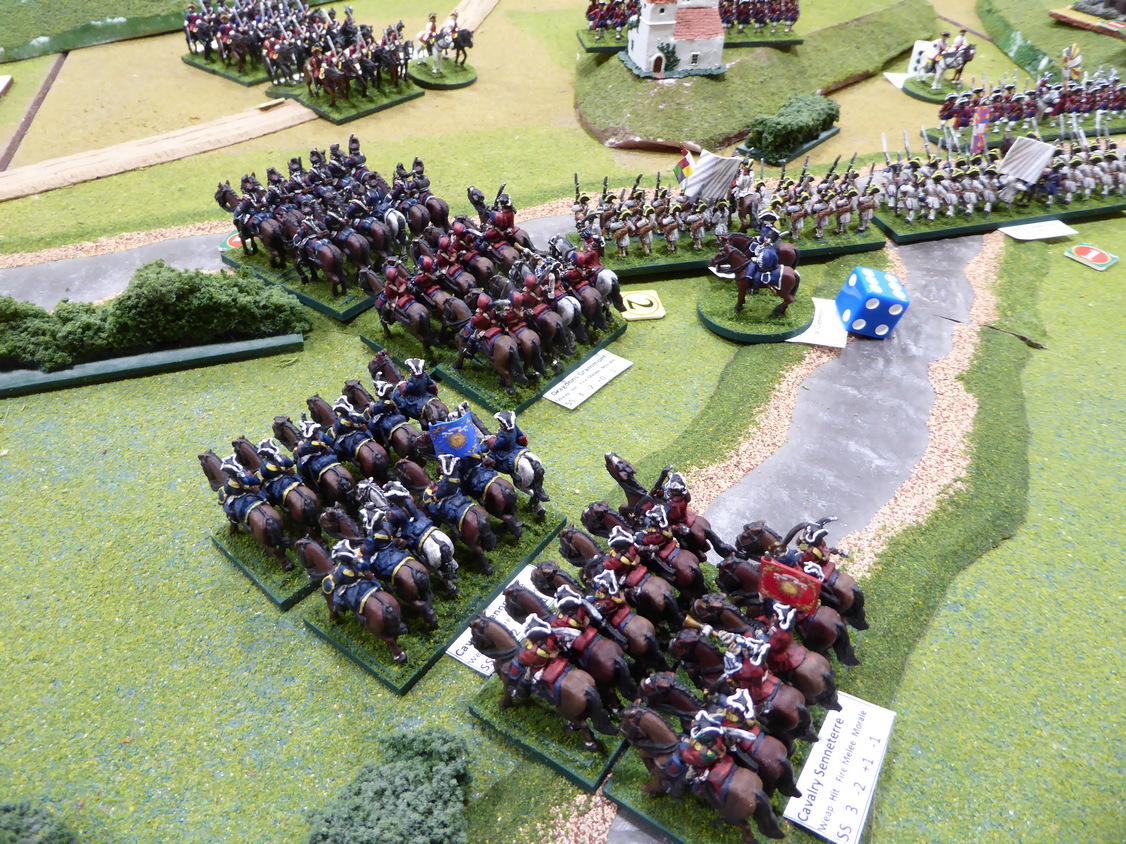
Back on the French left, Maillebois orders de Grammont and Senneterre's cavalry to swing around the left flank. With Liguane's Piedmontese dragoons awaiting orders, Piedmontese light infantry pop up along the banks of the river to contest any possible French cavalry crossing. The Piedmontese Guards, quiet on the heights until now, begin the descent down to the river. They too will contest the crossing.  |
As French cavalry approach,
the Piedmontese defense stiffens. |
 |
Firefight erupts near Chiesa de San Germano
as Liguane's dragoons are forced to withdraw. |
 |
| Piedmontese Guard join the firefight. |
 |
| Battle along the Tanaro. |
Not dissuaded by the light infantry's harassing fire, de Grammont's cavalry charges across the river scattering the light troops. Senneterre brings his cavalry up to the left of de Grammont in support. Forced to retire from earlier musketry, for now, Liguane's Piedmontese dragoons remain motionless overlooking the combat at the river.  |
| Light infantry dispersed by cavalry. |
Returning to the developing action in the center near Rivarone, Arambou's Brigade remains in a heated exchange wiith de la Chiesa at the river as the Spanish attempt to force a crossing at the bend in the river. Casualties rise as infantry and gun lines blast away at each other. The Piedmontese regulars first waver and then melt away under the pressure from Arambou's attack. De Gages sends two of his infantry battalions across the Tanaro in support of Arambou's success while his cavalry ford the river to the right of the bridge skirting the treeline. |
| Casualties rise in Arambou's firefight. |
 |
de Gages follows up on the
destruction of Piedmontese infantry. |
 |
| de Gages advances across the Tanaro. |
Seeing de la Chiesa's regulars disintegrate to his front, de Gages' supporting attack toward Rivarone presses on as Spanish light infantry cross the Tanaro and harass de la Chiesa's artillery. The momentum from this attack carries the Spanish into the Piedmontese guns. The battery is overrun. |
| Pressure mounts upon the Rivarone salient. |
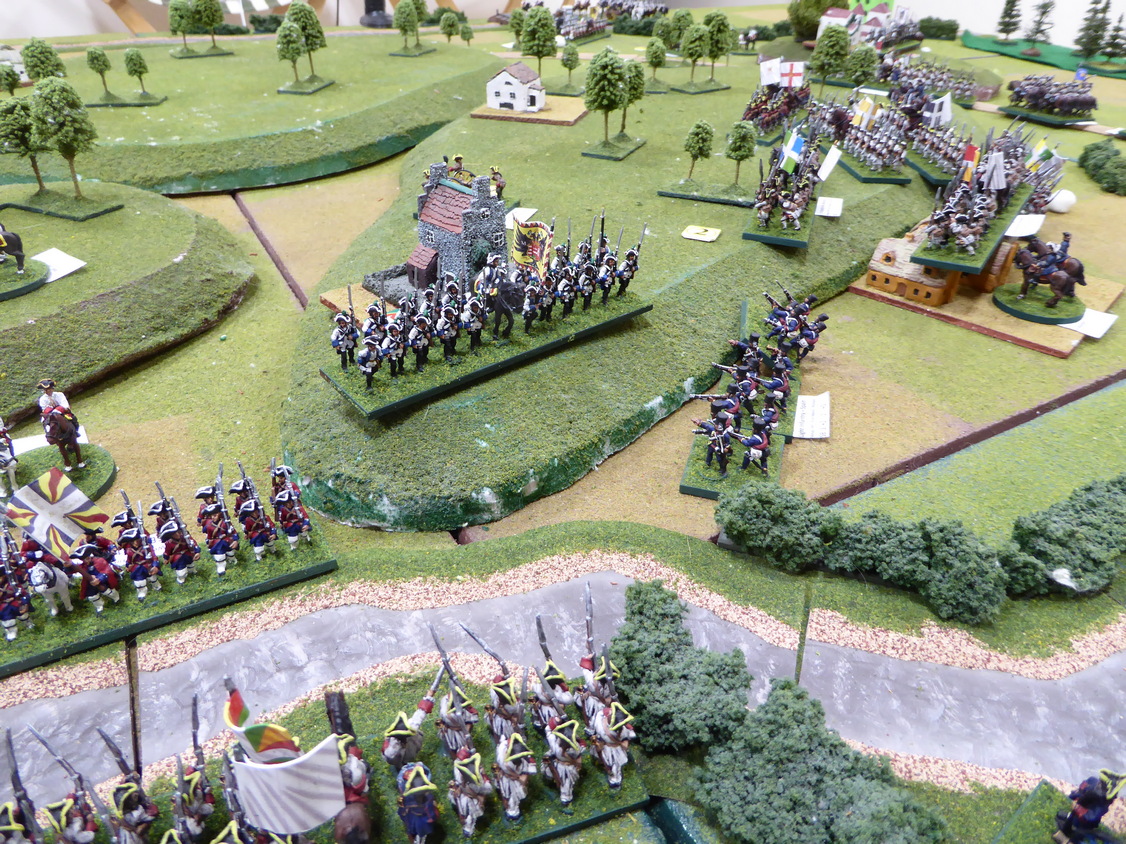
After a sustained bombardment of Rivarone from de Montal's heavy battery that sees heavy casualties among the defending militia, de Montal launches his assault. As the French infantry approach in serried ranks, the already wavering militia take to flight. Rivarone falls without much of a fight! |
Rivarone falls as de Gages' cavalry
moves to encircle Bassignana. |
With Rivarone cleared of enemy troops and de la Chiesa's brigade broken, Maillebois' French and Spanish advance. The Spanish light infantry, having aided in drivng off the guns at Rivarone, turn their attention to D'Aix's artillery near Montecastelle. Taking harassing fire and seeing Rivarone fall, the guns limber up and move off. French and Spanish infantry scale the heights up onto the lightly wooded plateau. Reaching the crest, no enemy can be seen. Is the battle won?  |
Overview of battlefield situation
as the Piedmontese center falters. |
 |
As French and Spanish infantry climb the heights,
D'Aix's artillery is driven off. |
Having assisted in seeing off D'Aix's artillery, Spanish light infantry press on against Montecastelle. The Montecastelle defenders shrug off the light harassing fire and concentrate their volleys into the French lined up along the Tanaro.
 |
| Spanish light infantry harass Montecastelle. |
To the west of Montecastelle, the Piedmontese grenadiers leave the cover of San Germano and advance down to the Tanaro to take up position alongside the Guard. Volleys intensify as the French infantry arrayed along the south bank of the river take heavy casualties. De Grammont's infantry show signs of wavering. Seeing both Senneterre and de Grammont's cavalry breach the Tanaro. Liguane seeks higher ground to counter French superior numbers. |
| Firefight on the Tanaro below San Germano. |
Back on the Bassignana front, having cleared the central heights of enemy, de Gages turns his attention toward the fortified town, itself. With Spanish infantry marching across the high ground, the Piedmontese King orders his cavalry to retire. Not only is the Piedmontese cavalry retiring to stay away from the enemy but it is positioning itself to block Spanish cavalry attempts against the pontoon bridge over the Po.
This foresight by the King is especailly timely since Schulenburg's Austrian infantry are seen marching across the pontoon bridge. To buy the Austrians time, the King leads charges at the enemy cavalry. In a series of charges and countercharges, the cavalry clashes see heavy damage to all. De Gages goes down in the melee!
With Spanish pressing in on Bassignana, the King's actions have momentarily prevented de Gage from capturing the bridge. As Austrian infantry deploy on the south bank of the Po, Austrian cavalry trot across the temporary bridge.
Has the battle turned?
 |
| De Gages' Spanish converge upon Bassignana. |
 |
| King Emanuele blocks the avenue toward the Po bridge. |
 |
| De Gages falls in melee. |
 |
| The Austrians arrive but is it in time? |
Even with the arrival of Schulenburg, the situation looks bleak for the King. While his grenadiers and guard continue to hold the upper hand in the firefight at San Germano, his army has been split. The enemy is in full control of the central heights and advancing toward the Po. With Liguane bottled up on the high ground behind San Germano, French cavalry have a clear path to cutting the road to the west. The weakened defenders of Bassignana will not hold out long against overwhelming odds. The King accepts his predicament and rides across the Po bridge while Schulenburg and his Austrians cover his escape.  |
Piedmontese grenadiers take lumps out of the French
as French cavalry are poised upon a flank. |
 |
| Firefight across the Tanaro. |
 |
Maillebois controls the central position
and pushes on toward the Po. |
After four hours of play, King Emanuele III concedes the field to the Franco-Spanish army. Following this hard-fought battle, Maillebois has done enough to win a Minor Victory.
Congratulations to the winning generals, David and Mike! Chapeau to Chris for providing an entertaining and spirited defense. Well-played by all!
Having completed seven turns with only eight turns guaranteed, Chris believed that Bassignana would not be relieved in time by a Schulenburg counterattack. In addition to this immediate reckoning, in an extended battle, the Austrians, alone, would be unable to stem the tide of the oncoming French and Spanish as they descended upon the pontoon bridge.
While another victory for the Franco-Spanish army (4-1 in this five game series), another historical result was seen on the miniature battlefield.
Thanks again to all of the players for producing another enjoyable gaming session. For me, this was great fun exploring the Battle of Bassignana in repeated trials on the table with an entertaining assortment of generals and approaches.
After a long engagement on the table, time to strike the tent at Bassignana.
What is next? Who knows? Clearing the table and back to painting for starters.


Many thanks for hosting a super entertaining battle Jon! It was a real pleasure to take part. I must say that actually playing the scenario made me realise so much more the extremely difficult position King Emanuele must have found himself in on that fateful day in 1745 when he was left by the Austrians to face the Franco-Spanish by himself. Having to defend a long riverline with so few troops whilst outnumbered around three to one is any general’s nightmare I suppose. Kudos to Chris for holding out so well. It was only when Senetierre’s cavalry showed up threateningly on his grenadiers’ right flank that he threw in the towel. And a great well done to David too as Mallebois.
ReplyDeleteYou are most welcome, Mike!
DeletePlayers can gain some useful insights into historical battles by refighting them on the table in miniature.
Another superb game and victory for the French
ReplyDeleteThanks, Neil! Yes, chock up one more victory for the French.
DeleteI am increasingly favouring the repeat play of systems / games to maximise the investment made in game one. This one in particular really seems to have taken your fancy and has really worked well for all the participants - it must feel like the end of a chapter.
ReplyDeleteHi Norm! Good to see you coming around to the benefits of repeated play. The weekly, UK group I remote into each week is starting to warm to the idea too. Progress!
DeleteCreating a scenario can take some effort with research, design, development, setting up, playtesting, etc. With all of that effort, it makes sense to me to get more than one playing out of it. As you say, we ought to maximize our investment.
Bassignana is only the latest in a long line of repeated battles. San Martino was most recent before this. I reckon I have refought Vimeiro 8+ times.
This may be an end to a chapter but when one chapter ends there is another chapter just beginning.
Me too. I might have to steal the idea of repeated play. 😀
DeleteNothing to steal. I have been doing this for a very long time.
DeleteA superb end to the run of games, it was good to see history turned on its head at least once.
ReplyDeleteThanks, Phil! It was good to see the players produce a resounding victory for a king at least one time. They were very pleased with their accomplishment!
DeleteThat was an excellent game Jon. And a very good and quickly produced AAR. I've enjoyed reviewing my mistakes and the King's triumph's through the photos!
ReplyDeleteI must salute my Bourbon neighbours on their victory!
You've got me reaching for my copy of the Wild Goose and the Eagle to look at Velletri and Piacenza.
Chris, thank you! Glad you enjoyed the game. It was really great fun. You all are sportsmen and gentlemen. You were a pleasure to conduct through the action.
DeleteYou (as King Emanuele III) played a very good game. Had the game continued two more turns you may have been able to turn it around if French cavalry could be kept from mauling D'Aix's command at San Germano.
Velletri and Piacenza? Hmmm. Something to investigate.
And the Bourbons salute the honourable enemy back!
DeleteA great end to a great series of games Jonathan.
ReplyDeleteThanks, Ray! Much appreciated!
DeleteSounds like this set up got it's money's worth Jon. Glad to have caught a lovely looking write-up, albeit the tail end of this series. A good and tough win for the French-Spanish!
ReplyDeleteDai! Long time, no see. Glad you were able to grab the last of the five games and enjoyed the write-up.
DeleteHallo mate. Out of my hobby-blog funk and thought it’d be good to see what folks were up to. Hope alls well your end
DeleteAll is good here!
DeleteA worthy "campaign" in place, like a dream story or movie where the protagonist relives an experience over and over.
ReplyDeleteA little like Groundhog’s Day , I suppose.
DeleteDuffer's Drift! That's what I was trying to think of yesterday.
DeleteOh, wooow what anew great looking battle Jonathan!
ReplyDeleteThanks!
DeleteAnother great game and AAR Jon. Well done to all involved once again. Certainly leaving an action such as this set up and played multiple times with slightly different approaches does allow one to fully appreciate the historical outcome, the issues faced by the commanders on the day etc.
ReplyDeleteGlad you enjoyed it, Steve! A lot of incremental benefit can be gained by playing a scenario multiple times with multiple players. I ceratinaly learned much. By my count, eleven different players participated in the series of battles.
DeleteIt has been an enjoyable ride, Jon, reading how different players tackle the challenges of this action. What was the mechanism for getting the dilatory Austrians involved.....did they appear at a preset time EG turn 6, or was it a dice roll? My point being, the Austrians (when they appeared at all) always seem to have been just a bit too late....was there an opportunity for them to arrive earlier and "save the day"?
ReplyDeleteGood to see you enjoyed the games too, Keith!
DeleteSince Schulenburg and his Austrians did not appear at the battle, I gave each brigade (one infantry, one cavalry) 30% chance of arrival on T5, 50% of arrival on T6, and 80% chance of arrival on T8.
You've certainly got your money's worth out of this scenario and it's been great fun! Chris certainly did better than Grimsby versus Nottingham Forest in the cup and it's definitely an equally uneven contest!
ReplyDeleteBest Iain
I milked it for all that it was worth, Iain! Stilll some interesting play, I think . One day, I may return.
DeleteHopefully, the players enjoyed the challenges and the contest no matter which side they played.
An amazing set of games - thank you for sharing all of it with us.
ReplyDeleteYou are most welcome, Greg!
DeleteAn excellent set of games running to it's super conclusion Jonathan!
ReplyDeleteChristopher
Much appreciated, Christopher! Hope you enjoyed all five games.
DeleteI’m really liking the repeated play of a scenario with different players; or at least the same rules system as that will enhance knowledge of the rules and yield more thinking about tactics than which dice to roll. And better scenario design as one can more easily assess strengths and weaknesses of units and deployment.
ReplyDeleteThat was a great run of scenarios. Looking forward to the next series (if inclined to do so). 😀
Thanks, Stew, for the vote of support and encouragement! Everything you mention adds to an enhanced experience and improves play. Of course, there will be other opportunites for series battles. I am pondering what will be next...
DeleteAnother rattling account and much closer than some of the other defeats. I'm sure I could still draw a map of Rivoli if I had too, as that is one layout that still sticks in my mind.
ReplyDeleteThanks, Lawrence! Rivoli is etched into my brain as well! Great fun!
DeleteSorry to be late commenting. Great report, which very closely reflects the battle as it happened, I think. Thanks for that and thanks very much for hosting and running the game, which we all very much enjoyed. I still feel it was nearer to a draw than a victory as Chris fought a very good fight. I look forward to the next!
ReplyDeleteAll the best,
David.
Hi David! Never too late to add in a comment! Glad you enjoyed the game!
DeleteHad Chris pressed the final decision rather than conceding, I may have tipped to a draw too.
What should be next???
Thanks, Jon. What about a small ECW battle? I have a George Gush scenario I've wanted to play for ages (well, decades) in his Airfix ECW guide book. I could send you scans of the pages which include a plan, OOBs and a run through of the game as he played it. it's basically a Royalist attempt to intercept a Parliamentarian convoy of cash and ammunition.
DeleteCheers,
David.
Well, I have not had the ECW collection out on table for a while so why not? My problem is that I have no baggage train to intercept and my units are regiment sized BMUs for fighting entire battles!
DeleteAh, tricky. OK, I'll save the George Gush scenario for when I get my ECW Paperboys done. :-) What about the battle of Cropredy Bridge 1644? It's an interesting encounter battle with two armies moving parallel to each other separated by a river and pushing forces across a bridge and a ford to fight, so not at all like those rather boring stereotyped ECW battles like Edgehill or Naseby with their cavalry on the wings and infantry in the centre.
DeleteCheers,
David.
I like the boring stereotypical ECW deployments! I will investigate Cropredy Bridge.
DeleteAh - chacun à son goût! ;-) There's a fair bit online about the battle, especially plans and material on the battlefield itself, but there is very little on the OOBs. I have Young and Toynbee's book on the battle which attempts to give a reasonably good summary of the units involved and I can let you have details if you need them.
DeleteCheers,
David.
This has been a great series Jonathan. It's fabulous (and edifying) the way you have played battles several times. You have taken hold of remote wargaming with gusto too!
ReplyDeleteI checked (quickly) and the only Austro-Piedmontese victory was from a counter-intuitive strategy of *not* defending the river, but rather holding other strategic points with their best troops. What have you learned from playing and hosting them? Can you see any other ways in which the historical losers could have taken the chocolates?
Regards, James
James, I am happy to see that you have been following along throughout the five rematches.
DeleteYou are correct in that the winning Piedmontese strategy seemed to hinge on not defending the Tanaro and making an end-run to Bassignana with Liguane's dragoon brigade.
What have I learned from these experiments? Well, I have a much better grasp of the historical situation and a fairly good idea on the time/space problem faced by the king.
With 20/20 hindsight, could I improve the Piedmontese situation and prognosis for victory on the field? I had several possible solutions but as you may recall, I was soundly defeated in the two games in which I played the Piedmontese. Do I still thinik the King could be victorious? Sure! In fact, had Game #5 continued, Chris may have been able to make a comeback on the banks of the Po but that we will never know with certainty.
Thanks for your comment and you raise some interesting questions.
What a smashing game it must have been to play. I was gripped by your report Jonathan. Thanks for the repeat plays on this battle. It seems to have given you and many others lots to reflect on about this engagement and how to wargame this and other historical battles.
ReplyDeleteThanks, Richard! Only by repeat playings do some of the nuances and best practices in a battle emerge. In these five games, eleven different players participated. That is a lot of players to cycle through one scenario. From comments, I think that many enjoyed themselves.
DeleteA cracking final game on this well bloodied battlefield…
ReplyDeleteAll the best. Aly
Aly, glad you enjoyed the final account!
DeleteThat's a perfect ending of a long story. I'm so happy that you was inspired to play my scenario! It would be such a fun to play with you. I'm sure.
ReplyDelete