Postie's Rejects return for an encore performance at Bassignana (see earlier battle report at Road to Bassignana). Rather than a three-player game as in the first playing, Ray joined Richard to fill out a four-player game. Richard and Ray took command of the Austro-Piedmontese Army while Steve and Lee headed up the Franco-Spanish Armies (Gallispans). Commands are illustrated in the table-shot below:
How did I see the battle unfold? Please read on.
Having chronicled a handful of Bassignana battles, the ground and situation are likely familiar to regular readers. Given that familiarity, we jump straight into the action.
The battle opens with the Spanish stepping off toward the bridge spanning the Tanaro River. The Spanish come on in densely packed formations with General de Gages at the head. King Emanuele III sends the Austrian defenders of Bassignana forward to contest the crossing. On the Gallispan Left, the French advance against Chiesa de San Germano and the Piedmontese defenders on the heights. The Piedmontese Right keeps a watchful eye on the advancing Frenchmen.
 |
| Spanish advance toward Bassignana. |
 |
The French advance on the Piedmontese positions
at Chiesa de San Germano. |
 |
| d'Aix' Piedmontese watch from Chiesa de San Germano. |
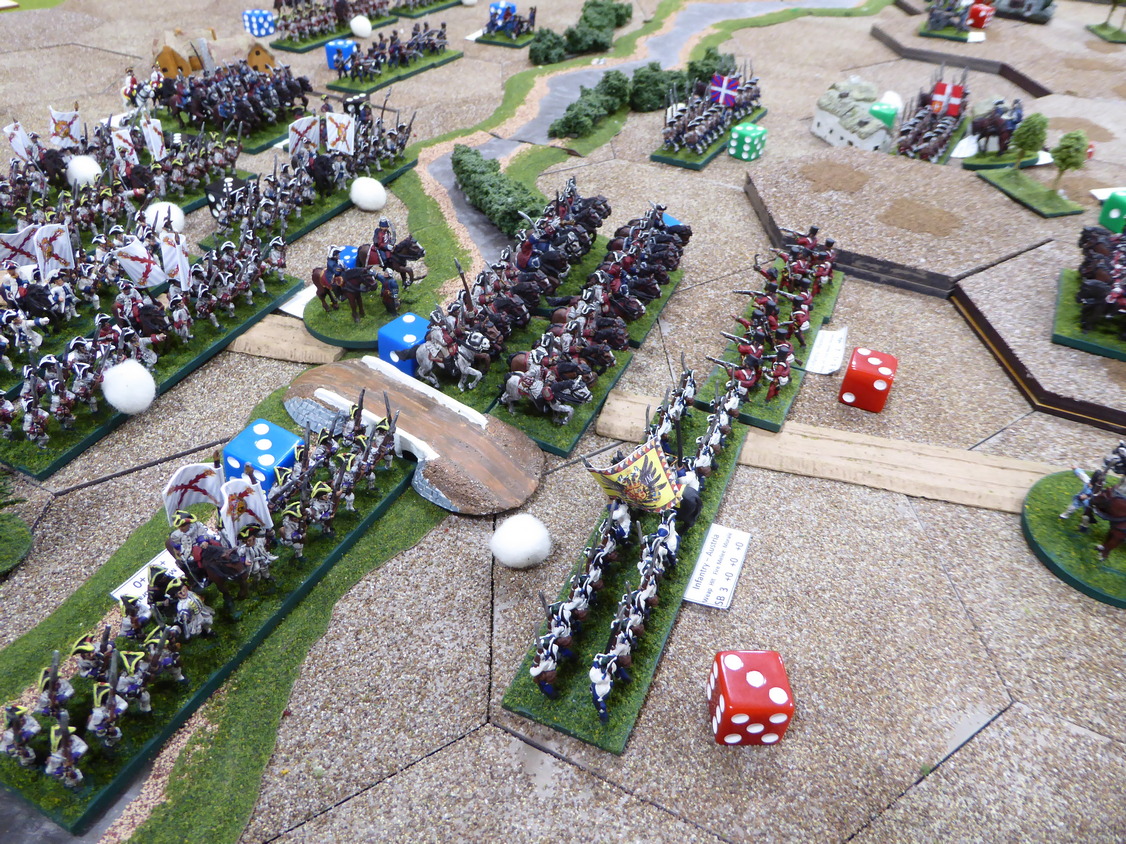
Back on the Gallispan Right, de Gages pushes his Spaniards into the Tanaro. As cavalry emerge to the west of the bridge and infantry climb the banks to the east of the bridge, they are met by musketry. Piedmontese light infantry pop up from the brush along the river and their fire rips through the Spanish horse. A number of horsemen fall but the Spanish press on and into the light infantry. The light infantry are no match for the cavalry as the horsemen charge out of the river. The light infantry suffer heavy casualties as they retreat back toward Bassignana.
Following closely behind the Spanish cavalry are Spanish infantry. One regiment crosses the Tanaro in column and then deploys into line under the watchful eye of the King and his cavalry perched on the hill and de la Chiesa's guns. The Spaniards deliver a first fire into the King's horsemen before they, in turn, are raked by canister. Bodies fall in both formations.
In an attempt to slow the attack and encourage the light infantry, King Emanuele joins the light infantry on the road while his wavering Piedmontese cavalry charge into the similarly wavering Spanish infantry. Battered and shaken from their earlier exertions, both formations disintegrate in the melee.
Facing odds of three to one against, the Austrians lining the Tanaro are overwhelmed by the masses of Spanish crashing into them. First softened up from a devastating volley delivered by Spanish infantry in the woods, the Austrians face waves of Spanish infantry. Unable to withstand this tsunami, the Austrians scatter.
 |
| Defense at the bridge. |
 |
| Spanish form a bridgehead on the north bank of the Tanaro. |
 |
| Piedmontese driven back from the Tanaro. |
 |
Only the King and a few light infantry
stand in the way to Bassignana. |
Is all quiet on the western front of the battle? No!
General Maillebois sends his two brigades on the left forward while de Montal demonstrates in the center against the defenders of the village Rivarone. As de Grammont's two cavalry regiments splash into the Tanaro, Liguane moves his two Piedmontese dragoon regiments up to contest the crossing. De Grammont's cavalry charge out of the river and into the Piedmontese. Suffering heavy casualties, the French are sent back from whence they came!
Under constant harassment from Piedmontese guns outside of Montecastelle, Senneterre sends one infantry regiment across the Tanaro to deal with these pests. A second French regiment follows up in column. Perhaps not seeing the Piedmontese grenadiers supporting the guns, the French in column are caught off-guard when the grenadiers charge down from the heights and smash into the column. Not surprisingly, the French regiment scatters to the wind.
Seeing de Grammont's cavalry streaming back through his own cavalry, Senneterre orders his two cavalry regiments forward. In the second charge out of the river, Senneterre's cavalry are repulsed. Again, casualties are heavy but this time, Liguane's Piedmontese are broken. While the cavalry are locked in combat to their left, French infantry line the Tanaro and attempt to shoot the enemy out of San Germano. They make little headway against the Piedmontese Guards barricaded in the church.
 |
As de Grammont brings his cavalry forward...
|
 |
| Liguane counters with his own cavalry. |
 |
| de Grammont's cavalry are sent reeling back! |
 |
| French sent to deal with d'Aix' guns. |
 |
| Senneterre attacks Liguane's dragoons |
 |
Piedmontese grenadiers destroy French infantry
as the Frenchmen cross the Tanaro! |
 |
| Liguane's Brigade of Piedmontese dragoons is broken. |
 |
| French try to blast the enemy from the church. |
Pinning de la Chiesa's Piedmontese at Rivarone with de Montal's Frenchmen, de Gages clears the heights overlooking the main road by overrunning a battery and destroying the Piedmontese militia. With two of his three formations scattered, de la Chiesa's Brigade is broken. With two of his three brigades broken and no sign of Schulenburg's Austrians, the King tries to buy a little time. Time, he does not have. In coordinated attacks, the light infantry to which he is attached breaks. In the confusion, the King falls.  |
| The Piedmontese position collapses! |
With the King dead on the field and his army broken, survivors retreat to the northwest to salvage what is left of the Piedmontese Army. Where were the Austrians? On this day, they never made it to the battle.
The result of today's battle was not unlike the first Reject game. That is, the Piedmontese fell to the Gallispans. Still, the game returned another historical result with the exception that the King fell again.
Congratulations to Lee and Steve for a well-played game. They attacked early, often, and kept the pressure up throughout. Ray, commanding the Piedmontese Right made a remarkable stand against the attacking waves of Frenchmen. His efforts were not enough to turn the tide of battle. My condolences to Richard and Ray in a tough loss. They, too, played equally well but fortune was not in Richard's court (again) on this day.
Great game fellas and thank you! This is the Last Stand at Bassignana, for now. Next up? I think we may return to battles in Ancient Sumeria.


A superb report honestly retold. Evidence that a wargame can illuminate history and aid in the explanation of military engagements, and the challenges faced by commanders. Thank goodness my dice controlled the fate of metal models and not actual troops on the battlefield.
ReplyDeleteThanks, Richard! Relieved to see that the report offers a fair assessment of the game. Gaining insight from playing a scenario is a worthwhile takeaway.
DeleteRichard did seem to have the worst of it, and not for the first time. At least there is the consolation of having done as well as historical counterparts, the loss of the King aside.
ReplyDeleteRichard had some tough luck, again. I would like to see his luck at the table turn around. Fighting to a historical conclusion is a good result.
DeleteAnother death for King Emmanuele? You need to replace that figure as he clearly has a death wish! ☺
ReplyDeleteMore seriously, I wonder whether he'd have been allowed to risk himself? Frederick was told to flee his first battle and while he attempted to get himself killed in later ones, from memory, he was restrained.
Volley and Bayonet has specific "Monarch" rules to try and cover this.
Neil
Putting a commander at risk is up to the players. That risk can be mitigated by getting him out of the combat before his unit is destroyed.
DeleteThis was a really tough game, I always thought seeing the table setup it was going to be a loss. But for me it was a, let's see what damage we can do to them kinda game. I thonk think I held my own, but the battle was won and lost on our left. Poorcm Richard was swamped by Lee's command. There wasn't much he could do? Our plan fell apart in the first turn, with how the enemy moved and Richard's dice were.......Well least said about them the better.
ReplyDeleteA great game Jon I like these puzzle solving kind of games It just didn't work for us this time.
Thanks, Ray! You put up a stiff defense but Poor Richard’s wing collapsed before help could arrive.
DeleteI enjoy puzzles too and I know you out some thought in how to solve this one.
Another good read and another victory for the Franco-Spanish, it's been an interesting series of games, I am looking forward to the Sumerian series as it's not a period I know very much about.
ReplyDeleteThanks, Donnie! Glad you enjoyed this series. I expect a series of Sumerian battles up next.
DeleteAlways great to see the tricorne era on display. The look of the massed French cavalry (for some reason) caught my eye in this particular report. I think it's easy to overlook the fact that you are now routinely hosting virtual games for players from around the globe: how cool is that!
ReplyDeleteThank you, Ed! The massed cavalry do look good. I added a be country to the list of players this week. I enjoyed an ancients game with a fellow from South Africa.
DeleteA fine finish to the run of games, shame the King was sacrificed yet again but then one would have thought he couldn't be that unlucky again🤔 Apart from that history won out.
ReplyDeleteYes, this was a fine end to the series but the Piedmontese were hoping for something more.
DeleteA great review of an enjoyable game. Richard & Ray put up a stubborn defence but the dice had other ideas. In the end Steve and I just had weight of numbers on our side and were able to keep both wings of the Piedmontees army from supporting each other.
ReplyDeleteAnother great game Jon, thank you for running yet another excellent game.
Thanks, Lee! Very pleased that you enjoyed the game. You and Steve performed marvelously on the battlefield.
DeleteYou are most welcome! You fellas are a treat to manage at the table.
It's nice to see that at least in your scenario the Spanish can perform well and it's a surprise that the king was killed (as he never was killed in our games at Quistello, Guastalla, Bassignana ...). The Italian battle ground is looking well on your table. In 2 weeks I will upload our report of Parma. Maybe you will like it...
ReplyDeleteGetting the King killed is a low probability event that can be avoided with some care and foresight.
DeleteI will definitely be looking for your Parma battle.
I'm very much excited to read what you think about our battle of Colorno.
DeleteI think that you are doing very well in playing so often. My own co-players are ill or have no time until their next event. Although I'm normally playing my battles some weeks or even months before uploading.
I have more content on our blog since I post about my new units too since the HoW-forum is gone... Unfortunately I can't paint for weeks... Cheers!
André, I have been away and have fallen behind. I will get to your blog and battle reports soon. I hope! Happy to see more wargaming content on your blog of late.
DeleteAha! The King dies again. There has been a high casualty rate for generals in the recent run of games. I wonder if it’s either us players being tempted to take risks that wouldn’t have been taken, or the odds are high in the rules. I suspect it’s not the latter as you need to ‘kill’ a unit first to even have a chance of killing the general/king.
ReplyDeleteA great series of games Jon. Well done!
Chris/Nundanket
Chris, high leader casualty rate is due to putting them directly in harm’s way. Players tend to play aggressively without fully realizing the long term consequences.
DeleteA superb battle report, poor Richard seemed to have the worst of it with his poor dice rolling
ReplyDeleteThanks, Neil! Yes, Poor Richard…
DeleteAnother superb looking game Jon, but very hard for Richard and Ray. To Chris' point re leader casualties and the king in particular, I think we wargamers are far more inclined to "throw in " a leader to try and gain an extra dice in a melee etc than would be likely to happen in real life! Would a King lead an almost certainly doomed cavalry charge, for example...almost certainly not!
ReplyDeleteThanks, Keith! As noted above we may be more cavalier with our treatment of leaders than we ought if players didn’t get their blood up during a game.
DeleteAnother splendid game. I have lost count of the number of times you have hosted this battle.
ReplyDeleteThanks! I’ve lost count too…five in this latest series.
DeleteThanks for another great report Jonathan.
ReplyDeleteSeems like all the players are republicans given how many times the King has died. 😁
You’re welcome! This is a tough time to be king.
DeleteGreat report as always Jonathan!
ReplyDeleteThanks, Michal!
DeleteAnother brilliant action there Jon, but it is certainly risky being a royal in these games;)!
ReplyDeleteThanks, Steve!
DeleteSplendid looking, as someone had mentioned, to rephrase a quote, "dice are poison."
ReplyDeleteDice can be poison, for sure.
DeleteSorry to see this battle leave the lists for now.
ReplyDeleteI am too but time to move on.
DeleteEverybody keeps coming back for more, so it must be a good time to kill a king.
ReplyDelete😁
It must be!
DeleteRegarding your comment on the first picture: too bad you couldn't read the reflection of his cards on his glasses :D
ReplyDelete