Monday, August 15, 2022

There Was Such Great Promise

On Sunday, Matt (wargamesinthedungeon) and I met on the remote fields of Bassignana to witness the third playing of the battle.  For those following earlier accounts, the ground should be well traveled.  For those new to the battle, below is a photo of the battlefield showing initial troop dispositions and place names.   

Initial dispositions
Matt took command of the combined Franco-Spanish armies while I headed up the defending Piedmontese/Austrian armies.  Rather than umpiring, I actually took up a command in Sunday's contest.  With two games in the books and the decision split, which way would the battle turn in Game #3?
French wing ready to step off.
Spanish army poised for action.
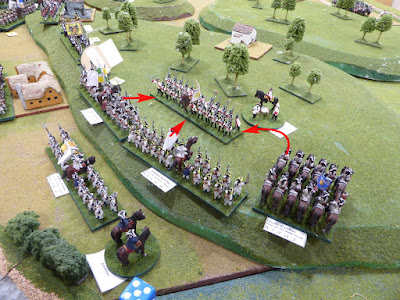
Matt's initial attacks and probes.
De Gages' brigade reaches the Tanaro River. 
His cavalry cross and are immediately
attacked by enemy cavalry.
Unsupported, the rash Piedmontese cavalry are scattered.
Not a good start for King Emanuele.
Artillery at Rivarone causes casualties upon Arambou's
 infantry as it prepares to the cross the Tanaro.
Battle view looking from the east.
Maillebois' French brigades prepare to cross the Tanaro
opposite Chiesa de San Germano and Montecastelle.
The defenders await.
In the center, de Montal attacks
 de la Chiesa's brigade at Rivarone. 
View of battle from southwest.
Despite artillery bombardment from the heights above,
de Montal's attack ejects the militia from Rivarone.
The militia is dispersed.
De la Chiesa goes down in battle, hors de combat.
Flush with seeing success at taking Rivarone,
Arambou assaults the guns at Rivarone.
De la Chiesa's battery is overrun.
The Piedmontese center has cracked!
Against Chiesa de San Germano,
 de Grammont lines up two battalions on the banks
 of the Tanaro and fires into the defenders.
The Piedmontese grenadiers are unmoved.
Senneterre sends two battalions across the Tanaro
 in an assault against Montecastelle.
The first attempt is bloodily repulsed.
While the Piedmontese left and center crumbles,
the right stands firm. 
On the Spanish wing, de Gages establishes
 a bridgehead across the Tanaro.
de Gages forms up his infantry and blasts
 the light infantry in front of Bassignana.
The light infantry melt away.
Bassignana is undefended!
With Rivarone in French hands,
 de Montal and Arambou prepare to press ahead,
 up the heights. 
In a concerted effort, de Montal and Arambou overwhelm
 de la Chiesa's last remaining battalion.
With their general dead on the field,
the Piedmontese scatter.
Isolated, King Emanuele falls to the calamities of war.
Having split the Piedmontese line,
 de Montal changes focus to attacking
D'Aix' position at Montecastelle. 
Before de Montal can close,
 the defenders of Montecastelle destroy
 one of Senneterre's battalions with volleyfire. 
De Gages has a firm grip on Bassignana.
With King Emanuele dead on the field and de la Chiesa's brigade destroyed, even the timely arrival of Austrian cavalry cannot stabilize the situation.  The Franco-Spanish army has won the day!  Congratulations to Matt for a well deserved victory.  Before battle began, the position of the King’s army held much promise.  While the fighting may have extended another turn or two, left with mainly cavalry, the Piedmontese/Austrian armies could not have recovered and held lost ground.

As in the historical battle, the Piedmontese army was split and overwhelmed before Austrian reinforcements could intervene.  Casualties were surprisingly evenly distributed with each side losing about a half-dozen units in the action.  The Piedmontese army would withdraw back across the Po River as they did historically.  This time, without their King!
Matt's screenshot of endgame action as seen from his iPad.
Looks good, no? 
Game length clocked in at about 2.5 hours and six turns played.

Still, great fun and another interesting outing at Bassignana! 

Friday, August 12, 2022

Paint 'em or Purge 'em

After 18 months of no additions to the ECW collection, I decided it time to revisit the project.  With most of the ECW figures having been painted and mustered out from The Lead Pile long ago, the project is considered finished.  A few bits and pieces linger but no pressing needs remain.  Is this true that the project is finished with little need for expansion?  From experience, this is rarely the situation.

Digging through the boxes of metal, a box of TAG figures emerged.  Ah, I remember these.  Seems only one unit of TAG cavalry has seen the paint brush to date.  Why not add another regiment of horse?  Indeed, why not?

As work progressed on the next nine horsemen, I dug around some more in the pile.  Out of the figure stash came about two-dozen musketeers.  Now, these are really dressed for the earlier Thirty Years War but they could see service in my ECW project in a variety of roles.  But does the project really need more musketeers with no complement of pikemen?  

These musketeers could be pressed into service as commanded shotte, militia, or baggage guards.  Since there are no dedicated commanded shotte or town militia mustered out in the collection, a need could conceivably exist.  Oh, and the figures are beautiful too!

Having never fielded either commanded shotte, town militia, or firelocks/baggage guard in a game, perhaps simply purging these figures is the prudent way forward.  Of course, maybe the right scenario has yet to make it to the table?

As my decision hangs in the balance, what would you do?  I will count up the responses and see where the issue stands.  Perhaps someone will lay a convincing claim to these figures before I push them into the painting queue? 

Paint 'em or Purge 'em? 

I may have answered my own question...

Monday, August 8, 2022

Samurai Archers

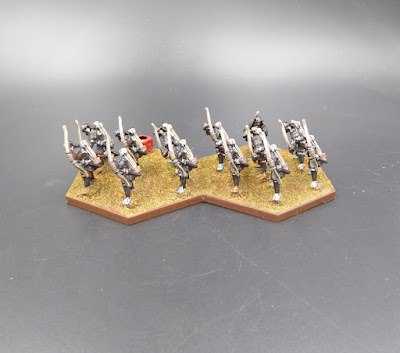
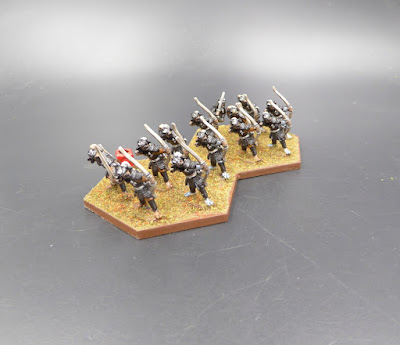
As a brief intermission between fielding SYW French, off from the painting desk today is a unit of Samurai bowmen.  These 15mm figures are from Museum Miniatures were part of a holiday sale pick-up in January.  Great figures with excellent sculpting.  Still more cavalry and teppo remain to push into the painting queue when I need a change of pace. 
SYW French remain a dominant sight in the painting queue although another diversion is in work.  A dig through The Lead Pile surfaced a box of TAG Thirty Years War/ ECW figures.  Both infantry and cavalry were rediscovered in the mix.  Nine of the horsemen were gathered up and primered in preparation for seeing some action at the painting desk.  After the next SYW French infantry musters out, I expect these cavalry troopers will be next on the scene.  

Gaming remains afoot including an introduction of Commands & Colors Ancients (CCA) to a fantasy gamer.  Yes, indeed!  I enticed a Warhammer 40k player to give historicals a try. 

Having replayed Caralis 215BC a number of times and finding it always to produce a close game, I put that out on the table for a refight in 6mm.
Caralis 215BC
My opponent chose to command Carthage and after a brief overview of the rules, we set to combat.  Logan began the game in a blaze of successes.  Quickly opening up the center, I found Rome down 5 banners to nil.  Rome recovered.  By endgame, Rome stood on a 7-6 advantage.  In one last grand cavalry charge, Carthage took out two severely weakened Roman infantry units in the center to claim victory.  It was a terrific Carthaginian victory.  Even better, my WH40k opponent enjoyed the game and is looking forward to more historical CCA games.

Score!

Up on Graham's gaming table for Tuesday is a rematch of last week's RCW battle.  Players are switching sides and plotting new battle plans. 

Thursday, August 4, 2022

Flagging French Cavalry

One of the early decisions made when I sat down to plan a French army was what to do about cavalry standard bearers.  Do I order one standard bearer for every unit I plan to field, some of the units, or none?  Since I had no French cavalry flags at the ready, the decision was to include standard bearers for perhaps half of the units.  Standard bearers with no flag look a bit forlorn.  I should know.  Most of my SYW cavalry have no banners waving in the breeze.  Armed with that decision, I sat down to make up the Christmas order to Eureka Miniatures.  As I type out these words, memories of poring over the pages of the Christmas catalog and making lists come rushing back.  Oh the joy!  Not much difference with the exception that fifty years have passed since those formative days.

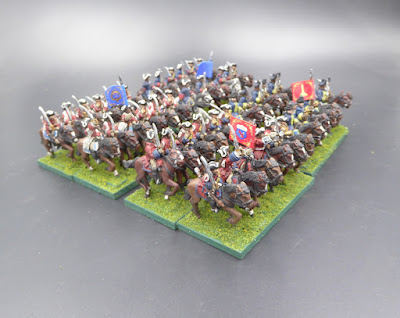
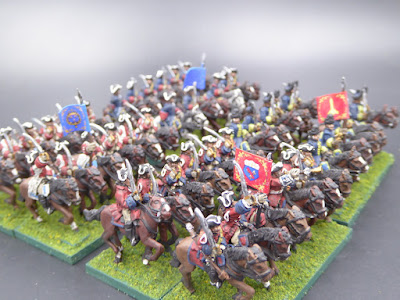
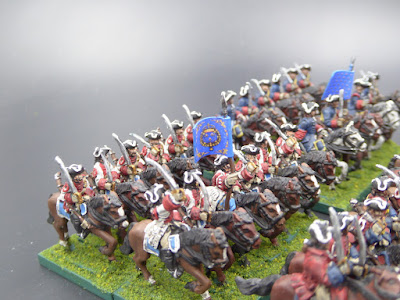
Anyway, having recently completed the first tranche of French cavalry units to field for Bassignana (up to seven units now), David (Not by Appointment blog) asked if some French cavalry flags would interest me.  Of course, they would!  Having seemingly kept a watchful eye on the mustering out of my French cavalry on the blog, I received an email with the standard for one of my recently released units.  After an exchange of emails, another flag for one of my units appeared.  And another.  And another.  David was creating these little masterpieces at a rate unsustainable to my painting throughput.  I may have more French cavalry banners than I do painted cavalry units; or unpainted ones!  This is especially true since not all of my painted cavalry units field a standard bearer.

In talking with David, one of his concerns is the small size of the cavalry banners.  He much prefers seeing the large flags of the infantry regiments.  Yes, cavalry banners are much smaller than their foot colleagues by design.  This concern is pronounced with flags for 15mm figures when compared to 25/28mm figures.  With Eureka cavalry, this is even more pronounced.  Many of the Eureka cavalry have short standards.  No space on the pole to attach a larger flag without replacing the pole.

Would much of the detail put into a cavalry banner be lost to the eye when printing and when displayed upon the gaming table?  Judge for yourself on four of the newly flagged cavalry units.


David's artistry in his flag work is still on display even in these small cavalry flags.  The banners provide a splash of color to the cavalry unit and help identify the command stand at a glance. 

Brilliant work, David, and thank you!  Now, I need to go off and make a new Wish List for Eureka Miniatures and include more cavalry standard bearers among the unit orders. 

Tuesday, August 2, 2022

2022 Great Wargaming Survey is Live!

The 2022 edition of Wargames, Soldiers, and Strategy Magazine's The Great Wargaming Survey is active at the following link: 

GWS 2022

The 2022 survey sees one or two new questions and an improved ranked-choice UI.  I found the survey only took a few minutes to complete. 

If interested, I encourage readers to take a few minutes out of their day to complete the survey.  If my post-survey analyses are of interest, jot down your responses for later reference when I present summaries and inferences.  All responses are anonymized and reported as summaries only.

Survey runs through 31 August.

Thank you.

Jon

Sunday, July 31, 2022

Look! I Painted Something!

In a tip of the cap to one of Stew's recent ramblings on blog content at A Terrible Loss of Lead and Wealth, I offer up a Look - I painted something post.

Mustering out from the painting desk today are a dozen horsemen from the French Raugrave Cavalerie Regiment.  Figures are from Eureka Miniatures.

I thought these were the last of the French cavalry figures from my big Christmas restock of Eureka Miniatures back in December.  As is often the case, I was wrong.  A careful rummage through The Lead Pile surfaced another dozen French cavalry troopers.  Hooray!  These newly-found figures will go into the production queue with a goal of mustering out as the Colonel-General Cavalerie Regiment.  Inspired by David's recent, superb flagwork for this regiment (see French Cavalry Standards - Colonel-General Cavalerie Regiment), a redcoated regiment is just what I need. 
Speaking of David's superb flagwork, his barrage of cavalry flags led to a series of misfortunes on Saturday.

With enough newly raised regiments to warrant printing up another flag set, I set to work creating the set of flags.  With the sheet finished, the flagsheet was sent to the printer.  The flags printed but the color blue was not rendering.  Was the color cartridge out of ink?  The printer status suggested the cartridge was still mostly full.  Hmm.  Were the printer heads or cartridge contacts plugged?  They all looked OK but I gave each a good swab anyway.  I tried again.  Still not blue. Perhaps the printer heads were misaligned?  I aligned them.  Nope still no color. 

Off to the store for new ink cartridges.  Back again.  Still no color.  Sigh.  A call to tech support suggested that the printer heads were damaged and ought to be serviced and replaced.  Well, the cost of sending the printer out for repair was almost the equivalent cost to purchasing a new printer.  What did I do? Purchasing a new printer seemed reasonable.

With an in-house supply of ink cartridges, I wanted to purchase a printer with the same ink cartridge specs.  Having found several contenders, I went out to buy one.  The store had the correct printer so I bought one and brought it home.  

Installation became a small nightmare as the printer screen kept issuing a "Printer photo tray" blocked error.  No way past this error and the tray showed no sign of blockage or jam ("jam"?  is this another variation on Stew's PB&J posts?).  I digress...

Another call to tech support in Bangalore was met with a long pause as "Bob" searched the printer knowledge base.  After several minutes wait, Bob came back onto the line to say that the tray is defective.  Return the printer to the store from which I purchased it and get another.  Oh, and good luck!

Well, back to the store I go with the inoperative printer in the opened box.  After I explained the situation and my call to India, the guy in customer service said, "let's get you a new one."  After exchanging printers, back home I went with the new package.  

After unpacking and setting the new printer up, installation began.  Less than 15 minutes later, the new printer was being put through its paces on diagnostics and printing test pages.  All is working but duty calls to other pressing matters like preparing dinner for guests.

Now, time to give the new printer a test run with an assortment of Dave's flags.

Whew!           

Wednesday, July 27, 2022

Learning curve is not so steep!

Having battled at the confluence of the Po and Tanaro Rivers two weeks prior (see Bassignana, A Battle Report) and with no better offers, the fellas agreed to fight the battle a second time in the regular, weekly Tuesday time slot.

The first encounter ended with a Franco-Spanish victory as Chris led de Gages' Spanish on a romp toward the pontoon bridge over the Po as Bassignana fell.  With no sign of Schulenburg's Austrians in sight, victory was declared for the Franco-Spanish alliance. 

Since four of the five players in the previous game would return, commands were shuffled up to provide a new challenge to each player.  Richard and Chris would switch sides and command the Piedmontese/Austrian armies while Steve would swap the Piedmontese King's sceptre for a French general's command.  Phil remained on the Franco-Spanish side but taking overall command as French General Maillebois.  Ian, a new recruit for Game #2 took de Gages' Spanish command.

Early consensus suggested the battle may be too tough to allow the Piedmontese to score a victory.  I thought the Piedmontese had an opportunity to see success but the defenders may have a learning curve to scale.  Richard and Chris took up this challenge.  Studying the ground, army dispositions, and victory conditions, a plan was hatched.

Could the lessons learned from Game #1 help to level the playing field or would the challenge or learning curve prove too steep? 

As a refresher, the initial army dispositions are:

Initial battle dispositions
Battlefield looking to the west.
On to Battle!

In the first playing, King Emanuele III (KEIII) ordered Liguane's dragoons to ford the Tanaro and apply hard pressure on the French left at the start of battle.  The ploy paid off in disrupting the French lines of communication but the effort effectively took Liguane out of the battle at a crucial stage.  After scattering a French cavalry regiment, Liguane never affected the battle again.  Would the new KEIII (Phil) follow the same path? 
Liguane's dragoons positioned on the Piedmontese right.
Maillebois' French ready to advance across the Tanaro. 
The Spanish on the Franco-Spanish right kick off the action by moving up into position to ford the knee-deep Tanaro river.  Maillebois' French follow suit and advance to prepare for the crossings opposite Chiesa de San Germano and Montecastelle.  For now, the only Piedmontese action is to wheel Liguane about and trot off to the north toward the Po River.  What?  The defenders of the multiple villages facing the Tanaro prepare themselves for defense. 

The Franco-Spanish attack begins.
All along the Tanaro River, the Franco-Spanish armies wade across the waterway.  Senneterre's two infantry battalions waste little time in climbing the hill to Montecastelle.  D'aix' infantry atop the heights readies for the attack it knows will come.  
Senneterre assaults Montecastelle
as the Franco-Spanish cross the Tanaro.
The Spanish ford the Tanaro.
The French wade across the Tanaro.
Senneterre's attack goes in against the defenders of Montecastelle and is bloodily repulsed by well-timed and successfully delivered volleys.  Senneterre's two infantry battalions fall back across the Tanaro.  With infantry falling back, Senneterre's artillery bombards Montecastelle to cover the retreat and soften up the defenders.  On Senneterre's left, de Grammont sends his two infantry battalions in against the defenders of Chiesa de San Germano.  The Piedmontese grenadiers of San Germano deliver a withering volley into the face of the attackers.  Heavy casualties do not discourage the French from continuing to close.
Senneterre attacks Montecastelle.
Maillebois orders both de Grammont and Senneterre's cavalry to cross the Tanaro.  De Grammont's two cavalry regiments swing wide left around Chiesa de San Germano.  To where did Liguane's cavalry disappear?  Chris sent a chat message to me providing orders for Liguane.  He asked me to remove the cavalry from the table when out of sight of the enemy and track their progress off table.  Chris is a crafty one!
Attack against Chiesa de San Germano goes in
as Senneterre's attack against Montecastelle is repulsed.
(Note that the Piedmontese players are all smiles).
In the close assault at San Germano, de Grammont's attack is stopped short.  The lead battalion, already wavering from the volleys, is cut down.  De Grammont falls in the attack too.  While overseeing the developing attack on Rivarone, Maillebois receives word that de Grammont has fallen.  The attack on Chiesa de San Germano has stalled.  Maillebois spurs his horse to rush off to shore up the faltering attack against the Piedmontese right.
de Grammont falls in the assault
upon Chiesa de San Germano
.
In the center, de Montal and Arambou converge their energies against the defenders of Rivarone. With only a small brigade, de la Chiesa will have trouble holding the exposed village.  Despite support from D'aix' guns on the hill, the pressure is great.  In the attacks, de la Chiesa's guns are lost and the regulars are forced back onto the heights.  The hapless militia holding the village are overrun by de Montal's Brigade.  Rivarone is lost!  De la Chiesa's Brigade is broken! 
Attacks on Rivarone.
With Rivarone in French hands, Senneterre renews his attack against Montecastelle.  Again, Senneterre's attack is repulsed as the Piedmontese right stands firm.  Again, Senneterre's artillery covers the withdrawal by bombarding the village.  Senneterre's cavalry are sent north into the valley between Montecastelle and Chiesa de San Germano.  This is a dangerous maneuver with the high ground lined with the enemy. 
Arambou and de Montal move against Rivarone. 
Back on the Spanish right, de Gage forms a bridgehead on the north bank of the Tanaro.  Getting too close to Bassignana, one of de Gage's cavalry regiments is dispersed from volleys from the battalion garrisoning the Bassignana fortress.  De Gage's infantry fan out to counter enemy light infantry threats to his right while marching on Bassignana directly with the remainder.
Rivarone falls!
Having crossed the Tanaro,
 the Spanish advance toward Bassignana.
Above the valley north of Montecastelle, the Piedmontese guards pour volley after volley down onto the French cavalry.  One formation is dispersed before it can complete its run of the narrow gauntlet.  Seeing Senneterre's second attack repulsed at Montecastelle, French artillery concentrate on the castle.  Still, the Piedmontese defenders remain steady.  Positioned below the defenders on the hill between Rivarone and Bassignana, Arambou's infantry engage in a firefight with the remnants of de la Chiesa's infantry.  If Arambou is to succeed, he may have to take the ground by force.
Into the Valley of Death.
French cavalry receives a whiff of lead from on high.
This is exactly what Arambou does!  Supported by de Montal, Arambou climbs the heights and pushes the enemy back.  Maillebois sees his army on the heights!  On the Spanish front, a firefight erupts with the defenders of Bassignana.  The Piedmontese light infantry continues harassing de Gage from the treeline.
Piedmontese center and left are bending
as the enemy scales the heights.
On the French end of the battle line, Maillebois watches as his French infantry are thrown-out yet again from both San Germano and Montecastelle.  French losses are heavy but Sennettere's cavalry reach the church at Fiondi.  Can the Piedmontese be surrounded?
The Piedmontese slowly give ground.
Perhaps not!  In the distance, Liguane's cavalry reappears on the road to Bassignana near the pontoon bridge.  Schulenburg, followed by Neuhaus' Austrian infantry, is seen crossing the pontoon bridge over the Po.  Reinforcements arrive to squash any thoughts of either encirclement or breakthrough.  With the French left wrecked and both Bassignana and the pontoon bridge secure, Maillebois' thoughts of victory are fleeting. 
Liguane and Schulenburg arrive!
Franco-Spanish armies running out of steam.
Maillebois' hopes dashed.
With the game session drawing to a close, victory goes to the Piedmontese and Austrian armies!  Congratulations to Richard and Chris for reversing history in a convincing manner.  

While the King saw one brigade wrecked (de la Chiesa), the remainder of the Piedmontese army remained in stable condition.  The Franco-Spanish, however, suffered mightily on the attack.  Only Arambou's Brigade saw itself with little damage.  The other four brigades were all on the verge of breaking.  They had literally fought themselves out.  With repeated attacks against the Piedmontese strongpoints, the end of battle tally showed Maillebois' army losing six units.  Several more were close to dispersing as well.

The Franco-Spanish battle plan, while leading to victory in Game #1, seemed to carry forward to Game #2.  Having lost the first battle, the Piedmontese and Austrian armies came up with a different strategy to tackle the problem.  That change of strategy worked!  Rather than defend the Tanaro River line, the King opted to defend the strongpoints and high ground.  The focal point of the defense was not to lose Bassignana.  If Bassignana could be defended then having the pontoon bridge cut was an unlikely possibility.

Interestingly, the French attacks against the strongpoints of Chiesa de San Germano and Montecastelle ended in the same manner as before.  That is, all attacks were repulsed with heavy casualties.  Having the Piedmontese grenadiers and guards defending these positions was key to keeping these objectives firmly in Italian control.

As umpire and figure-pusher, watching these strategies unfold differently from Game #1 was rewarding.  Players adapted to lessons learned from the previous game and put those lessons into work to alter the outcome.  KEIII did a good job in tipping the seeming imbalance in the historical situation to give his army a fighting chance at victory.  A fight for victory that ended in success.  The boys are quick studies and the learning curve is not so steep.

Thanks again to the players for an enjoyable outing.