Having battled at the confluence of the Po and Tanaro Rivers two weeks prior (see Bassignana, A Battle Report) and with no better offers, the fellas agreed to fight the battle a second time in the regular, weekly Tuesday time slot.
The first encounter ended with a Franco-Spanish victory as Chris led de Gages' Spanish on a romp toward the pontoon bridge over the Po as Bassignana fell. With no sign of Schulenburg's Austrians in sight, victory was declared for the Franco-Spanish alliance.
Since four of the five players in the previous game would return, commands were shuffled up to provide a new challenge to each player. Richard and Chris would switch sides and command the Piedmontese/Austrian armies while Steve would swap the Piedmontese King's sceptre for a French general's command. Phil remained on the Franco-Spanish side but taking overall command as French General Maillebois. Ian, a new recruit for Game #2 took de Gages' Spanish command.
Early consensus suggested the battle may be too tough to allow the Piedmontese to score a victory. I thought the Piedmontese had an opportunity to see success but the defenders may have a learning curve to scale. Richard and Chris took up this challenge. Studying the ground, army dispositions, and victory conditions, a plan was hatched.
Could the lessons learned from Game #1 help to level the playing field or would the challenge or learning curve prove too steep?
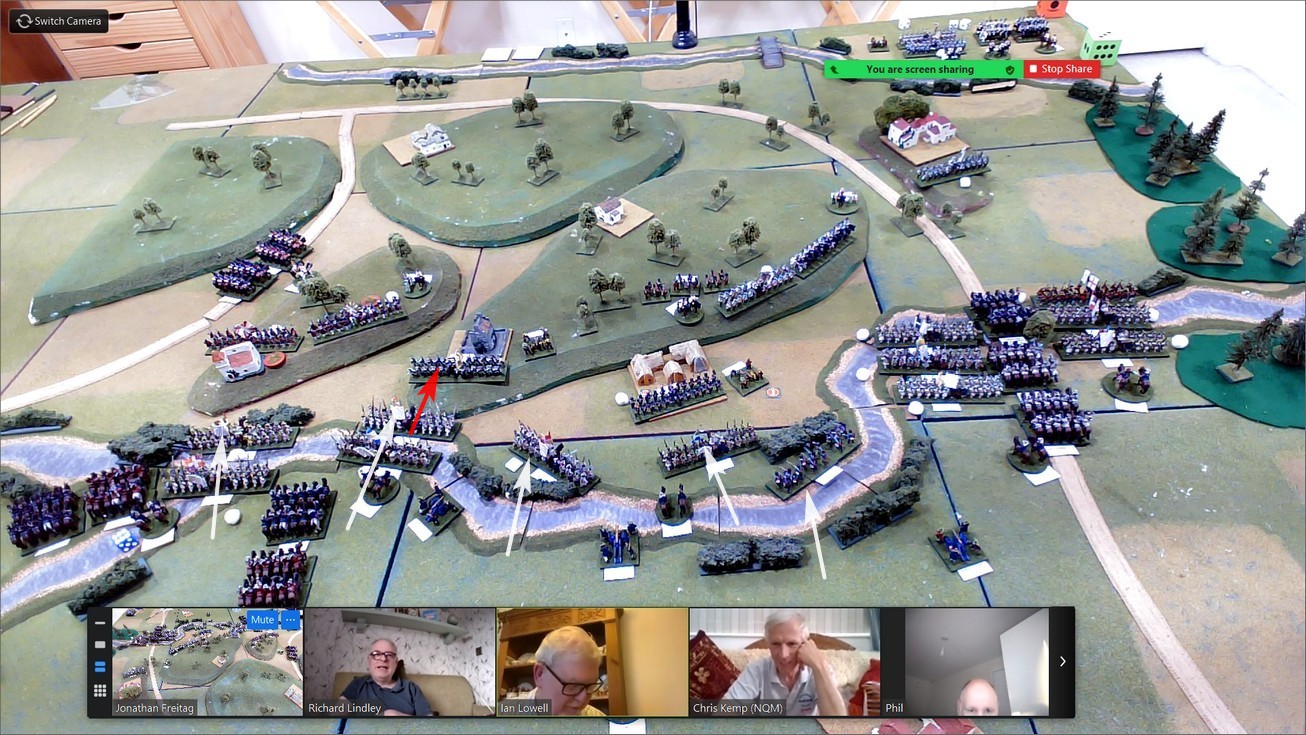
As a refresher, the initial army dispositions are:
 |
| Initial battle dispositions |
 |
| Battlefield looking to the west. |
On to Battle!
In the first playing, King Emanuele III (KEIII) ordered Liguane's dragoons to ford the Tanaro and apply hard pressure on the French left at the start of battle. The ploy paid off in disrupting the French lines of communication but the effort effectively took Liguane out of the battle at a crucial stage. After scattering a French cavalry regiment, Liguane never affected the battle again. Would the new KEIII (Phil) follow the same path?
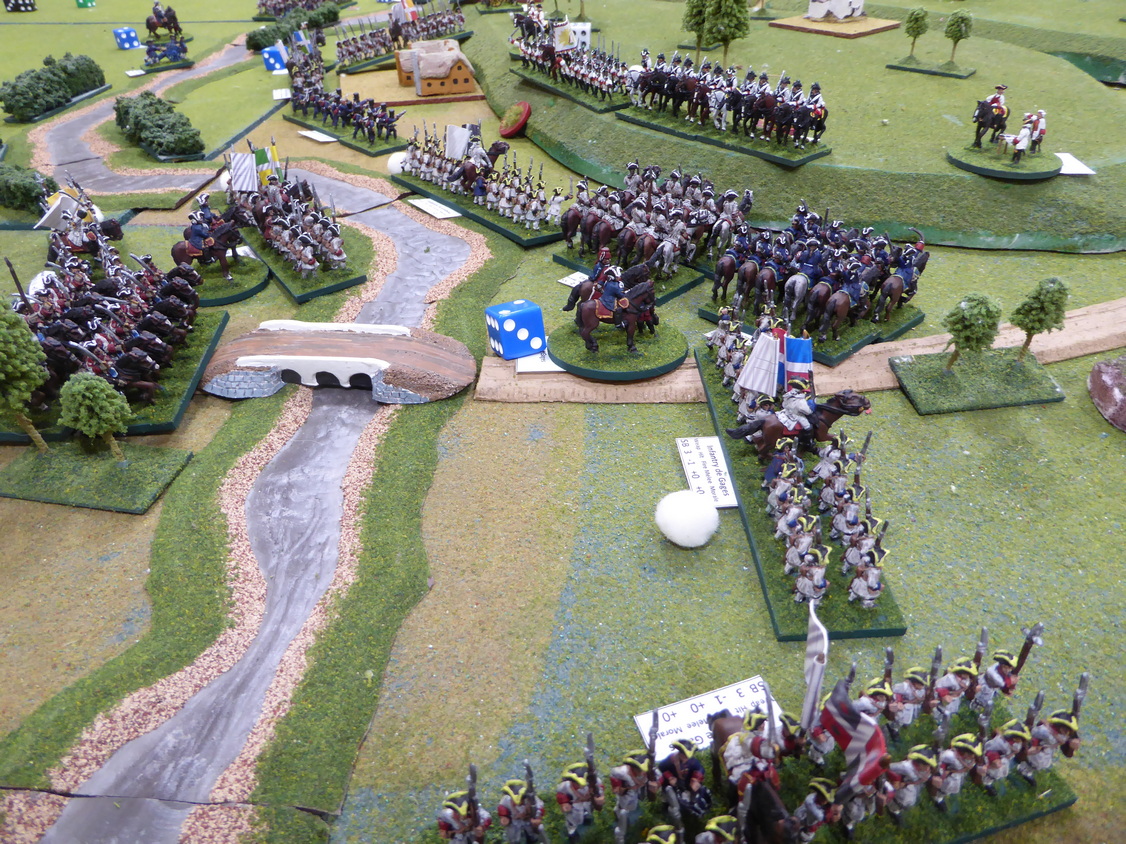
 |
| The Spanish ford the Tanaro. |
 |
| The French wade across the Tanaro. |
Senneterre's attack goes in against the defenders of Montecastelle and is bloodily repulsed by well-timed and successfully delivered volleys. Senneterre's two infantry battalions fall back across the Tanaro. With infantry falling back, Senneterre's artillery bombards Montecastelle to cover the retreat and soften up the defenders. On Senneterre's left, de Grammont sends his two infantry battalions in against the defenders of Chiesa de San Germano. The Piedmontese grenadiers of San Germano deliver a withering volley into the face of the attackers. Heavy casualties do not discourage the French from continuing to close.
 |
| Senneterre attacks Montecastelle. |
Maillebois orders both de Grammont and Senneterre's cavalry to cross the Tanaro. De Grammont's two cavalry regiments swing wide left around Chiesa de San Germano. To where did Liguane's cavalry disappear? Chris sent a chat message to me providing orders for Liguane. He asked me to remove the cavalry from the table when out of sight of the enemy and track their progress off table. Chris is a crafty one!
 |
Attack against Chiesa de San Germano goes in
as Senneterre's attack against Montecastelle is repulsed.
(Note that the Piedmontese players are all smiles). |
In the close assault at San Germano, de Grammont's attack is stopped short. The lead battalion, already wavering from the volleys, is cut down. De Grammont falls in the attack too. While overseeing the developing attack on Rivarone, Maillebois receives word that de Grammont has fallen. The attack on Chiesa de San Germano has stalled. Maillebois spurs his horse to rush off to shore up the faltering attack against the Piedmontese right. |
de Grammont falls in the assault
upon Chiesa de San Germano. |
In the center, de Montal and Arambou converge their energies against the defenders of Rivarone. With only a small brigade, de la Chiesa will have trouble holding the exposed village. Despite support from D'aix' guns on the hill, the pressure is great. In the attacks, de la Chiesa's guns are lost and the regulars are forced back onto the heights. The hapless militia holding the village are overrun by de Montal's Brigade. Rivarone is lost! De la Chiesa's Brigade is broken!
 |
| Attacks on Rivarone. |
With Rivarone in French hands, Senneterre renews his attack against Montecastelle. Again, Senneterre's attack is repulsed as the Piedmontese right stands firm. Again, Senneterre's artillery covers the withdrawal by bombarding the village. Senneterre's cavalry are sent north into the valley between Montecastelle and Chiesa de San Germano. This is a dangerous maneuver with the high ground lined with the enemy.  |
| Arambou and de Montal move against Rivarone. |
Back on the Spanish right, de Gage forms a bridgehead on the north bank of the Tanaro. Getting too close to Bassignana, one of de Gage's cavalry regiments is dispersed from volleys from the battalion garrisoning the Bassignana fortress. De Gage's infantry fan out to counter enemy light infantry threats to his right while marching on Bassignana directly with the remainder.
 |
| Rivarone falls! |
 |
Having crossed the Tanaro,
the Spanish advance toward Bassignana. |
Above the valley north of Montecastelle, the Piedmontese guards pour volley after volley down onto the French cavalry. One formation is dispersed before it can complete its run of the narrow gauntlet. Seeing Senneterre's second attack repulsed at Montecastelle, French artillery concentrate on the castle. Still, the Piedmontese defenders remain steady. Positioned below the defenders on the hill between Rivarone and Bassignana, Arambou's infantry engage in a firefight with the remnants of de la Chiesa's infantry. If Arambou is to succeed, he may have to take the ground by force. |
| Into the Valley of Death. |
 |
| French cavalry receives a whiff of lead from on high. |
This is exactly what Arambou does! Supported by de Montal, Arambou climbs the heights and pushes the enemy back. Maillebois sees his army on the heights! On the Spanish front, a firefight erupts with the defenders of Bassignana. The Piedmontese light infantry continues harassing de Gage from the treeline.  |
Piedmontese center and left are bending
as the enemy scales the heights. |
While the King saw one brigade wrecked (de la Chiesa), the remainder of the Piedmontese army remained in stable condition. The Franco-Spanish, however, suffered mightily on the attack. Only Arambou's Brigade saw itself with little damage. The other four brigades were all on the verge of breaking. They had literally fought themselves out. With repeated attacks against the Piedmontese strongpoints, the end of battle tally showed Maillebois' army losing six units. Several more were close to dispersing as well.
The Franco-Spanish battle plan, while leading to victory in Game #1, seemed to carry forward to Game #2. Having lost the first battle, the Piedmontese and Austrian armies came up with a different strategy to tackle the problem. That change of strategy worked! Rather than defend the Tanaro River line, the King opted to defend the strongpoints and high ground. The focal point of the defense was not to lose Bassignana. If Bassignana could be defended then having the pontoon bridge cut was an unlikely possibility.
Interestingly, the French attacks against the strongpoints of Chiesa de San Germano and Montecastelle ended in the same manner as before. That is, all attacks were repulsed with heavy casualties. Having the Piedmontese grenadiers and guards defending these positions was key to keeping these objectives firmly in Italian control.
As umpire and figure-pusher, watching these strategies unfold differently from Game #1 was rewarding. Players adapted to lessons learned from the previous game and put those lessons into work to alter the outcome. KEIII did a good job in tipping the seeming imbalance in the historical situation to give his army a fighting chance at victory. A fight for victory that ended in success. The boys are quick studies and the learning curve is not so steep.
Thanks again to the players for an enjoyable outing.


The birds eye view that falls out of the necessities of remote gaming, do give a very pleasing look of armies in action - a nice table.
ReplyDeleteI am increasingly seeing the importance to returning to the same battle / rules for 2 - 3 games in a row, to maximise the benefits of learning rule sets and better understanding what the game / scenario / system are demanding. Game number 2 is invariably more satisfying than game number 1.
I have just had my Quatre Bras game to the table for 3 consecutive plays and hugely enjoyed that.
Thanks, Norm. Pleased you like the look of the table. The birds eye photos are screenshots from the webcam positioned over the Franco-Spanish side of the table.
DeleteReplaying a scenario has many benefits as you note. A gamer can learn much from replaying a historical scenario, I think. I am an advocate, for sure.
What are your thoughts on the battle, itself, and how the battle unfolded?
Will we be seeing accounts of your Three Days of QB?
The rules did a good job, combined with your commentary, of bringing a lot of life to the battle. Love the idea of Liguane's cavalry disappearing and re-appearing, a real benefit of remote / umpire.
DeleteThree games of Quatre Bras, but only one got a blog outing and that really more to serve as an introduction to Jours de Gloire, so that future battles (Aspern-Essling next) could be covered a little more lightly.
I am a fan of Bey's JdG series and have many games in the series. My Aspern-Essling is the first edition in the folio packet. What are the differences in the newly released second edition that warrant picking it up?
DeleteThe blurb says ….. You get the 2021 rules, stacking limits have been modified in the specific rules, night rules for scenario 3 have been modified and there is a bonus scenario, a hypothetical situation published in Vae Victis special edition No 12. The counter artwork has been upgraded.
DeleteThanks! I look forward to your review and play through.
DeleteAnother great battle and write up Jon. So interesting to see how a different pair of eyes...and brains...can come up with a different solution. Now, in game three, you need the Piedmontese to follow a similar strategy to game two, and see if fresh French/Spanish eyes can come up with a winning strategy!
ReplyDeleteGlad you liked a second replay of Bassignana!
DeleteIt is very interesting to see how different players attack a battle in replays. Something can be gained from each trial. Now it is the Franco-Spanish commanders' turn to step up the game plan to counter this Piedmontese/Austrian success.
Agree, excellent looking battle again Jonathan!
ReplyDeleteBest regards
Thank you, Michal!
DeleteAnother great game there Jon and nice to see a different outcome, for the reasons already stated. There is much to be gained from replays of the same battle (certainly hisotrical ones) to help understand why they turned out as they did or what could have been done better for either side to achieve victory.
ReplyDeleteHere the decision not to defend the river line (as advocated by Napoleon and Clausewitz) but the BUA's made a lot of sense and obviously worked out rather well!
Currently the River Po is at a historical all time low and can be walked across, due to lack of winter snow and the spring thaw run off that brings, combined with very little rain at all in northern Italy. Imagine if that were the case for this battle, which could change things a bit.
Thanks! As wargamers and armchair generals, we must always keep in mind that the historical battle outcome represents but one single data point. That historical result may not have represented the most likely outcome of the engagement.
DeleteKEIII's plan to defend the BUAs proved successful in this battle trial. Would this plan work again against a different Franco-Spanish plan? Something to explore. Richard, as KEIII, realized that holding Bassignana was key and led down the road to potential victory. This time, he was correct!
Interesting tidbit about the water levels in the Po. During this battle, the Tanaro was only knee deep but the Po had limited crossing points. Exploring this battle with a fordable Po would be an interesting exercise.
Excellent! Looks great and read like an absorbing game.
ReplyDeleteI'm a big fan of refighting scenarios to see if a different plan (and sometimes dierolls) makes a difference.
Ross, this was a fun battle to watch unfold. So was the first battle!
DeleteYep. We both enjoy refighting battles. A lot of insight by doing so.
Cracking game. Good to see the defenders pick up a victory
ReplyDeleteThank you, Neil! Yes, it was very good to see the defenders grab a victory in a situation that looked devoid of much hope.
DeleteLooks good. I'm sorry to have missed this one. Twice. July has proved to be very busy.
ReplyDeleteThanks! It was good. The gaming Gods conspired against you in July, for sure.
DeleteA very nice battle report and a good game by all accounts.
ReplyDeleteThank you, George!
DeleteAn interesting and absorbing read again Jonathan, good to see that the result of the battle is not a foregone conclusion too.
ReplyDelete"Interesting and absorbing read" is a great compliment! Thank you, Phil!
DeleteA nice reprise and an interesting move by Chris to pull the cavalry off the table and have you track it like that. Nice thinking there.
ReplyDeleteChris was thinking outside of the box on his request to “disappear” the cavalry. I thought, why not?
DeleteLatest, released dispatch suggests that Chris was simply following orders to redeploy Liguane from the right flank to Bassignana. Richard was the mastermind behind this ploy!
DeleteWhat a superb looking game Jonathan. Those big cavalry masses really fit the bill.
ReplyDeleteThank you, Mark! The cavalry BMUs are only 12 figures but based knee-to-knee and in tandem, the block looks good to my eye.
DeleteNow then, that looks good. A feast for the eyes. As well as French, Austrians and Prussians, do you have an army specifically painted as Piedmontese? That's something I fancied doing back in my 25mm days as it is quite a small army relatively speaking. Oh and Spanish?
ReplyDeleteSorry, not being able to comment lately. I've found a way of doing so again from the laptop but not my phone.
Hi Chris! Good to see a comment from you! Hopefully you can get your commenting issues sorted. Looks like it works from the laptop. Hooray!
DeleteFunny that you mention Piedmontese and Spanish. While I have no specific Piedmontese and Spanish armies mustered and ready for battle, I have an order for more French infantry inbound for just such an endeavor. All three of these nations tended to follow the French model in that line regiments are in white with foreign regiments in blue or red. Until they can field their own armies, I will continue to substitute French.
May add in a few Genoese battalions too, for good measure.
I plan to refight this battle in a couple of weeks when Mike (see his comment above) is free from domestic duties. I could use a Few Good Men to take commands if you are interested.
That sounds excellent. I love Savoy uniforms. They are a little bit different from the French uniforms - I would guess a bit more looking modern. The Piedmont army already had bearskin caps for grenadiers for example. Therefore I used "Austrians" for my Piedmont army especially because they have drawbacks.
DeleteAndré, I really need better uniform info on the Piedmontese. By "modern" do you mean with both front and back turnbacks? I was thinking using French with front and back turnbacks but I may need to reconsider if my assumption was wrong.
DeleteI agree that battles are more fun the second time around for players and GMs as things tend to gel more and tactics become more refined as the rules more comprehended. Though I usually end up tinkering with the scenario some. Did you make any changes? 😀
ReplyDeleteStew, no changes to either rules or scenario. I kept everything RAW.
DeleteBrilliant defending by the Piedmontese and the Franco-Spanish certainly failed to make their superior numbers tell. I honestly did not understand the ‘valley of death’ (as you put it) maneuvre. It was a bit suicidal imo to expose their flank in that manner. And am I the only one to get the impression that both sides’ artillery is underutilised?
ReplyDeleteThe Piedmontese played a good game, for sure. Having played the Franco-Spanish in Game 1, Richard and Chris spotted the weaknesses of the Franco-Spanish and emphasized the strengths of the Piedmontese and the victory conditions.
DeleteOn the cavalry ride up the valley, Senneterre thought he could squeeze through the narrow valley without incident and exit to the north near two objectives. He forgot that D’Aix had placed much of his brigade on reserve to respond to such an incursion. That mistake cost him dearly.
On artillery, both were used but the light guns were not very effective for either side. Batteries were few and bombardments were lackluster.
Great to see your thoughts and analysis of the battle.
That is looking excellent. We had similar outcomes when we played the game. It's crucial that the Spanish and French defeat the Savoy right very fast and maybe to send the stronger French cavalry to Bassignana to help the Spanish. In my games the Spaniards have smaller units than the French and therefor are breaking very fast if not attacking in superior numbers at once.
ReplyDeleteThank you for your report. It would be nice to join your battles. But I'm very bussy and maybe it would be to difficult because I'm in Europe...
Thank you, Andre. The Spanish are weaker in my game too. They must attack in u is on as you suggest to see success. In both games, we found that the Piedmontese right is a tough nut to crack. Those positions held out successfully in both contests.
DeleteWhile your busy schedule may not accommodate a game, playing from Europe poses little difficulty.