Monday, December 30, 2019

SYW Command

While building the OBs for Kunersdorf, I discovered that despite the huge armies amassed between Jake's Russians and my Prussians, troop totals fell short.  Although I thought I had fielded plenty of command stands, the Prussians still required two more to fill out all of the commands.  Similarly, the Russians found themselves one command short.  On the infantry front, Jake's already massive Russian army came up eight infantry regiments short.  
To alleviate the Russian infantry shortage, I pressed six Russian regiments of mine into service and two Austrian infantry regiments.  Perhaps a few more Russian musketeer units ought to be pushed into the painting queue?  For the command stands, I painted three command stands the week prior to the game.  These commands stands are on display today.  Figures are Eureka Miniatures.

As for the battle of Kunersdorf, itself, the opening session of the battle saw the completion of about three hours of game time.  While the Russian Muhlberg position teeters on the verge of collapse, the Russians have abandoned their earthworks near Juhlberg and are advancing upon Prussian positions near Kunersdorf.  The first play may very well end in an historical outcome.  If the Muhlberg falls, the Prussians will likely be positioned in a very similar situation to the high water mark of the historical Prussian attacks.  This situation is not conducive to a Prussian victory.  Casualties have been especially heavy to the cavalry arm of both armies.  More details on the replay once photos and notes are organized. 

Saturday, December 28, 2019

Celtic Chariots in 6mm

Digging around in The Lead Pile in a search of components for a planned 2020 project, I unearthed a few packs of Baccus 6mm ancients.  These few packs of tiny figures were left over from a time when I was building Punic Wars armies in 6mm for who knows what ruleset.  

When Commands & Colors: Ancients (CCA) came upon the scene, I rebased the figures so that the armies could be utilized on a hex grid and gamed using CCA.  This was a decision to which I have no second thoughts or misgivings on my direction.  These armies have fought many a battle on a grid and I see no end in sight.  
One pack of figures uncovered in the recent dig contained eight Celtic chariots.  Having spent much time in 2019 in fielding Celtic warbands in 28mm for a planned Telamon recreation, I immediately thought about the possibility of fighting Telamon in 6mm.  The problem with that line of reasoning is that only a handful of warbands are present in the 6mm armies.  More Celts would be needed for sure.
Having not painted any 6s in years (a quick check of the Painting Log shows five years to be exact!), I forgot how small these little fellas were.  Even with another five years for the eyes to continue aging, I found these Celts painted without too much difficulty. On the battle board and at playing distance, these chariots will look just fine.  Also rediscovered was a bag of Velites.  I may as well push these into the painting queue too.

Wednesday, December 25, 2019

Silent Night

Christmas 2019 presents itself in a manner different from Christmas' past.

While the house on the hill is usually Ground Zero in the storm that surrounds the holiday, this year, the house is quiet.  With only one out of four grown children in town for the holiday, no houseful of guests, no whir and whirl of breakfasts and large dinners to prepare.  No chaos of grandkids tearing open presents and laughter over spilled mimosas and silly gifts.  This year, no stress.  Nancy and I even had the opportunity to take in a movie Christmas Eve. 

A quiet Christmas is rare.

For the first time, Christmas Day activities will be celebrated at Daughter #1's new home.  She is excited to host and the grandkids will be happy not to bundle up and haul all of their presents to grandmas.  Later, the Christmas Dinner Feast will be held at a nearby resort.

With most holiday responsibilities removed, there will be time for reflection and even an opportunity for a quiet painting session if I choose.

No matter how this day is spent, I wish you all a Merry Christmas. 

Merry Christmas!

Tuesday, December 24, 2019

Battle of Kunersdorf: A Scenario

The Battle of Kunersdorf, 12AUG1759.
As suggested in a previous post showing the layout of the upcoming Kunersdorf battle (see Setting Up the Battle), the battle scenario has been in work.  With references primarily from kronoskaf.com's Project SYW and Grant's Wargaming in History Vol 5, a working model is in place.  The battlefield takes up a 12' x 6' table and the size of the armies are HUGE.  Rules in use: Honours of War

The battlefield is constricted with a number of choke points for the attacker.  The ridge along which the Austro-Russian Army is deployed is protected by earthworks running the length of the ridge.  Besides the defensive works, the Austro-Russian positions are protected by a series of ponds and marshes and a stream to the northeast of the Muhlberg.  The village of Kunersdorf, itself, poses an obstacle to an attack since it is burning.  The Muhlberg, upon which the Russian Observation Corps is deployed is a Geographical Objective worth three army points as is the Grosser Spitzberg in the center of the Russian held ridge.  In addition to earthworks, the Muhlberg is protected by abatis. 
Kunersdorf terrain features
The Russians, under Saltykov, have taken up positions along the ridgeline with the Observation Corp positioned on the Muhlberg.  The remainder of the Russian commands are strung out along the main ridge with the Austrians under Loudon at the foot of the ridge below Judenberg.  The allied positions look formidable.
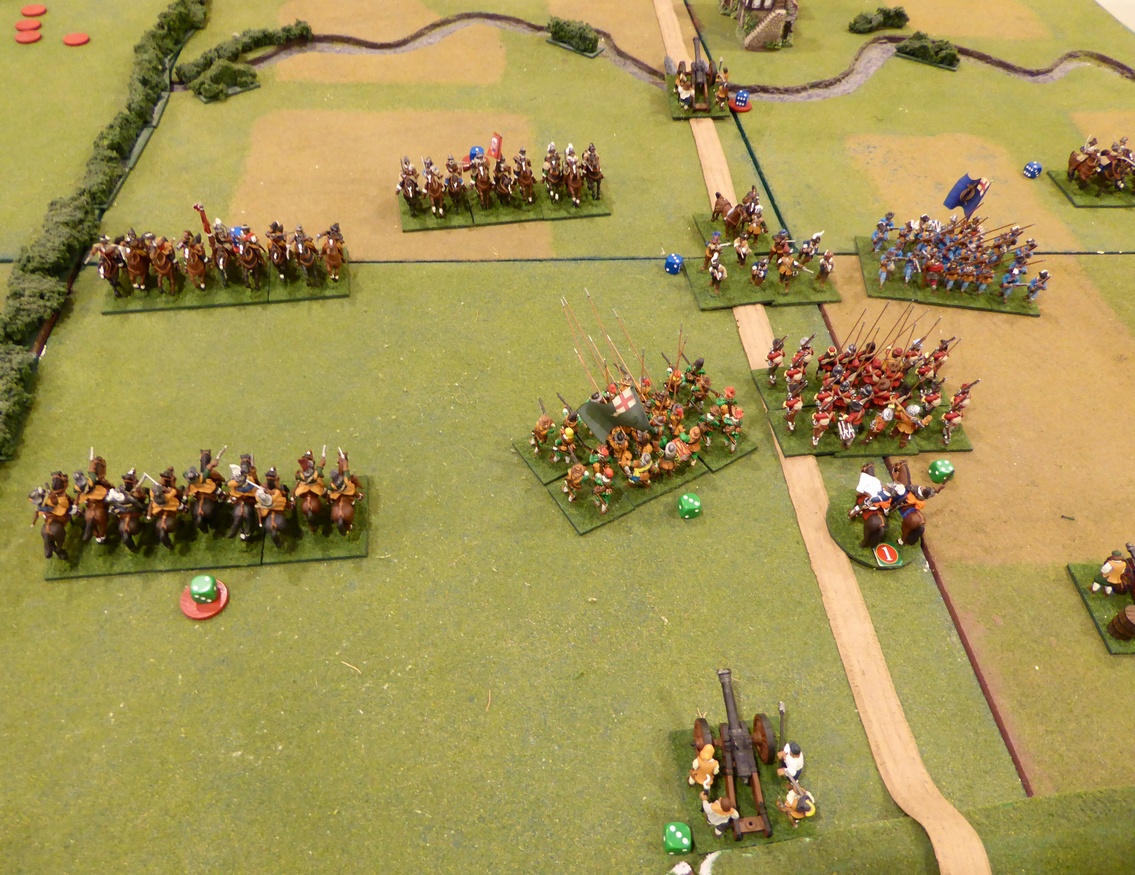
Kunersdorf Initial deployments
Frederick has the Prussan army deployed in a crescent around the Muhlberg with Frederick commanding the left, and Finck commanding the right.  An Advance Guard consisting primarily of grenadiers is led by Schenkendorff.  Two Prussian cavalry formations are stationed on the extreme Prussian left.

To prevent the order of battle from running more than a page or two, the units have been grouped by type within each command rather than by regiment.  The OB is:
PRUSSIAN ARMY (Army Break Point = 26)
King Frederick Dashing
RW: GL von Finck Dithering
RW Cav: von Schorlemmer Dashing
  1 x Carabinier
  2 x Cuirassier
  3 x Dragoon
  2 x Hussar
RW Inf: Klitzing Dependable
  1 x Musketeer
  3 x Fusilier
  12 pound battery 1
  12 pound battery 2
Adv Guard Schenkendorff Dashing
  3 x Grenadier
  1 x Fusilier
CR: 1st Line Hulsen Dependable
  4 x Musketeer
  1 x Fusilier
CL: 1st Line Wedel Dependable
  4 x Musketeer
  1 x Fusilier
CR: 2nd Line Itzenplitz Dependable
2 x Grenadier
1 x Fusilier
CL: 2nd Line Kanitz Dependable
  2 x Musketeer
  2 x Fusilier
  1 x Grenadier
12 pound battery 3
12 pound battery 4
12 pound battery 5
12 pound battery 6
12 pound battery 7
HOW battery 1
RW: GL Wurttemberg Dependable
  3 x Cuirassier
RW: GL Platen Dashing
  3 x Dragoon
  3 x Hussar

AUSTRO-RUSSIAN ARMY (Army Break Point = 36):
Saltykov Dithering
RW: Demiku Dependable
  3 x Cuirassier
  3 x Hussar
Center 1st Line: Fermor Dithering
  8 x Musketeer
  1 x Grenadier
  12 pound battery 1
  12 pound battery 2
  Shuvalov howitzer
Center 2nd Line: Villebois Dependable
  9 x Musketeer
  1 x Grenadier
  12 pound battery 1
  12 pound battery 2
Center 3rd Line: Rumiantsev Dependable
  2 x Grenadier
  7 x Musketeer
  12 pound battery 1
  12 pound battery 2
LW: Galytsin Dependable
  1 x Observation Corps Grenadier
  6 x Observation Corps Musketeer Fire as Inferior
  12 pound battery 1
  12 pound battery 2
  Shuvalov howitzer
LW Cav: MG Piotr Jeropkin Dependable
  3 x Cuirassier
  2 x Horse Grenadier
  1 Dragoon
Loudon (Austrian) Dashing
  5 x Musketeer
  1 x Grenadier
  3 x Hussar
  4 x Dragoon
  12 pound battery 1
  12 pound battery 2

Special Terrain Effects:
- Earthworks are HEAVY COVER and block LOS
- Kunersdorf is burning and is impassable. Dorfsee is impassable.
- Ponds and marsh impassable to artillery and cavalry. Otherwise rough.
- Water Meadow is Rough. Impassable to artillery.
- Earthworks and abatis are rough. Impassable to artillery and cavalry. 
- Grund is rough.
- When Russians retreat/rout from earthworks, roll 1AVGD6.
     On ‘3’ abatis is burning.
- Abatis burns for two turns. Impassable during this time.
     Spreads to adjacent sector each turn.
- Firing from Muhlberg down into grund toward Walkberg, roll 1 AVG D6
    DR=3 fire at -1
    DR=4 fire at -2
- Huhner Fliess – crossing takes one turn.
Objectives:
   Muhlberg 3 points
   Grosser Spitzberg 3 points
Battle begins at 11:30am with a preparatory bombardment.

Kunersdorf looks like another tough fight for Frederick.

Saturday, December 21, 2019

Old Glory 10s - Confederate Infantry

Having given the SYW project a little attention of late, work returns to clearing out some of the 10mm ACW pile of lead.  With today's effort, the last of the Confederate infantry is finished.
Mustering out from the painting desk are 120 10mm Confederate infantry from Old Glory.  As other Old Glory 10mm infantry before, these are in five figure strips.  Detail may not be as good as other manufacturers but en masse, I think they look good.  From tabletop viewing distance, I tend to only see flashes of color in the sea of grey anyway.
What is left in The Lead Pile for this project?  A couple of hundred Federal infantry, some cavalry, and guns are all that remain.  Not that much, really.  The collection already fields enough forces to conduct most of the battles.  Adding more is a luxury and not a necessity at this point.  

Wednesday, December 18, 2019

Setting Up the Battle of Kunersdorf

Russian Observation Corps on the Muhlberg
After much planning, research, and an August 2019 anniversary battle goal that slipped through my fingers, I finally snapped into action to put the Battle of Kunersdorf onto the table.  Tactically, the situation for Frederick at Kunersdorf is similar to what he faced at Zorndorf, only worse.  A larger Russian army is dug in on a series of hillocks surrounded by difficult terrain.  These earthworks encompassed nearly the entire ridge.  Avenues of attack are limited and this is not good cavalry country.  Having not much in the way of earthworks, two orders to Battlescale were placed.  After finishing 40 pieces of earthworks, I was ready to begin.

Preliminary work on an Order of Battle had been formulating for some time. When I got down to work in earnest, the result was an eye-opener.  Kunersdorf is HUGE.  I thought the Zorndorf battlefield fought in an earlier series of battles was huge.  Kunersdorf is even larger with 50+ BMUs per side.  The battlefield takes up the entire 12' x 6' table.  
Russian gun emplacements on the Grosser Spitzberg
As one of my battlefield map guides, I used the map presented on BritishBattles.com.  Some of the period maps showed variation in the terrain but for the most part, I stuck with the map below:
Kunersdorf from Britishbattles.com
The Muhlberg upon which the Russian Observation Corps is deployed represents a salient to the Russian positions.  Most of the Prussian guns are positioned on surrounding hillocks all having the Muhlberg as their target.  If the Muhlberg falls, the Russian position remains formidable.  Kunersdorf with the string of lakes and marshes protect the Russian center. Attacking the Russian positions from the opposite side is broken up by marshland.
Major terrain features of Kunersdorf
Think of the ridgeline as an arrow with the Muhlberg as the arrowhead.  The arrow would point to the northeast.  Looking down upon the battlefield from the northeast, the exposure of the Observation Corps situated on the Muhlberg is apparent.  Historically, the Observation Corps collapsed quickly when the Prussian grenadiers (center formation) attacked from the Walkberg.  The Russians on the Muhlberg salient retreated back to the main body.  Luckily, the main Russian body was able to stabilize the situation before the Prussians could mount their next attacks upon the heights.
Initial dispositions
Russian right with Austrians behind the Juhlberg
Prussian left and center
Prussian right
The battle will pose challenges to both combatants.  Pushing troops around the battlefield could begin this weekend.

Saturday, December 14, 2019

GWS Hobby Spending: Age and Interest

Jasper, of Wargames, Soldiers, and Strategies (WSS), continues presenting results from The Great Wargaming Survey 2019 via the WSS blog.  The latest entry focuses on hobby spending in a brief synopsis of some of the results (see: Take My Money).  In a follow-up post, I dive a bit deeper into the topic focusing on relationships between hobby spending, survey respondent age and primary interest.  For these analyses and conclusions, please read Digging Into the Numbers: Hobby Spending – Age vs Interest on the WSS blog.  Really.  I encourage readers to read the WSS blog post before continuing on so that the following analysis has a better chance of making sense.  Return back here for an expansion of the analysis when finished.

OK.  Are you back?

From the analysis presented at the WSS blog, I draw the following inferences, generalizations, and observations on hobby spend with respect to age and primary interest:
  • The under 21 age group spends the least.
  • Spending tends to increase monotonically with age until reaching 61+ age group.
  • The 40 and under groups tend to spend more on Fantasy/Sci-Fi.
  • Respondents age 41+ tend to spend more on Historical.
  • When the 51-60 age group chooses a primary interest (whether Fantasy/Sci-Fi or Historical), that group tends to spend more than other age groups.
  • Respondents with a primary interest in Fantasy/Sci-Fi tend to spend less than the other primary interest groups.
Each of these broad observations seem reasonable and hardly revelatory.  Are there any of the above in which to take issue?  I do not, but others may.

The analysis in the post, Digging Into the Numbers: Hobby Spending – Age vs Interest, relied upon counts and descriptive statistics to reach the inferences listed above.  These counts and descriptive statistics published in the WSS blog entry will be used in the following analyses.  Digging a little deeper into the data science toolbox, I will examine the survey data from a correspondence analysis perspective.  The goals in correspondence analysis are twofold:  either discriminate (differentiate) between one or more attributes or associate one or more attributes into similar groupings.  Results can be presented graphically making the analysis quick to digest.

While there are three survey attributes of interest (Hobby Spending, Age Group, and Primary Interest), I begin by examining attribute pairs first before jumping into the three dimensional case using all three attributes at once.

Primary Interest vs Age Group
From this correspondence analysis, two distinct groupings emerge.  One group contains historical wargamers that are age 51 and over.  The second group comprises fantasy/sci-fi wargamers that are 40 and under.  Notice that the "Not specified" primary interest group also falls within this category.  The graphic illustrates a clear separation between the two groups suggesting that the data are highly differentiating on these two attributes.  With their positions close to the origin, "Mixed" and "41-50" show less distinguishing features between the mature historical wargamers and the young fantasy wargamers.      
With "20 and Under" and "Not Specified" near the origin and distinctly separated from "Fantasy/Sci-Fi " and 21-40 wargamers, the following alternative classification is reasonable too:
Which is the better classification?  I vote for the latter, three group classification since the "20 and Under" group has very little data.  One point to remember, it is always prudent to verify results against the underlying data.

Spend by Primary Interest
When considering annual hobby spending by a gamer's primary interest, three distinct groupings emerge.  The three classifications are:
  • Fantasy/Sci-Fi spending USD 700 or less
  • Mixed spending USD 701 to 2,800
  • Not Specified spending over USD 2,800 
These are interesting results.  Do these groupings make sense intuitively and can they be explained satisfactorily?  I think so although those survey respondents not specifying a primary interest but associated with the highest spending may be a conundrum.  Maybe these are collectors and not wargamers?  Perhaps gamers and not wargamers?  Thoughts?

Notice the Historical wargamer has not been assigned into a grouping since this group is not easily differentiated by spending levels.  The data suggest Historical wargamers spend proportional to their expected spending level.

Spend by Age Group
A graphical representation of spending by age group shows a clear bifurcation into two groups.  The tails of the age distribution (30 and under and 61 and over) are associated with spending modestly on the hobby at no more than USD 700 annually.  The mass of the age distribution tends to spend above USD 700 annually.  Again, the results seem reasonable given the spending propensity of these groups.     

Spend by Primary Interest and Age Group
Time now to combine the three pairwise comparisons into one graphical analysis.  Unlike the pairwise correspondence analyses, analyzing more than two attributes requires a different technique.  Correspondence analysis offers an extension called multiple correspondence analysis (MCA).  The technique is similar but the interpretations are somewhat different.

In the MCA graph below, what does the scatter plot of spending, age, and primary interest suggest?  The results may be difficult to interpret or are they?
Like correspondence analysis, attributes plotted along the origins exhibit little differentiation.  These less distinctive attributes include '$', 'SSS','Mixed', '41-50', and 'Not Specified.'  After ruling out these attributes that cannot be easily distinguished, each quadrant is examined.  What inferences can be made from each of these quadrants and what labels attached?
Starting with the blue upper right quadrant and working counterclockwise, these associations can be labeled as:
  • Blue - The Grognards - Historical wargamers, age 61+.  Spending patterns are not easily differentiated but they know what they like and it is historical.
  • Green - The Young Recruits - The 30 and under fantasy/sci-fi wargamers with modest discretionary income.  
  • Yellow - The Wanderers - wargamers of 31-40 years in age with diverse wargaming interests and hobby expenditures. While some may specialize, many sample from historical and fantasy/sci-fi. 
  • Red -  The Hard Campaigners - wargamers age 51-60 with money to burn.  Diverse tastes in wargaming interests but when they settle on a genre they have the money to spend.
Of course, these are only the labels I assigned.  Others are equally suitable.  Keep in mind that these are associations and tendencies only.  These are not hard and fast rules.

After making it through this analysis (is anyone still with me?), as a reader, does your wargaming situation fit nicely into one of these associations generated by the Great Wargaming Survey results?  Remember, these are only broad associations and tendencies representing the sample as a whole.  If not, where would you fit?

Does this analysis provide a useful picture of the hobby with respect to spending by age and interest?  For me, yes.  I hope others may find this exercise of interest as well.

Thursday, December 12, 2019

SYW Dragoon Regiment # 6

Having recently mustered a trio of Prussian guns out from the painting desk and with Kunsersdorf in mind, the brush remained engaged in the 18mm SYW project.  In a similar manner to the Prussian artillery before, these dozen horsemen represent the last of the Prussian dragoons remaining in The Lead Pile.  Although there is a fair number of packs of Old Glory and Lancashire Games' SYW infantry in inventory, the ranks of the Eureka figures are beginning to show strains of depletion.  Luckily, I have a gift card or two and Eureka is offering a December sale.  I need to start making a list and checking it twice.
As almost all of the cavalry for this project, the dragoons are from Eureka Miniatures.  They trot off the painting desk as two squadrons of the 6th Dragoon Regiment.  At latest count, 21 squadrons of dragoons can be fielded for battle.  With the manner in which we game Honours of War in which two such stands comprise a four squadron regiment, ten regiments of dragoons can see service in any given battle.  Ten regiments of dragoons are probably sufficient for most battle requirements. 
Thoughts of preparing for Kunersdorf continue.  The battlefield has been laid out and an OB drafted.  The battlefield, itself, is in draft form as well.  While I made what I consider reasonable terrain and space assumptions, time will tell once troops are deployed if the space and distances remain reasonable.  I plan to take a few battlefield photos this weekend and see where I stand.  In the meantime, the painting desk remains busy.

Monday, December 9, 2019

SYW Prussian Artillery and Earthworks

Although not off the production line in time to see action at Zorndorf, two Prussian howitzers and a 12 lb battery roll out from the painting desk.  These two howitzers will definitely see action when Kunersdorf takes to the gaming table.  Figures are Eureka Miniatures.  Nice figures and about time I got around to painting them.
As for the Battle of Kunersdorf, good progress was made over the weekend.  The terrain was laid out including the construction of the earthworks present all along the ridge where the Russians deployed historically.  With the defensive works at Kunersdorf in mind, I placed a test order from Battlescale in early November for a number of 10mm earthworks. 
Defenses on the Mühlberg
After the order arrived, I set to work painting and flocking the pieces.  The initial order contained 27 pieces of earthworks.  Making them battle-ready was not too big of an effort.  Great pieces that should work for earthworks and redoubts for 10mm to 18mm figures.  What I found, though, was that 27 pieces of earthworks would not cover the entirety of the ridge.  Given that shortfall, a second order to Battlescale was sent off.  I am awaiting the arrival of the second order.

The earthworks are nicely cast with good detail.  The earthworks are backed by post and plank with earth piled up against one side.  With post and planks painted and the tailings flocked, the result is quite convincing.   
Earthworks detail
Even if Kunersdorf was to be presented before the additional earthworks arrive, most of the critical Russian positions would be protected.

Friday, December 6, 2019

Celts on Parade

Having worked on churning out one Celtic unit per month, on average, in 2019 and with the stash of Celtic figures exhausted, time for a parade. 
Figures are a mix of Crusader Miniatures, Black Tree Design, and 1st Corps.  There might even be some Renegade figures lurking about too.  A few chariots from Newline Designs are on the way but beyond that, The Lead Pile is now devoid of Celts. 
Totals for this sub-project thus far are:
  • 162 foot in 12 warbands
  • 2 chariots
  • 28 cavalry
Looking at the size of this force, I think the Battle of Telamon is now finally attainable.

With the SYW battle of Kunersdorf in work on the gaming table, recreating Telamon must wait until Kunersdorf clears the deck.  That could be months away.  When I am ready, the Celts will be too. 

Wednesday, December 4, 2019

Last of the Celts?

No, not the last of the Celts but the last of the warbands.  The warband mustering off the painting desk today is the last of the Crusader Miniatures' Celts in The Lead Pile. The BTD Celts were exhausted long ago.  The bad news is that having waited since May for a resupply from BTD, I cancelled my order.  The good news is that I received a refund and an apologetic note from the proprietor.  While no more warbands are in the offing, an order from Newline Designs is on its way containing a couple of chariots.  That will round out the Celtic collection nicely.
These dirty dozen Celts make up the 12th warband fielded in total and the 9th warband fielded in 2019.  With a dozen warbands, Telamon is not far off.  I sure would like to deploy a couple more chariots, though.  The chariots will be arriving any day.  Pushing them into the painting queue upon arrival, a year-end deployment is possible.  

Having painted a dozen Celtic/Gallic BMUs in 2019, I think it time for a parade to see the Celts en masse.  The Celtic component of my 28mm Ancients project has more than doubled in 2019.  Of course, a number of other projects saw progress in 2019 too.  Looking at the Painting Log, total figure count is approaching 1,600 that have crossed the painting desk in 2019.  At the beginning of the year, I marked out a goal of 900 painted figures.  I may reach 1,600 by year-end.  Still, The Lead Pile never seems to shrink. 

Sunday, December 1, 2019

Back to Southam, 1642

A second solo battle of Southam jumps into action on the gaming table.  After this battle is wrapped up, the deck will be cleared for the next planned battle.  I think it may be Kunersdorf.  

As a reminder of the situation, see deployments below:
Who is Who at Southam
Turn 1.
Parliament army under Lord Brooke steps off toward the Royalist positions.  As Brooke's force descends the heights, one of his light guns positioned astride the road fires into Carnarvon's Horse disrupting its ranks.  Carnarvon withdraws to a safer distance passing through Clarke's Horse drawn up to his rear.
Handily outnumbered in infantry, the Earl of Northampton tries to bring his comparative advantage to bear early.  That advantage? Cavalry.  On the Royalist left, Northampton's Horse wasted little time and sets off toward the Parliamentarian line.  Facing him in the distance, Goodwin's Horse responds.  In the initial clash of man and horse, Goodwin's disciplined horse gains an advantage and the Royalist horse breaks for the rear.  Shaken from the clash, Goodwin does not pursue.
Northampton and Goodwin clash
Northampton breaks for the rear
In support of Northampton, Middleton's Horse passes through the retiring horse on his way to seek revenge upon Goodwin.  Shaken from the earlier melee, Goodwin attempts to evade the charging Royalist horse.  Beginning his retrograde a little too late, Middleton catches Goodwin near the foot of the heights.  While both suffer from the fight, Goodwin receives more than he gives.
Middleton vs Goodwin
Continuing his withdrawal, Goodwin's retreat uncovers Hampden's Foote.  Middleton's pursuit targets the Parly foote.  While Hampden cannot stop the charging Royalists through volley, Middleton is sufficiently discouraged from pressing on and recoils after a brief melee.  Both suffer in the fight but Middleton is much worse for his exertion.  Still, the charge is deemed a success as Goodwin is sent packing and Hampden is shaken and weakened.  Still, Middleton teeters on collapse.  One little shove and he may be gone. 
Middleton pursues into Hampden's Foote
Middleton retires, exhausted
Turn 2. Lord Brooke retains initiative.  
Hampden's Foote rallies while Goodwin's Horse does not.  Brooke's two guns on the left fire on the Royalist guns near the bridge.  The fire is too much and the Royalist gunners scamper away.  The guns deployed on the right of the road fire on Northampton's Foote to no effect.  Lord Brooke's Foote advances up the road.  
Brooke's Foote advances
For the Royalists, Carnarvon's Horse rallies while the nearly exhausted Middleton withdraws.  The Earl rides over to rally his own regiment of horse.
Royalists regroup
Turn 3.   The Earl of Northampton seizes the initiative.  
On the Royalist right, Clarke's Horse charges Fiennes' Horse.  Fiennes' cannot muster the courage to counter charge.  Instead, he falls back.  Unfortunately, this retrograde uncovers one of Lord Brooke's guns.  The gun gets off a shot before overtaken by the hard charging cavalry.  Clarke's Horse absorbs the casualties from the close range artillery blast but overruns the guns.  The crew are cut down where they stand and the gun destroyed.  Their momentum carries them into Brooke's second gun.  Again, the crew manage to fire off a last minute blast and more horsemen hit the ground.  Tired from their exertions and exposed, Clarke's horsemen retreat toward a less hazardous environment. 
The charge
The pursuit
The destruction of a gun
The stall
Following up on Clarke's success and with Fiennes unable to respond, Carnarvon charges the remaining gun that had only moments before driven off Clarke.  Seeing Carnarvon come on from a great distance, the gun has time to reload and fire.  Although mostly ineffective, the artillery fire is enough to discourage Carnarvon from pursuing the prize.  He turns and retreats back to his lines.
The repulse
Riding over to Middleton, Northampton rallies his victorious troopers and leads them back into the fray.  Wanting to knock Goodwin's Horse out of the fight for good, Middleton charges.  Shaken, Goodwin withdraws cautiously. The Earl, leading Middleton's horse in pursuit of the withdrawing cavalry of Goodwin, reaches the end of his tether.  Nearly exhausted from the long charge, Middleton balks at the sight of Goodwin not in full flight.  At the end of his tether, the elastic snaps and Middleton breaks.  Oh, the tragedy!
The Earl leading the charge
and pursuit
and retreat
The Earl in rout
Fiennes and the remaining gun on the Parliament left rally but Goodwin does not.  Brooke's Foote fires into the dragoons.  The dragoons suffer from the volley but hold their ground.   Holles' Foote advances upon Carnarvon's Horse and unleashes a volley.  A number of horsemen fall as Carvnarvon continues his retreat.
Brooke volleys into Saville's Dragoons
Holles fires into Carnarvon
Carnarvon retires
Turn 4. Lord Brooke regains the initiative.
Goodwin fails to rally and Hampden's Foote fires into the exposed flank of Middleton's Horse but fails to find its target.  Fiennes' Horse charges Carnarvon.  With a Combat Effectiveness at 1, Carnarvon is likely to retreat.  He does. 
An easy shot at Middleton misses
Fiennes charges
and crashes into Carnarvon
Carnarvon sent packing
The gun on the right fires into Northampton's Foote.  The Royalist infantry take casualties and falls back.   Holles' Foote advances on Clarke's Horse.  Clarke smartly falls back.  Brooke's Foote fires into the dragoons.  Saville's dragoons suffer casualties but hold their ground.  After unleashing a volley, Brooke charges.  The dragoons evade and scamper back across the river by way of the bridge.
Dragoons fall back across the bridge
With the dragoons turning tail and retreating, Brooke veers to hit Northampton's Foote.  Northampton buckles and the regiment falls back in retreat.  With both Royalist artillery and dragoons wavering near the bridge, Northampton's retreat through their ranks as it scrambles to reach safety on the south side of the river is too much.  Both the dragoons and artillery break when Northampton's panicking infantry pass through them.
Brooke charges Northampton's Foote
Northampton breaks and stream across the bridge.
Artillery and dragoons carried away in Northampton's retreat
Brooke and the Parliamentarian Army holds the field of battle
With the only Royalist troops on the north bank of the river being cavalry and they in shaky condition, the Earl of Northampton abandons his position and admits defeat.  Southam is a victory for Lord Brooke and the Parliamentarian cause.

Again, Southam provided an interesting little action.  With no more than eight units per side, fate can play a big role in determining the outcome.  Even with the possibility of luck rearing its head, the battle was closely contested.  Ebb and flow of battle was present throughout.  The Royalists saw good success early on with their cavalry.  Taking out one gun, a second gun was in great peril.  Cavalry battles witnessed successes and setbacks for both.  Goodwin's cavalry once shaken never managed to regain its composure.  The best Roundhead horse regiment on the table neutered early on.  What a waste.In the end, the Royalist position disintegrated when retreating units fell back onto themselves in the rush to clear the bridge before being trapped.

For now, the ECW collection will be boxed up and put away for another day.  Next up is likely a try at Kunersdorf in December.  Details on the scenario are still in work but I am forging head with deploying the terrain onto the table.  Kunersdorf will be another in a long line of battles in which I wonder how Frederick ever got the moniker of The Great.