The fight over the Hallowed Ground at Gettysburg continues. Having fought Hood's Attack now at four games and counting, the tally shows two games apiece for the armies.
For Game #5, many of the fine campaigners from earlier remote battles return to the table. The players are:USA:
All but David B have fought this battle before (see Hammerin' Sickles). In that contest, the Federal Army eked out a victory on the last die roll of the game. Thrilling stuff. Would this battle be as hotly contested as the first match-up? Let's see.
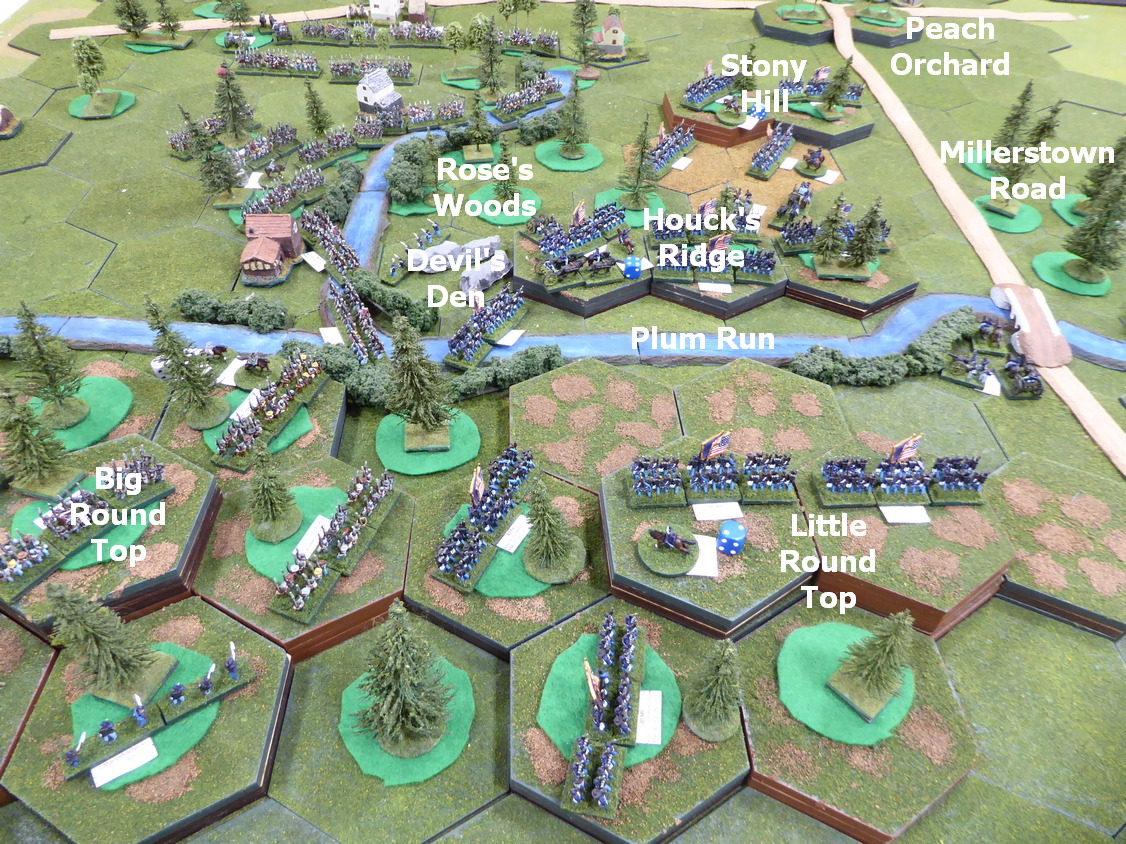
As a reminder of the overall situation,
 |
| Battlefield geography and place names |
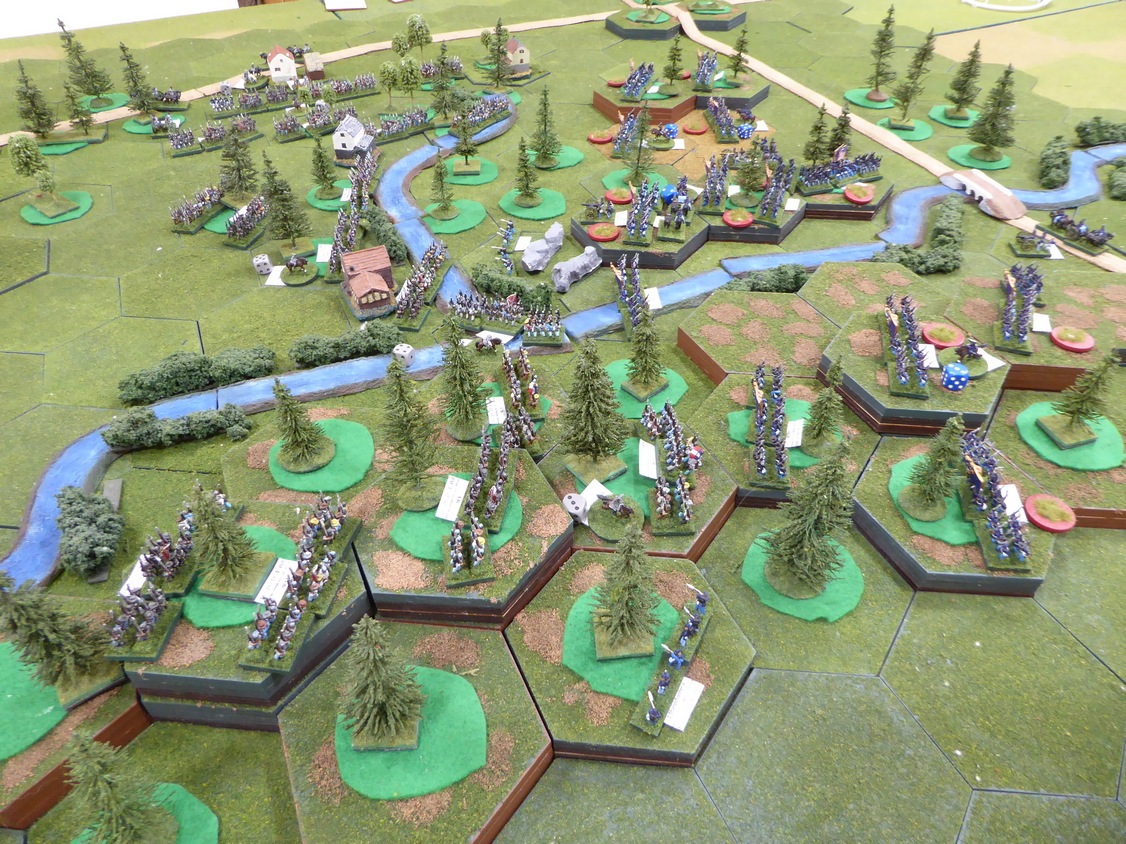
 |
| Initial army concentrations |
 |
| Army deployments |
Having read through accounts of the other battles, both armies had plans for how to fight. The Federals would start with most of the units on Reserve while the Confederates were set on bringing the fight to the Bluecoats as quickly and with as much force as possible. |
| Federal Army in waiting. |
 |
| Battlefield viewed from southwest. |
 |
| Battlefield viewed from east. |
On to battle!
With Hood under attack orders, the Rebels have initiative on the first turn. Although the Devil's Den salient is within General Law's grasp, Hood uses his initiative to open the battle by activating Robinson and his Texans. Robinson has two regiments of Texans on Big Round Top and two regiments along Rose's Run and out of command.
Robinson leads his Texans in an attack against the 83PA positioned in the woods on a saddle of Little Round Top. The Texans suffer heavy casualties but the Pennsylvanians are sent packing. They are done for this battle. Vincent, on Little Round Top, sends the 20ME down to sweep around the Texans' right. The remainder of Vincent's Brigade remains calm and stationary atop the heights of Little Round Top.
Panning back to Devil's Den, Law attacks the sharpshooters among the rocks with the 44AL. The Alabamans are repulsed but casualties are light. Attacking from Plum Run, the 48AL goes in against the sharpshooters. Ward attempts to reinforce Devil's Den with the 124NY on Houck's Ridge but they refuse to respond. The second attack carries Devil's Den. The sharpshooters are scattered.
 |
Support for Smith's guns are driven off
while Winslow's guns give Benning a blast of canister. |
Sensing a weakening of Ward's Houck's Ridge position, de Trobriand calls up Winslow's guns to stop the enemy. Blasted by canister and musketry, Benning's Brigade takes heavy casualties but they stand firm. With the other half of Robinson's Brigade positioned along Rose's Run, Hood orders them to advance against de Trobriand to ease pressure on Benning. Anderson's Brigade comes into action against the Federal right and de Trobriand. With many soldiers crammed into close quarters in the woods, casualties rise quickly. In this sector, the battle ebbs and flows as first the Rebels are pushed back and then the Federals are pushed back. Regiments on both sides are stretched to the breaking point. In the confusion of the heavy fighting below Houck's Ridge, Ward manages to slip a regiment in to join Smith's guns. Stalled under heavy fire, Benning begins to give way. Part of his brigade is thrown back to Rose's Run. Has the battle turned?
 |
| De Trobriand is hotly engaged in Rose's Woods. |
 |
| The battle ebbs and flows in Rose's Woods. |
 |
| Benning is thrown back from Houck's Ridge. |
Not yet!
Benning redoubles his efforts throwing two more regiments against Houck's Ridge. This time, the Rebels prevail. Federal infantry are scattered and Smith's guns are overrun. The southern end of the ridge is in Rebel hands. Following up on this success, the 1TX and 3AR from Robinson vigorously attack de Trobriand's 17ME and Winslow's guns in the woods on the western slope of Houcke's Ridge. The two fresh Confederate brigades put the Yankees to flight. General Birney, directing the defense, falls. The Federal right is crumbling.
 |
| Rebels take Houck's Ridge! |
 |
de Trobriand's Brigade crumbles
as the Rebels clear Rose's Woods. |
Over on Little Round Top, Law and Robinson continue pressing up the slopes. Fighting is intense as units from both sides waver and then break. Vincent sees Hazlett arrive with his guns and orders them up onto Little Round Top. From the heights, Hazlett pours fire onto Houck's Ridge. Perhaps in desperation, Vincent leads two regiments down from Little Round Top into the Texans below. The Texans skedaddle but Little Round Top is now garrisoned only by Hazlett's guns. Vincent's Brigade is broken in the effort.
Law pushes infantry onto the heights and attacks Hazlett's guns. Hazlett is overrun and his guns lost. In an attempt to throw the Rebels off from the heights, Ward crosses Plum Run at the head of one regiment and attacks the Rebels. Ward's attack is in vain. His regiment is lost; his brigade broken, and he is dead on the field.
 |
| Hard fighting on Little Round Top. |
 |
| Vincent sees success |
 |
| but is short-lived as Little Round Top is lost. |
 |
| Hazlett's guns are overrun and Ward killed. |
With Little Round Top securely in Rebel hands, the Confederates turn to throwing Vincent's remnants off of the heights. Weakened from heavy fighting, Federal infantry offer not much resistance. Here, it becomes a mopping up action.
Back along Houck's Ridge, the Rebels press on. The remnants of de Trobriand's Brigade make a couple of spirited Last Stands but they soon fall under the weight of Rebel numbers. With three Federal brigades broken and Weed's Brigade still to appear, the Union troops in this sector are compelled to retire. For them, this battle is lost.
 |
| Mopping up on Little Round Top. |
 |
| Houck's Ridge cleared of enemy troops. |
 |
| The Merry Band of Brothers. |
With the battle still in vivid memory, having concluded less than twelve hours ago, it may be too soon to consider a retrospective of the action.
This was another exciting battle in which momentum swung to and fro with each Brigade activation. The result seemed up for grabs until the Federal position collapsed everywhere, at once.
Great game fought by a great group of players.
Thanks all!
Playing time about three hours.


Well done to the combatants. The consistent pressure of the Rebel attacks paid off with a stunning victory.
ReplyDeleteConsistent pressure and the favor of the Dice Gods.
DeleteExcellent game and report, yet again. I lived every step of this one - my compliments to everyone involved.
ReplyDeleteThanks, Tony! This battle report probably makes more sense having fought the battle and being familiar with the ground. Sorry that you could not make the game for the rematch.
DeleteA true meat grinder of a situation / game. Interested to see that 124th NY refused to respond a reinforce request, was that just an Activation thing?
ReplyDeleteI was looking at this set-up and immediately thought of a Gettysburg boardgame that I have just pre-ordered and the thought occurred that with your hex set, you could defer to a boardgame set of rules for some games if you have one of particular favour or suitability.
The Worthington Publishing ‘American Civil War Battles’ series could hold some promise, though I think they might produce a long game with a lot of die rolling.
Casualties were high to both but the Federals were nearly wiped from the table. 124th NY was on Reserve but failed to activate. Dave had a number of his regiments positioned on Houck's Ridge, in Reserve, that failed to activate. Those failures could have made a difference in holding the important ridge.
DeleteWith the table set for a hex grid, translating a boardgame to miniatures ought to be an easy transition. Many boardgame rules are much more complicated than FoH and I am quite happy with the results and familiar with the rules. I can adjudicate mostly without even referencing the QRS.
Great report again sir!
ReplyDeleteMuch appreciated, Michal!
DeleteA hard pounding and no mistake. Taking the battle to the enemy paying off again.
ReplyDeleteYes, a hard pounding, for sure. The Rebels came on strong and the Fates led them to victory.
DeleteMany thanks Jon, for a great report and a fantastic game. We were thoroughly hammered! Fortune certainly favoured the bold this time, though we largely blamed Dave C's terrible die-rolling for our troubles - and if only our reinforcement brigade had arrived... Indeed my (Vincent's ) charge from the heights was 'in desperation'!!
ReplyDeleteYou are welcome, David! The game was great fun with lots of drama and tension. While Sickles was hammered, no doubt, the Rebels were not so confident at the start of the last turn that they would see victory. Had Weed's Brigade arrived, it may not have turned the tide. With three Union brigades in tatters, the battle is over regardless of what Weed may accomplish.
DeleteDave C's die rolling was poor, for sure, and Mark's was above average. Not a good recipe for victory.
Thanks for playing!
I can’t believe how many great games and tight outcomes have issued from this one scenario. There were at least three occasions when the game could have gone the other way especially with my reckless insistance on using the bayonet over fire power. Much of the rebels success can be attributed to this aggressive stance but to my mind Chris’ careful positioning and timely flanking fire were just as if not more effective. So then, thanks to you Jon for organising our get together and extra special thanks to our gallant Federal opponents who retained their sense of humour throughout. True gents and good sports. Dave C…pm me your address and I’ll send you my lucky red dice in the post!
ReplyDeleteI am getting a lot of mileage out of this scenario. All of them have been great fun. Got a lot of good games from the First Manassas scenario too.
DeleteThe battle had opportunities to tilt either way but you Rebels really played a great game. Your plan and tactics worked, sometimes better than they should have!
Happy to see that you have enjoyed these games. There will be more to come!
Thanks for the offer Mark but I suspect that as soon as your lucky red dice got anywhere near me they would turn on me too. I am having a problematic relationship with dice generally at the moment :-(
DeleteIt was a great game in spite of the hostile dice, and I am just waiting for all those amazing dice rolls when the universe finally rights itself.
Well, David, there will be more chances for your dice problem to correct itself. Can’t last forever, can it?
DeleteGreat report John! But wait, you listed Chris and Mark as US commanders, Dave and Dave as CSA at the beginning. Then congratulated Chris and Mark as CSA winners at the end??
ReplyDeleteWhoops! Corrected. Good eye, Vol! Just checkin' to see if anyone is paying attention...
DeleteSee I told you I was a 1! Lol
DeleteYou did!
DeleteSounds like the dice gods were with the CSA this game and only added to an effective plan of battle. Another great game, though with such heavy casualties...
ReplyDeleteYep. The Dice Gods were definitely on the side of CSA in this fight. Still, it was close until it wasn't and either side good see the victory line. It was a great game, no doubt!
DeleteWow, that was another humdinger of a game Jon! Advantage seemed to sway to anfpd fro but the Rebs came out on top to take a 3-2 lead....great stuff!
ReplyDeleteThe game was a humdinger, alright, played by a fine foursome of veteran remote wargamers. There was a lot of attack/counterattack, jab/parry, and to/fro throughout the game. With activations by brigade, a lot (and I mean a lot) of action happens in one turn. Again, we made it through three turns before a decision was reached. Well, more than a decision; it was a TKO as the Federal Army broke.
DeleteGlad you enjoyed this continuing saga of Hood's Attack.
Another cracking game that obviously could have gone either way it seems, with the Dice Gods favouring the Rebs it would appear, or enough to make a difference. All of you are really getting good value from this one scenario.
ReplyDeleteAre you planning a sort of wash up of all the games at the end, to see what worked, what didn't, where Lady Luck played her part etc?
Thanks, Steve! The scenario produced another competitive game until the end. Dice Gods may have favored the Rebels but the Rebels made their own luck as well. I get a lot of satisfaction from replaying a scenario multiple times to test different approaches and allow a chance for the Law of Large Numbers to get in with repeated trials. I hope the players enjoy these repeat performances as much as I.
DeleteGood idea on summarizing a retrospective on all of the games played in this series.
I like to take time to reflect upon my games in my 'Post Game Thoughts' musings, as much for my own enjoyment and hopefully for others too. Similar to the post game chats with friends are often very enlightening, getting to hear how the other side viewed the game, what worked, what didn't etc.
DeleteI always enjoy your “Post-Game Thoughts” section in your battle reports. I tend to stick to the game narrative sans analysis because I am usually spent b6 time I finish the battle report and I don’t want to detract from the the story with a critique.
DeleteThat was a great game, credit to the players. Engaging report. The Feds seemed to have less good fortune with bringing their reserves into action. Was this critical to the outcome?
ReplyDeleteAnother fascinating battle playing out differently than your last battle. The Federals did not have your success in releasing Reserves as you did in your game. Where you never failed, The Two Daves rarely succeeded! Critical? Perhaps, it could have made a difference. In brief post-game discussion, the Federals noted that once a unit was released (either successfully or through failure) from Reserve they were hard pressed by the Rebels to ever an opportunity to put a unit back into Reserve again.
DeleteGlad you enjoyed the report!
Great battle! It is interesting to follow the progress of the game in detail. You, Jonathan, have a high quality mural - why not take some close-up photos?
ReplyDeleteThank you, Valentin! I will work on getting some close-ups. I am typically in a rush to sneak in a photo while one of the players is issuing or orders or thinking about next moves during the game. All I have time to do is bend over and take a quick snapshot. I will work on getting lower with the camera. Thanks for the suggestion.
DeleteAn aggressive approach by the Confederates always seems to serve them well in this scenario, although with the standings at 3-2 it is still quite even. Reading these AARs has finally pushed me over the edge and I'll likely be making the plunge with some ACW purchases next week.
ReplyDeleteAggression worked this time for the Rebs but in the last game the Federal use of Reserves stymied and thwarted much of this aggression.
DeleteA new project for you? Terrific! Can I label myself as an Influencer now?
At the rate you paint, you will have armies out and in battle in no time.
I would definitely label you a social media influencer Jonathan. Just as long as you don't start turning up to restaurants demanding free meals.
DeleteThis is a great scenario. Very well chosen and well constructed. Having played it twice now, I believe it can be pulled out and played multiple times without exhausting all the options.
ReplyDeleteIt’s amazing how much action there was in just 3 (THREE!) turns. Partly that’s due to the rules, and partly the scenario set-up.
Mark chose the overall approach and encouraged me to leave my usual cautious stand back and fire from cover approach, so kudos goes to Mark as architect of the victory. He kept charging away in situations where I wouldn’t have risked it, but it definitely paid off. He took Little Round Top, Devil’s Den, ALL the US guns and Houck’s Ridge (twice). I can claim a contribution to the first assault of Houcks by clearing the infantry off with artillery fire. And I was able to re-group Billings and Anderson whilst Mark was taking the lead, for the final assault.
Right until the last few activations I felt the game was in the balance, and the collapse seemed sudden from my perspective.
Oh and a special mention to whoever nobbled Dave C’s dice.
Chris
Thank you, Chris!
DeleteIt is amazing how much action can be squeezed out of only three turns. Much of that is due to activation by brigades. Not only can the situation change significantly, in one turn but in one activation. I think it makes the game dynamic, uncertain, and good fun.
You and Mark devised a solid plan that was well executed. You hit the Federals hard, knocked them off balance, and then never let up. Perfect. Your artillery really do good work in this game. Even your counterbattery fire was quite effective.
I agree that the game held in the balance until the Federal position quickly unraveled. With their brigades breaking, the Federals simply could not absorb the punishment you were dealing out.
Well-played by the Confederates, perhaps, helped along a little by Dave's unbelievably rotten dice.
Great game!
Another splendid battle from the one scenario, very economical! It does seem like the Confederates benefit from being used aggressively and it sounds like the reserve rules didn't quite work out for the Federals, all good fun!
ReplyDeleteBest Iain
Thanks! Your assessment is correct on all three counts!
DeleteOh, the ACW
ReplyDeleteIs the best CW
As shown by these posts on Sickles,
The ACW
Is the best CW
AARs so good they tickle!
Bc when the ACW
Is the best CW
5 games is never enough
For the ACW
Being the best CW
We all want more of this good stuff.
😀
SUPERB!
DeletePlease don't encourage him.
DeleteNoted!
DeleteWhat's the tune you sing it to Stew? 😄
DeleteBy the way. I can't agree on the ACW being the best CW. It's not even the best English speaking CW. The ECW was so badass it spilled over into a SCW, and ended up being a war between England and Scotland (whilst having round two of the CW at the same time). 😉
The Rebs are so difficult to beat in this scenario. It looks like the Feds had trouble activating their reserve, this would really make it difficult for them.
ReplyDeleteWell fmdone to all the players and you Jon, it was an enthralling read.
I agree that the Feds may have the tougher situation especially if reinforcements are tardy. The Feds had a lot of trouble activating reserves among other dice challenges.
DeleteGlad you enjoyed the read, Ray!