After fighting Hood's attack at Gettysburg a week ago (see Hammerin' Sickles, Again), Reject Central expressed an interest in a rematch. The Confederates wanted to reinforce their winning streak. The Federals wanted to upend the Confederate juggernaut's plan. Monday saw a return to Hood's attack at Gettysburg. Wanting a true rematch, players remain with the same commands as in the previous edition. That is, USA
CSA
Would the Confederates see a continuation of their success in a rematch or would the Federals turn the tables on the Rebels and sneak out a victory? From post-game discussions and email exchanges, I sensed Federal confidence was not high in overturning last week's results. However, there was hope and a plan was percolating. Throughout the week leading up to Monday's game, I received emails from the Federal players asking about how to put the notion of using Reserves into practice. In previous games, I suggested that using Reserves may be a useful tactic to interrupt the opponent's decision cycle. I could see the wheels of evolution turning as our discussions continued. For Richard's riveting battle account, please visit, Hammering Reserved. Really, don't bypass Richard's retelling of the battle from the Federal perspective. Great stuff.
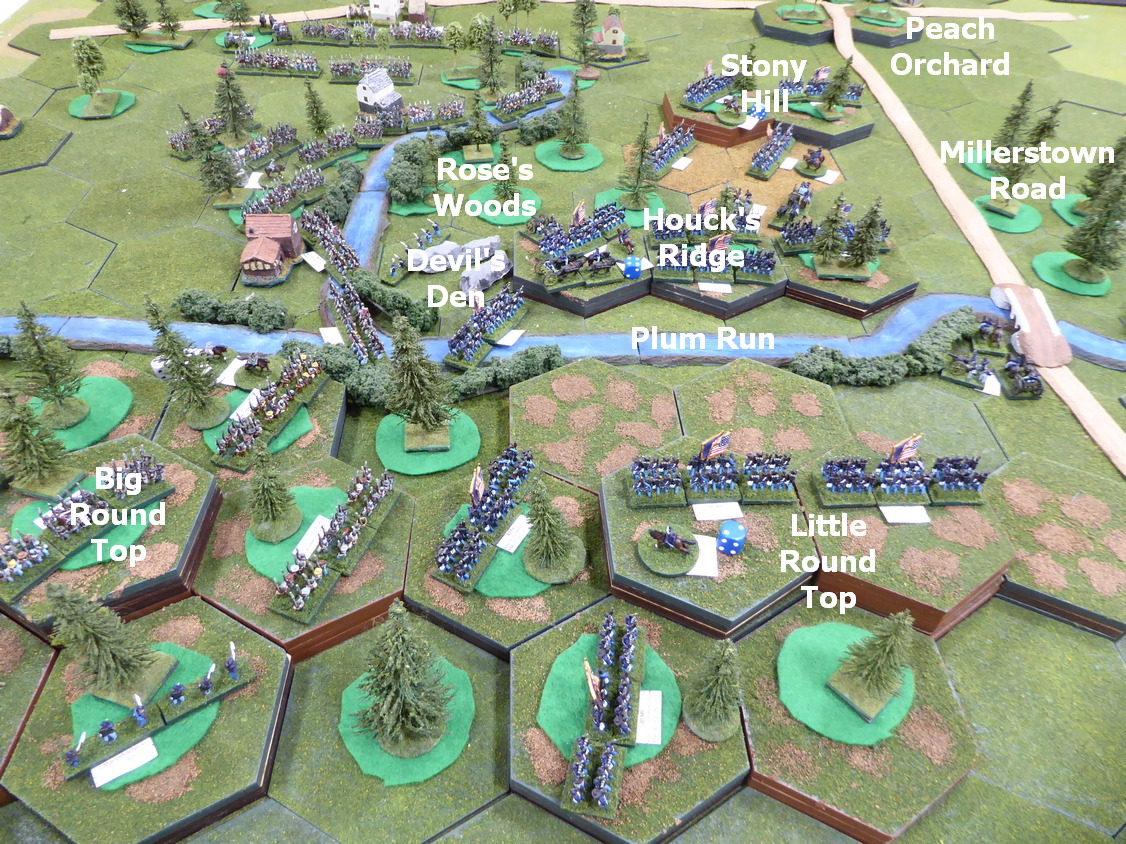
As a reminder of the overall situation,
 |
| Battlefield geography and place names |
 |
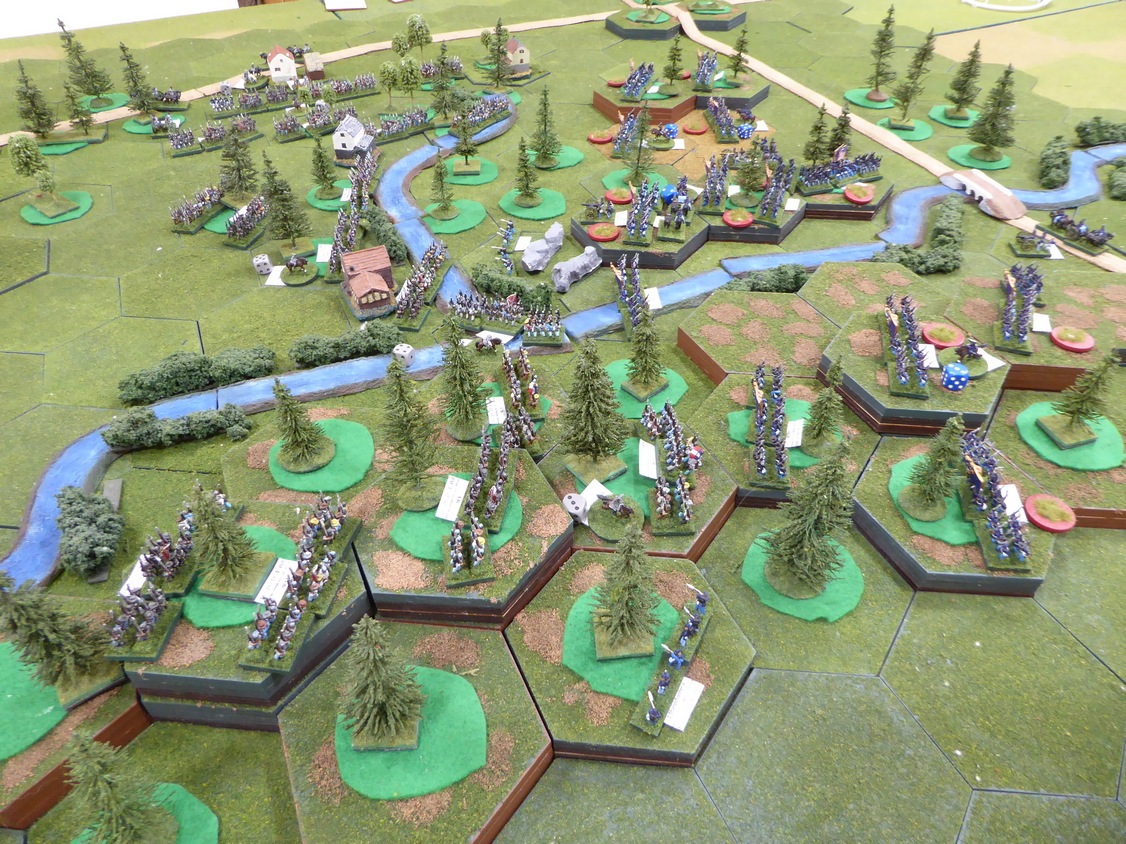
| Initial army concentrations |
 |
| Army deployments |
When the curtain lifts on the battle, the Confederates are greeted by a different sight. Almost the entire Federal Army has been placed upon Reserve (small red discs). What this means is that a Federal unit has a chance to activate and respond during its opponent's activation. Will this small tactical change affect the battle's outcome? |
| Federal Army in waiting. |
 |
| Battlefield viewed from southwest. |
 |
| Battlefield viewed from east. |
On to battle!
The battle opens with the Confederates activating General Law's brigade positioned on Big Round Top and opposite Devil's Den. Law leads two regiments in against the US Sharpshooters hiding out among the rocks in Devil's Den. Before the Rebels can close, General Ward reinforces the sharpshooters with the 124NY moving down from Houck's Ridge. The presence of the New Yorkers makes no difference. The defenders of Devil's Den scatter as they are overrun. The sharpshooters retire in good order back up the ridge. The New Yorkers are not seen again! Not the start Sickles expected.
Hood then sends General Robinson and his Texans into action against Little Round Top. Again, General Vincent slips in a supporting regiment to bolster the 83PA before the Texans strike home. In fierce fighting, the Texans are repulsed with heavy casualties. Vincent is relieved to see the Rebels driven off. Somehow, Robinson's Brigade became separated during the approach march. While two regiments were present in the attack on Little Round Top, the 3AR and 1TX find themselves deep in Rose's Woods to the west. These two regiments splash across Rose's Run only to be greeted by a hail of bullets from de Trobriand lined up in the woods.
 |
| General Law attacks Devil's Den. |
 |
| Robinson is repulsed at Little Round Top. |
 |
| Elements of Robinson's Brigade cross Rose's Run |
 |
| only to immediately come under fire. |
To thwart the Rebel advance, General Birney personally leads a regiment to a position below and south of Houck's Ridge. Ward sends reinforcements into the Valley of Death along Plum Run between Houck's Ridge and Little Round Top. Casualties rise as the two armies exchange volleys at close range. Facing canister from the ridge above and fire from Plum Run, the Rebels in Devil's Den begin to waver but hold on. To relieve pressure from the fire coming from Plum Run, Law brings the 47AL forward.  |
| The Rebel advance is blocked. |
 |
| Heavy fighting along Plum Run. |
 |
| View looking from south. |
Sensing that his attack against Little Round Top has stalled, Hood sends Benning into action to clear Rose's Woods and press on toward the Wheatfield. Benning takes his charge with gusto. His entire brigade of four regiments attacks. Taking heavy casualties from de Trobriand from the front and Smith's guns from above, Benning stands firm. His attack pins de Trobriand in place while Robinson charges Winslow's guns on Stony Hill. The guns are overrun by the 3AR. The 1TX pushes de Trobriand back from the Wheatfield. The Federal right is getting perilously stretched. |
| Benning prepares his attack |
 |
| as Robinson prepares his. |
 |
Winslow's guns are lost as Rebels
reach Stony Hill and the Wheatfield. |
While Benning's pinning action allows progress against the Federal right, it comes at a high cost. His regiments are beginning to melt away from the heat of combat. In an attempt to reduce pressure on his brigade, he leads an attack up Houck's Ridge to dislodge enemy guns and skirmishers. While his attack succeeds in overrunning the guns and scattering the skirmishers, Benning falls and his brigade is broken. Confronted by enemy to its front, much of Benning's Brigade falls back, spent. Anderson comes up in support of the Rebel attacks against the Federal right.  |
| Heavy fighting at the southern end of Houck's Ridge. |
 |
| Benning attacks up Houck's Ridge to take the guns. |
 |
| While successful, Benning dies and his brigade broken. |
With the Federal right stretched, the elastic finally snaps and de Trobriand collapses. One regiment scatters while a second falls back to Houck's Ridge to regroup. Unfortunately for de Trobriand, he goes down and his brigade is broken. The 3AR presses on to the foot of Houck's Ridge. Not only is the south end of this vital ridge in Rebel hands but the north end is under heavy pressure.
To alleviate this pressure on Houck's Ridge and hopefully stabilize the situation, Birney grabs the nearest regiment and counterattacks. Catching the Rebels by surprise and in flank, the Rebels recoil. Robinson's Brigade breaks. Hoorah! This success is short-lived. Anderson gathers his brigade and storms the heights of Houck's Ridge. The Federals are driven back. Ward's Brigade breaks.
 |
| The Federal right is driven in. |
 |
| Rebels reach Houck's Ridge |
 |
| before a surprise counterattack drives them off. |
 |
| Anderson presses onto Houck's Ridge. |
 |
| Federal hold on Houck's Ridge hangs by a thread. |
Back in the Valley of Death along Plum Run, the Rebel attack stalls although Confederate troops are seen on Houck's Ridge and Little Round Top. With Weed's Brigade of blue-coated infantry finally arriving on Millerstown Road to shore-up the collapsing Federal right, Vincent strikes!
Leading the 20ME and 83PA in an attack, he sweeps down from Little Round Top scattering the wavering Rebels in his path. Reaching Plum Run, he finds Law and his Rebels in disarray.
 |
| Heavy fighting along Plum Run. |
 |
Vincent prepares to clear Little Round Top
of the weakened enemy. |
 |
| Remnants of Law's Brigade scatters as Vincent storms on. |
Robinson and Benning's Brigades are broken and Law's Brigade teeters on the edge. Taking Little Round Top is beyond Hood's grasp. With the Federals having two unspoiled brigades ready for action, Hood calls off the attack.
This fight is over.
Congratulations to all for a very well-played and exciting battle. The Federals came out on top in this rematch but like the previous contest, the fighting was fierce and casualties high.
To Richard and Ray, as Federal commanders, your change in tactics and strategy carried the day. Grasping how to use reserves, I reckon, helped towards seeing victory this day. To the Rebels under Lee and Surjit, you played a solid game and you nearly saw victory once again. I wager we do not see a return to the Old Tactical Ways again.
Great game! Thank you all!
For those keeping score at home, current tally for this scenario shows each army has two victories. We stand at 2-2. Another game on Wednesday.


Excellent report on a thoroughly entertaining and challenging game Jonathan. The use of reserves was vital in countering the rebel advantages and rob them of total control of events. Whilst ideal for defenders, the key is to transfer this lesson to an attacking force.
ReplyDeleteA well conceived and executed scenario worthy of publication.
I'm still buzzing!
Thanks, Richard! Very happy to see that you enjoyed, scenario, challenges, and play.
DeleteOn Reserves, I find rotation is helpful on attack while spoiling attacks works well on defense. Of course, YMMV.
Hope buzz lasts.
Forgot to ask...Was this a full read or a skim?
DeleteIt was a full read Jonathan.
DeleteGood!
DeleteI can't argue with anything Richard said. It was a total turnaround from the first game, with a very pleading result! The way we planned how to use the reserve orders worked a treat and like you said, will now change any future battles we play.
ReplyDeleteWell done Jonathan, it was a crackin game!
The game saw a radical turn-around in Federal play. For the better, I think. You figured out how to use Reserve to your benefit and it worked tremendously well. Again, congratulations on a well-played game. Your repulsing of the Rebels on Little Round Top by throwing a pair of '9s' when needing 9+ for morale checks was a gift from the Dice Gods.
DeleteI did pull off a few good dice rolls when we needed them. I hope I can carry on with that luck going forward.
DeleteYour timing was perfect! For me, these runs never last.
DeleteI read Richard's report yesterday, and the suggestion to use Reserves and being able to interrupt an opponent was a good idea. Still a close game, but that seems to be what made the difference.
ReplyDeleteRichard beat me to the punch on the battle report post; great account too! Seeing how to apply Reserves in a game was an eye-opener to all involved, I reckon. It will be fun to see if the lesson sticks. Putting into play is more difficult than one imagines. The Federal use of Reserves made a difference in this game.
DeleteThanks for your comment!
Great battle and well done to the Federals on claiming the victory
ReplyDeleteThanks, Neil. Yes, “well done” to the Federals. They really deserved this victory having worked so hard to achieve success.
DeleteThank you very much for another great battle report Jonathan!
ReplyDeleteYou are welcome!
DeleteFull read, as for most of your battle reports, always interesting to read. It looks like Reserves just gave the Federal forces the chance to break up the Confederate attack, did it surprise the Confederate commanders? Apologies for not commenting before, I intend to change this! John
ReplyDeleteThank you, John!
DeleteWere the Confederates surprised? Although they have not said so, I bet they were surprised to see the new Federal tactic in play. I hope to see a battle report from one of the Rebel players to see their impressions of the battle. Lee, are you reading this?
Very good to see your comment on this post and the one on reading battle reports. Much appreciated.
Welcome!
Good AAR , the adjustment by the Feds shows the best feature of replay, the different approach paying off. Now to the other blog.
ReplyDeleteThanks, Joe! Yes, the value of replaying scenarios on full display in these two battles with the Rejects,
DeleteBack to remark the photos show the game. strength of using the 10mm scale. Great Looking game.
ReplyDeleteThanks! I agree that 10mm is well-suited to playing large ACW battles.
DeleteAnother cracking game by all involved! Good to see the Union side coming up with a plan and sticking with it. By the sounds of it both sides now know the value of putting units on Reserve status.
ReplyDeleteGlad you enjoyed the battle account, Steve! While some have used Reserve occasionally in past games, all learned a valuable lesson on how to wield the Reserve Rule in this fight. Unlikely we see the game played without using reserves again.
DeleteDespite all the hyperbole in the Northern press, it seems like this was a pretty close contest and a narrow Union victory, unlike the previous outing, when the Bluebellies were well and truly whupped! All to play for in the deciding game I would say! (I wonder where they got that idea about the reserves from....??)
ReplyDeleteKeith, you are correct. The battle was closely contested. The result mirrored the historical account remarkably. Since we have seen nothing from the Southern Press, difficult to discern if Richard's account is hyperbole or not. Game #5 is with another group and another rematch. As for reserves, I may have suggested it more emphatically before this game.
DeleteAnother fine looking battle Jon 👍
ReplyDeleteThanks, Matt!
DeleteJust back from reading Richard's account, the cunning plan paid dividends though the result was never certain from reading the accounts. It certainly gave the Confederate generals something to think about. Both reports were a joy to read.
ReplyDeleteGlad you enjoyed both reports, Phil!
DeleteGood on the Union players. This scenario must have a lot of legs underneath it as people want to keep coming back to it. Must mean you designed it right. 😀
ReplyDeleteFor a game with good ACW flavor there should be something in the game that helps the defender as being on the defensive was known to be at an advantage and both sides sought it out. The reserve rule seems to fit that well enough to create an opportunity Fire. 😀
Stew, I think these fellas simply enjoy gaming! They would likely play most things I set out. Attacking should be hard especially if the defense is properly prepared. Reserve allows a defender to properly situate units in anticipation for an attack. The downside is that this action requires planning.
DeleteAnother great sounding and looking game, looking forward to the decider what have you planned after that?
ReplyDeleteBest Iain
It was an exciting game, Iain. I thought the game produced some good tension and decision-making opportunities. What's next? Well, there still remains a playing or two left in this battle. After that, I think a different period is in order. What? Who knows?
DeleteAwesome, Jonathan! What knowledge of the topic! I spent two evenings studying the course of your game. Thank you for such a detailed and well written report. Will you analyze the battles of the 18th century in a similar way? I am impressed...
ReplyDeleteThank you, Valentin! Your comment is one of the top compliments I have received on my battle reports. Very much appreciated and congratulations on reading the account carefully. When I return to 18th Century battles, you can expect more of the same in the battle reporting.
DeleteAnother excellent sounding and looking game Jonathan…
ReplyDeleteAll the best. Aly
Thanks, Aly. It was a good one, no doubt.
DeleteWell done to the Union players! What a cunning plan.
ReplyDeleteAnother great AAR Jon. Enjoyed the pictures too.
Yes, the Union players fought a cunning battle. Glad you enjoyed the battle report. You are up next!
Delete#1 for this one Jon. Results were very much like the historical, especially arounf the wheat field. Does Reserve apply equally to the Rebels, or can only be used by the Feds?
ReplyDeleteThat’s great! Yes, the result is a very plausible historical account. The use of Reserves is available to both armies.
DeleteI like this reserve rule. Gives more options to a defender and your payers seemed to make great use of it. 5th and final battle of this scenario will be interesting - same players?
ReplyDeletereserve does allow the defender (or anyone, really) some flexibility. It can come at a cost since failure is an option. The rule has been underutilized until the last game. I think now that it has seen action, that group with be using it in the future. Next game is with three of the four players in,
Deletehttps://palousewargamingjournal.blogspot.com/2023/07/hammerin-sickles.html.
While Wednesday's game will be #5, it is not the last.
Once again, apologies for my tardy response to your post. And what a great battle report it is. This replay of the game was great fun and very challenging for the confederate payers. We shifted our overall strategy for this game, but in the end it didn't work. We simply ran out of steam in the face of an excellent defence.
ReplyDeleteLee! No need to apologize. All comments welcome, always!
DeleteGlad you enjoyed both battle report and game. The way in which the Federal turned their strategy around from the first game was astounding. Wasn't it? The Federal put up a good defense but you Rebs gave them all that they could handle. It was a great game. Thanks for participating and commenting!