or Hood's attack at Gettysburg.
Moving on from the long run of battles at First Manassas, focus turns toward the Gettysburg battle. Like the Manassas battlefields, I visited Gettysburg in May spending three days wandering around the battlefield. I came away from Gettysburg with a better understanding of the topography and its role in the direction of the battle.
I expect to examine several of the various actions within the three-day battle. Hood's attack on the Round Tops, Rose's Woods, Devil's Den, and Houck's Ridge will be the first.
Many wargamers, with an interest in the ACW battles, know the details of this part of the battle well. From the fight for the Wheatfield to Devil's Den to the 20th Maine's stand on Little Round Top, many of these landmarks are well-known and well documented.
 |
| Battlefield and army dispositions. |
For this game, many of the fine campaigners from earlier battles returned to the table. The players were:
CSA:
Each team received a Battle Briefing before the game with which to plan their opening strategy. Did these plans survive contact? Let's see.
When battle opens, Hood's Division is already on the move. Finding Big Round Top occupied only by skirmishers, Law's Brigade along with elements of Robertson's brigade clear the heights and swing around to the north to take Little Round Top. As these brigades advance upon Little Round Top, the Confederates are surprised to see that it was now occupied by Vincent's Brigade. In the valley below, Benning and Anderson's Brigades cross Rose's Run and enter the woods. It is not long before they run into elements of Birney's Division positioned along Houck's Ridge in a line stretching to Stony Hill.
 |
The Confederates discover Little Round Top
occupied by enemy troops. |
 |
De Trobriand anchors the right at Stony Hill (foreground)
and Ward occupies Houck's Ridge (background). |
Robertson begins the attack against Little Round Top with the 4th and 5th Texas regiments advancing on the Federal positions. Rebel fire drives back the 83PA with heavy casualties. As Vincent forms up his line, the 4TX suffers two volleys. The 4th is crippled before it can clamber up the heights. In the Valley of Death below, Law's attacks are met with fierce resistance. The 44AL is repulsed from its attack upon the sharpshooters stationed in Devil's Den. No progress is made against the 4ME straddling Plum Run linking Houck's Ridge to Little Round Top.  |
| Robertson attacks Vincent on Little Round Top. |
 |
| Federal lines stand firm. |
Having withstood the first Confederate attack against Devil's Den, the US Sharpshooters fall back into the cover of the woods. 124NY comes down from Houck's Ridge to occupy Devil's Den. In fact, Birney has both Ward and de Trobriand on the move. Ward descends Houck's Ridge to contest the Rebel advance into the woods while de Trobriand forms a line between Stony Hill and Houck's Ridge running through the Wheatfield. |
Rebels are repulsed at Devil's Den as
Ward stiffens the Federal defense. |
 |
| Heavy fighting around Devil's Den. |
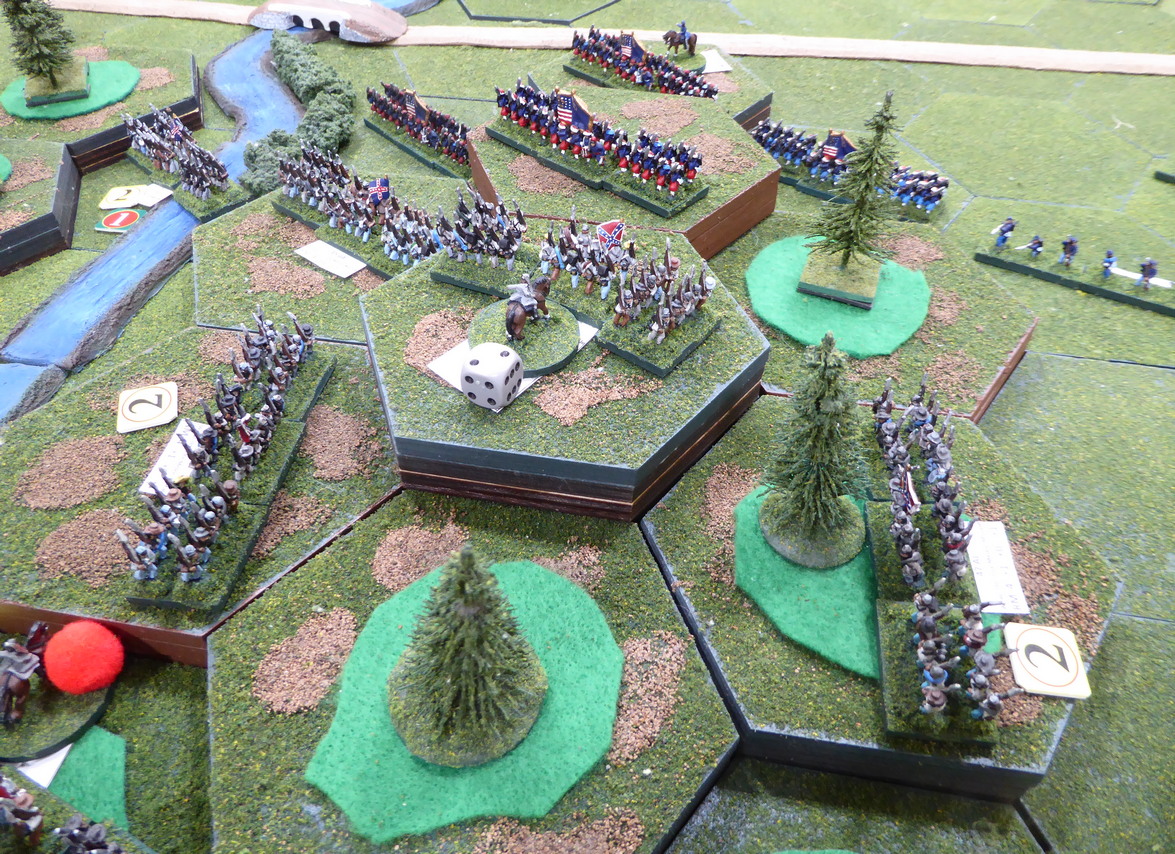
Fighting is hard along Rose's Run as the two battle lines form up and square off. Federal artillery on Stony Hill plasters the 9GA. Hood counters by bringing up Rebel guns. The Georgians fall back into Rose Farm to escape the heat. Casualties rise quickly as the two lines battle toe-to-toe in the woods and at Devil's Den. The Confederates stack up as they struggle to get across the wooded and marshy stream. Benning brings up more of his Georgians to contest Devil's Den. The Confederates storm Devil's Den and eject the Federals out of their defenses. The New Yorkers are destroyed where they stand. De Trobriand's line thins as the more numerous Rebel muskets begin to tell.
 |
Confederate battle line stretches from
Rose Farm to Big Round Top (in the distance). |
 |
| Rebels are stacking up as progress slows. |
 |
| Artillery at work. |
 |
| Benning prepares to attack! |
 |
| Devil's Den captured! |
 |
Slow going through the woods
but a split is forming between Ward and de Trobriand. |
Returning to the fighting at Little Round Top, Robertson attacks with his Texans but is driven back with murderous casualties at the hands of the 20ME and the 44NY. Robertson goes down! The 20ME continues pouring a deadly fire into the 4AL. The Mainers remain unflinching as volleys are traded. The Alabamans waver.
 |
| Robertson falls! |
Fixing bayonets, the 20ME charges down the hill and into the Alabamans. The 4AL breaks and runs! General Law falls! Thus far, the Rebel attack on Little Round Top has cost two generals down on the field. Casualties are high and the Rebel attack is unraveling. Receiving word of the setbacks, Hood leads Robertson's two remaining regiments toward the heights. 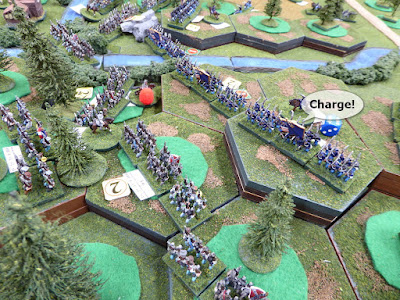 |
| The 20 Maine charges into the 4 Alabama! |
 |
| The Rebel attack unravels on Little Round Top. |
 |
| Hood brings up reinforcements. |
While Vincent and the 20ME successfully hold off the attacks on Little Round Top, in the valley below, the tables are turning against Birney and his Federal troops. Vincent is not out of harms' way, either. His brigade is slowly being overwhelmed as Rebels advance up Plum Run threatening his position.
Having pulled regiments off of Houck's Ridge to reinforce de Trobriand, Ward finds his brigade being cut to pieces by the overwhelming numbers of Confederates. In what seems like only minutes, Ward's Brigade is broken, Houck's Ridge is devoid of Federal troops, and the Rebels press on. De Trobriand's Brigade disintegrates soon thereafter. The Federal right has been shattered. In the distance brightly colored reinforcements are seen along the Millerstown Road. Weed's Brigade has arrived!
 |
| The Federal right is breaking! |
 |
| Only Federal guns remain on Stony Hill. |
 |
| Vincent's position is turned but help is on the way! |
 |
| Weed's Zouave Brigade arrives! |
After holding out on Little Round Top for a couple of hours, Vincent and the last vestige of his brigade (20ME) collapse. The barren ground of Little Round Top is open to the enemy.
As the Rebels encircle Little Round Top, Weed brings his brigade up for the fight. Benning leads his Georgians up to the top. Little Round Top is in the hands of the Rebels! Not for long, though. Weed counterattacks and sends Benning and his boys tumbling down. Benning is killed.
 |
| Rebels find the heights unoccupied. |
 |
| Benning claims Little Round Top. |
 |
| Weed retakes the heights and challenges all comers. |
With attack after attack going in against the Federals on the heights, Weed and his Zouaves cannot be dislodged. The fighting ends with the Federals still controlling the heights.  |
| Repeated attacks cannot throw off the Zouaves. |
WHAT A GAME! What a start to the series!
Mark and Tony scored a Federal victory on the very last turn of the game. This action was closely fought with heavy casualties to both combatants. Sickles really was hammered and hammered hard. The outcome really did go down to the wire and hinged (literally) upon the last die rolls.
Congratulations to the Federal commanders. My condolences to the Rebels generals.
The battle showed much ebb and flow as I suspect generals thought they were winning one minute and losing the next.
What could be better than seeing both history and the cinema come alive on the gaming table with the 20th Maine's determined stand and counterattack against the Alabamans on Little Round Top?
Great fun and thanks to Mark, Tony, Chris, and David for indulging me once again at the gaming table. You make it great fun as I watch the battle unfold.
Until next time!


Wow that was an epic struggle and I really thought the Confederates had done enough to win, destroying all those Union formations - but Little Round Top proved their undoing, just like the movie (and reality, I assume!)
ReplyDeleteNow, those plucky fighters from Maine can go off for a rest somewhere.....!
DeleteYeah, this was a really great scrap. Birney got badly mauled but Vincent hung in until Weed’s foot arrived just in the nick of time. Post-game discussion revealed that Weed was originally destined to shore up the Federal right. Probably a very wise move to reinforce Vincent before Little Round Top fell for good. The 20th Maine’s charge was so cinematic. Could not have scripted anything better.
What a closely contested game. A good opening to your series of planned games.
ReplyDeleteVery close result and a good start, for sure. Maybe this setting and situation interests you enough to try your hand at another ACW battle? Our Henry Hill battle was great fun.
DeleteAnother great looking gams sir!
ReplyDeleteThank you, Michal!
DeleteIt was a great game, Jon, and it makes a gripping report! I'm still thinking about the areas where the game mirrored history - spooky, at times! Thanks again.
ReplyDeleteTony, happy to see that your final game assessment was that of a success. You fellas made the game a fun and interesting contest. Your die rolling could been better. Yes, uncanny how the game mirrored history in so many ways. Great fun!
DeleteThanks for playing and commenting!
What a cracking game and lovely to see a Union win, but mainly it coming down to the last dice rolls, which what we really want to see in our games. The hext tiles looked great and do make it easy to follow the action.
ReplyDeleteI've been watching Mark's Games Room videos on Youtube, where they walk the battlefield, specifically looking at Hood's possible right hook to unhinge the Union left flank on Big & Little Round Top. Very informative to seem the drive/walk this option with a battlefield guide and the issues that arrive from it.
Having done this they have transferred it to the tabletop, but with the whole of the 2nd day (?) being gamed, which again was informative to see.
Steve, this was a cracking game, as you say. Coming down to the last die rolls on the last turn is a dramatic way to end the contest. Fighting the battle at a regimental level rather than at brigade level necessitates breaking the battle up into pieces especially for a remote game.
DeleteI am sure folk can put it more eloquently but, bloody brilliant!
ReplyDeleteI cheerfully accept “bloody brilliant”! Thank you.
DeleteI can honestly say that’s one of the best Wargames I’ve ever taken part in. Great fun even though we lost. I thought we had no hope until the Union right collapsed then hope when 20ME were defeated, to ‘cripes!’ when Weed arrived.
ReplyDeleteI think the rules are perfect for that sized action.
Thanks once again for brilliant hosting.
Chris/Nundanket
DeleteChris, your assessment of the game is a wonderful compliment to receive. Very high praise, indeed! Glad you enjoyed the game. I thought your play was measured and brilliant even in defeat. You have mastered pulling spent units out of the line to prevent brigade breakage. Had it not been for Vincent’s tenacious hold on Little Round Top and Weed’s timely arrival, Sickles (and the Federal position) would have been completely destroyed.
Thanks for playing and your kind comments!
Huzzah for the Union! Well done and an excellent game.
ReplyDeleteThank you, Mark!
DeleteI agree with Chris - one of the best games I’ve ever played in. Never taken part in such a nail biting finish before. The opportunity to charge down the hill with the 20ME was unexpected, and may not have been the right thing to do (since it eventually left them isolated and exposed) but I felt I had to, given my die rolling had been pretty good all night. The refinements to the rules that have accrued over the last few months really came together in this one and with the comprehensive briefing and brilliant battlefield I think you’ve now established the gold standard of remote gaming. Brilliant all round.
ReplyDeleteThank you kindly, Mark! You offer great encouragement. Your play, first as Vincent and then as Weed, lent a cinematic climax to the game that will be hard to top. Dismissing repeated volleys from the Rebs, the 20 Maine fixed bayonets and saw the Alabamans skedaddle. Your actions and results could not have been scripted any better. You repeated this feat with Weed’s Brigade. A field promotion is due! We will remember your actions for years.
Deleteplease please please tell me that Mark shouted "bayonets!" or "swing like a door" as he charged with the 20th....
DeleteHe did!
DeleteI KNEW I could count on Mark. Good job sir.
DeleteA great game, looks like a barn burner.
ReplyDeleteIt was great fun, Joe, enjoyed with a terrific bunch of gamers.
DeleteA fantastic game and nail biting encounter
ReplyDeleteGlad you enjoyed the report, Neil!
DeleteWhat a fantastic looking bash Jon, I thought the Union had it?
ReplyDeleteThanks, Ray! The Union looked on the ropes but Weed saved the day. Probably not the first (or last) time weed saves the day...
DeleteGreat game, Jonathan! Nevertheless, I will decide on a question that has been of interest to me for a long time ... What role do six-sided hexes play in your games? Sorry for my ignorance.
ReplyDeleteThanks! The hexes regulate movement, weapon ranges, unit facing, Zones of Control, Arc of Fire, and Line of Sight.
DeleteI can only echo Chris and Mark, Jon, I can't remember enjoying a game so much. It's rare for a game to really go down to the wire like that. After my terrible die-rolling at Little Round Top I really thought we were out of it until Benning's Brigade came storming across Plum Run. I have given my celebrated purple dice a stern talking to and I hope they are chastened enough that their performance of Thursday will not be repeated!
ReplyDeleteDave C
Dave, this is a terrific compliment! I am glad you enjoyed the game and the nail-biting finish. The Rebels had several chances to dislodge Weed on the last turn but it was not to be. Great fun trying, though. Chris guided Benning up Plum Run and Little Round Top to make the end a very close call. Rebels generals were dropping like flies in the fighting for those heights.
DeleteWow, a full 15 rounds for a TKO - amazing game as always Jon!
ReplyDeleteThanks so much, Greg!
DeleteTop notch! This must rank as one of the closest calls on your table Jon!
ReplyDeleteI have seen some very close calls but this was one of the closest. Likely the most dramatic too! The Rebels had three attacks to wrest control of Little Round Top. All failed to dislodge the Yankees.
DeleteGreat stuff Jonathan, and as others have said it really looked as though the Confederates would prevail. It is also great to read the comments from the players. Close games are usually the most enjoyable and memorable.
ReplyDeleteThanks, Lawrence! Very nice to see the positive comments from the players.
DeleteThe hex table has done particularly well handling a complex layout, it looks very good and the level of satisfaction that the gamers got out of it, speaks volumes for your organisational gift that you have for these games.
ReplyDeleteYes, with you and I coming from boardgame backgrounds, a hex-based layout can do a good job in building up complex but more abstract tables. As always, the players are very gracious and kind with their comments.
DeleteGreat report Jon. I at first thought the results would be close to the historical, then Benning took Little Round Top! I thought it was all over and alternate history was assured. Then Weed's counter attack flipped it back at the last second, wow! What a game! Your reporting lends a certain excitement as well. Really enjoyed this read.
ReplyDeleteThank you, Vol! Very happy to see that you enjoyed the telling of the battle account. It was an excellent fight. One that you will get to experience first-hand later next week. Have you chosen a preferred side yet?
DeleteGreat looking game. I love the table and it must be great fun to get those big battles in small scale onto the table.
ReplyDeleteThank you! It is great fun, for sure.
DeleteWell, that was exciting. I wonder how long it took everyone to calm down afterwards.
ReplyDeleteGood! You will have to ask the players. Dave said he would have stuck to his chair no matter how late it became.
DeleteA great read Jonathan. Gettysburg has always held a fascination for me (I have more books on the subject than any other one subject in my library) and am in the middle of reading Ralph Peters' "Cain At Gettysburg" and just finished the chapter on the action on Sickles' front.
ReplyDeleteGlad you enjoyed the report! I have a number of Gettysburg titles as well. Probably not as many as yours! After reading about the battle, you form an opinion of Sickles’ actions. I went to the battlefield with a hypothesis and left with a better understanding.
DeleteGreat looking battle Jon, I like the fact that you can get such a lot of the battle in one sitting 👍
ReplyDeleteThank you! Back from your summer battlefield tours?
Deletei'm really enjoying the ACW battle reports. Partly that's because it's me and my well documented love for the ACW, and partly that's bc i'm able to follow an ACW battle report much easier as the field / terrain is familiar as well as the forces.
ReplyDeleteThis post really makes me want to make my own little round top table.
That looked like a good game and judging from the responses from the players a LOT of fun. I mean it's hard to NOT have fun in the ACW but others have managed it.
😀
Your love for ACW is well documented. I know some who will not game ACW thinking it boring and pointless. Shall I name names? I don't think so.
DeleteWell that's certainly a close run thing, looks lovely and hurrah for the USA!
ReplyDeleteBest Iain
It certainly was close!
DeleteGreat report, Jon, and clearly a fantastic game, as the players testify themselves! Which is proof of the pudding.. Really great that it went 'down to the wire' like that!
ReplyDeleteThank you, David! Would the outcome have been different with you in command? We should find out!
DeleteFantastic game, ACW itch starting again as I have purchased some 10mm....
ReplyDeleteThanks! These figures are 10mm as well.
DeleteHuge battle, Jonathan! All the more impressive with the remote players.
ReplyDeleteThanks, Dean!
DeleteClose one and with a few encounters that were they to have swung the opposite way we might see a different result than recorded above.
ReplyDeleteHow you manage to keep such detailed notes when you have so much going on at once is impress Jon.
We could have easily seen a different outcome.
DeleteNotes? No notes. I keep it all in my head and then reconstruct the narrative from game photos.
God I am slow, I wondered what the title had to do with the Reds. Nice game.
ReplyDeleteGeorge, you are the first to comment on the title so you are not slow at all!
Delete