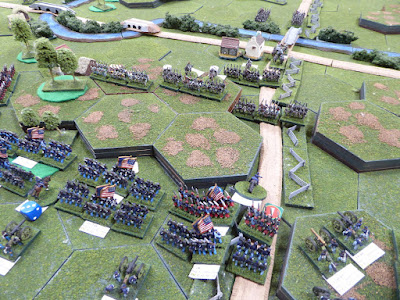
Having returned from a recent trip back East to walk several ACW battlefields, getting my 10mm ACW collection onto the table was Priority #1. With visits to Gettysburg, Antietam, First/Second Manassas, and Harper's Ferry, I had plenty of choices to make. The battle selected to kick off a string of ACW battles on the tabletop was First Manassas. While I tackle the entire battle, Young's Branch is focal to the table as it defines the major Confederate interior lines. Having seen an old map with the battle labeled as Young's Branch, I figured that a reasonable name for this scenario.
 |
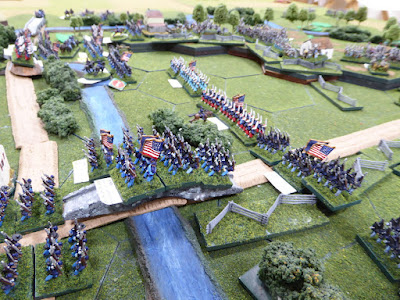
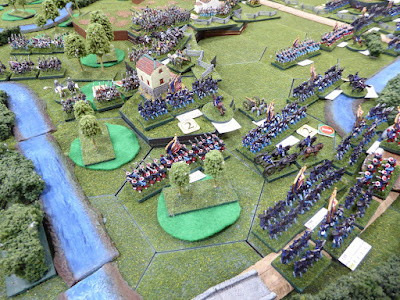
| Young's Branch battlefield |
 |
Looking north toward Stone House from Sudley-Manassas Road.
Henry House in the right foreground. |
With the battlefield and scenario set, I sent out a call for players. While Stew (A Terrible Loss of Lead and Wealth) suggested that he had to invite himself to grab a seat at the table, that is not quite true. There was a bit of convincing needed and finding a slot in his busy schedule.
Stew and I sat down on Saturday afternoon to give the scenario a run-through. For a change for me, both players resided in the same time zone. Stew chose to command the Federal Army under McDowell. I would command the twin armies of Johnston and Beauregard. This would be Stew's first remote game and the first with the rules. Being a longtime Fire & Fury aficionado, I wondered how he would take to my adaptation of Fields of Honor.Without wasting anymore print, let's move on to the fighting of the actual battle.
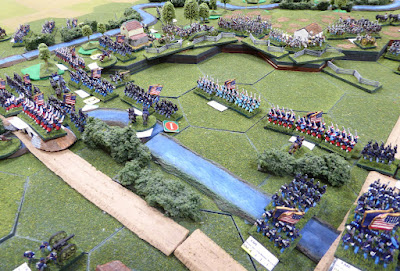
The battle begins with the arrival of Burnside's Brigade moving south along the Sudley-Manassas Road following McDowell's grand flanking maneuver. Warned of the Federal arrival to his left, Evans quickly moves the bulk of brigade from guarding the Stone Bridge over to Matthews' Hill. With reports of large Federal formations arriving to the north, Beauregard sends Bee and Bartow north from Henry Hill to support Evans.
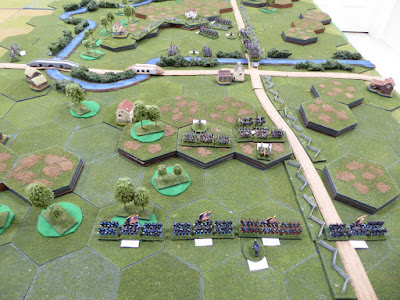 |
| Evans stands alone on Matthews' Hill. |
 |
| Burnside shakes his brigade out into line. |
 |
| Bartow and Bee race to Matthews' Hill. |
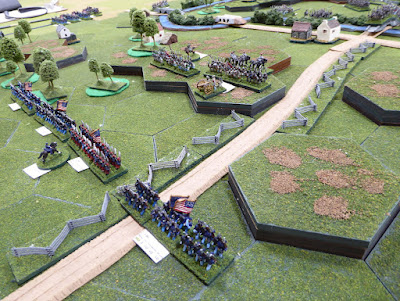
Before reinforcements could reach Matthews' Hill, Hunter brings up the rest of his division (Porter's Brigade) in support of Burnside. With artillery unlimbering on the knoll across Sudley-Manassas Road, the attack begins. Outnumbered nearly seven-to-one, the 4th SC puts up a valiant fight. Evans' 4th SC is cut to pieces in a hail of lead as Wise's guns stand on the heights alone. Evans must retire back beyond the crest. Both Hunter orders both Burnside and Porter to press on. |
| Hunter's Division attacks! |
 |
| Evans' losses are heavy but the Federals pay a price. |
 |
| The Rebels retire off of Matthews' Hill. |
 |
| Blue lines push the Rebels back. |
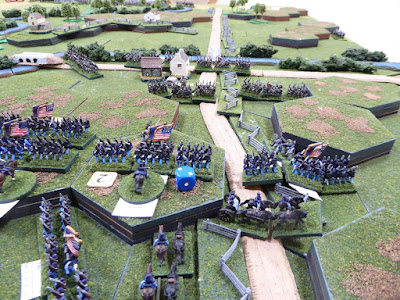 |
As the Rebels fall back to The Stone House,
Hunter's Division secures Matthews' Hill. |
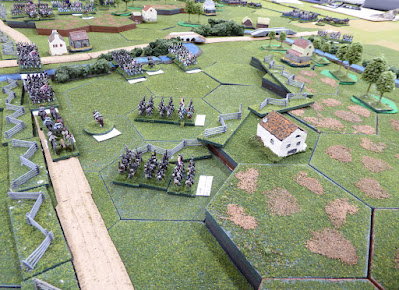
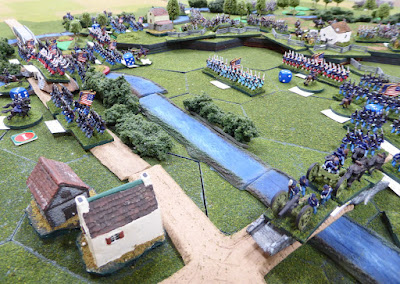
Facing overwhelming odds, Evans gives up Matthews' Hill. Seeing Evans' predicament, both Bee and Bartow form up along the Warrenton Pike near The Stone House. Will the Rebels make a stand at Young's Branch at the crossroads? No! Evans' Brigade breaks and scatters. With pressure from Hunter's division increasing, the Rebels choose to fall back from Young's Branch. |
| Rebels fall back to Young's Branch. |
 |
| Hunter's Division forms up at The Stone House. |
 |
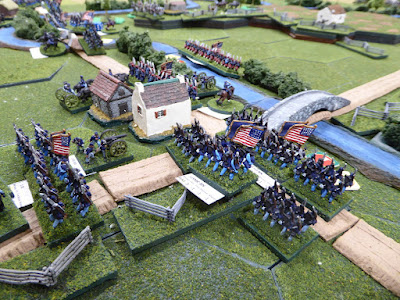
| Hunter crosses Young's Branch |
 |
| Jackson begins to deploy. |
 |
| Federals press on toward Henry Hill. |
 |
| Support arrives for Hunter. |
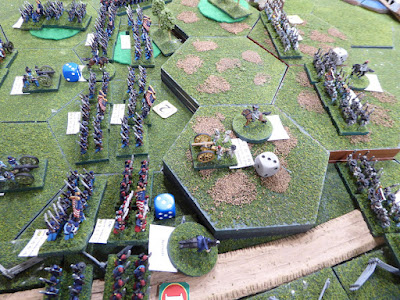
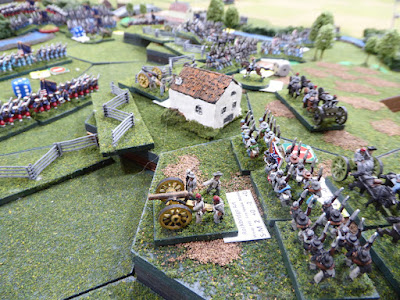
Back on the Confederate right, Sherman storms up Henry Hill to take Robinson House. Success! While the Rebels defending Robinson House are ejected with great loss, Sherman finds himself facing reinforcements from Cocke's Brigade. Rebels line the rail fence atop Henry Hill. Beauregard is carried to the rear, mortally wounded.
 |
| Sherman takes Robinson house! |
 |
| McDowell presents a wide front. |
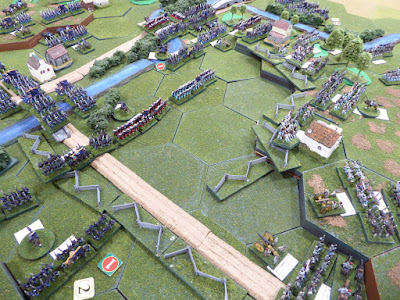
While Cocke moves up to line Henry Hill with Confederate infantry and Jackson forms up on his left, the Federal masses march on. Heinztelman continues pushing his boys hard on the Federal right. Jackson's left is becoming threatened as Franklin and Howard press down Chinn Ridge. In the heavy fighting at Robinson House, Sherman's success is short-lived. He is repulsed in counterattacks. Sherman's Brigade is broken.  |
Cocke lines Henry Hill awaiting
the assault he knows is coming. |
 |
| Battle overview. |
 |
| Sherman breaks. |
In a surprise to Heintzelman and Franklin, Elzey's Brigade appears along Chinn Ridge. Perhaps over-extended, the 5th MA is caught in flank and destroyed. Could this be a turn to Confederate fortunes? No!
As the Federals bear down upon Jackson, the firefights reach a crescendo. Jackson's Brigade is broken and Johnston falls, mortally wounded.
 |
| Federals close in on Henry Hill. |
 |
| More Federal reinforcements come up. |
 |
| Henry Hill is still in Rebel hands but not for long. |
With both Beauregard and Johnston dead on the field and four brigades wrecked out of eight, Jackson orders his army to retire from the field.
A brilliant Union victory! The war may be over!
Congratulations to Stew on a very well-played game. He managed to keep up a deadly fire throughout the battle and shredded many of the Rebel regiments. We played for about six hours straight. Whew! That is a very long game. The Rebels could have put up a little more resistance but, at this point, resistance seemed futile.
I wonder how the Rebels could have played their hand differently?
While this was Stew's first remote game, I hope to see him back at the table another time. Facing an opponent who offers a challenging game is a great pleasure.
Thank you, Stew!


Stew mentioned that it was quite a long game in his account, and six hours is a decent session. He also commented how quickly the time flew by, and it certainly seemed an action-packed game. An interesting AAR and some great photos of the action.
ReplyDeleteWhile the time passes very quickly in the heat of battle, six hours in a remote game is a long time to be on one's feet juggling the umpiring duties.
DeleteGlad you enjoyed the battle report!
That is a marvellous AAR Jonathan, carrying the reader right into the action. I really enjoyed that!
ReplyDeleteThank you, David! You offer great encouragement to press on with battle reporting.
DeleteA superb and action packed game. Seems that the time flew over for the both of you which is always a sign of a good game
ReplyDeleteMuch appreciated, Neil! The time certainly flew by in a jiffy. I regularly look down at my watch and think, "how did time pass so quickly?"
DeleteSplendid stuff indeed Jonathan…
ReplyDeleteAn excellent report of what looks and sounds like a most enjoyable game.
All the best. Aly
Thank you, Aly! The game was most enjoyable, indeed, and one more wargamer is introduced to remote gaming.
DeleteExcellent looking game sir!
ReplyDeleteThanks, Michal!
DeleteAn epic game there Jonathan splendidly played out and narrated.
ReplyDeleteThank you so much, Phil! I wish the Rebels could have played a bit more splendidly!
DeleteYour AAR read like a battle history, the table and the added illustrations were very informative. Even in the scale the troops looked right. Seconding Phil, epic, Jonathan, epic.
ReplyDeleteJoe, your response offers a terrific compliment. Glad you enjoyed the presentation.
DeleteAgree, a great account and interesting to see a ‘big battle’ so successfully represented in this space.
ReplyDeleteThanks, Norm!
DeleteSplendid sounding game, marvelously illustrated with your photos, tough result for you, can you see a way to win for the rebels?
ReplyDeleteBest Iain
Thanks, Iain!
DeleteCan I see a way forward for the Rebels? Definitely! While Stew warned that he typically starts off hot with his dice rolling and fizzles out later in the game, that cooling never materialized. I could have thrown the RESERVE mechanism into play but figured I would keep things easy for a first game. Next time I play, using RESERVE will definitely be in play.
Ah you've lured him in with an easy game, smart move!
ReplyDeleteBest Iain
Not easy. A little less complicated!
DeleteSplendid looking battle Jon and a great write up. I fear 6 hours remote would be too much for me. I have played a Manassas scenario here in the dungeon sometime ago. I might look it up and see whether it would work remotely ?
ReplyDeleteThanks, Matt!
DeleteSix hours is long for one session, for sure. Does your conclusion change if that six hours is broken into several, separate sessions?
I would recommend taking Jon up on the offer of this scenario Matt.
DeleteI appreciate the vote of confidence, Chris!
DeleteFor sure Jon splitting larger games over a couple of sessions, it’s just the thought of being sat at the computer for 6 hours at a stretch ?
DeleteThat read like an actual eyewitness account from up on a lofty mountain or some such. Very entertaining!
ReplyDeleteShame the Rebs got so swamped. I think reserves added would help them immensely.
Most encouraging response, Dai! Thank you!
DeleteI reckon the Rebels could perform better but perhaps not with me in command.
Have to echo the rest. That was a truly enjoyable read and a fantastic table. Kudos to Stew for carrying the field so brilliantly. I’m afraid now he’s going to feel invincible…….🙄
ReplyDeleteThanks, Mike! Glad you enjoyed the report. My poor Rebs took a pounding, no doubt. We cannot allow Stew to get a swelled head...
DeleteQuite the action, with the Rebs taking a pounding; could definitely have influenced the course of the war had it been this way in actual history!
ReplyDeleteThis result might have squashed the Rebellion before it much got underway. I can do better...maybe not against Stew.
DeleteWonderful report of the series of engagements in this large game.
ReplyDeleteThanks, Peter! A second game was completed on Wednesday. Now, I need to collect my thoughts and get down to writing.
DeleteAgree with everyone else Jon and given your penchant for recreating historical actions to gain insight into the actual events. I guess the lesson here is, as you say above, if the Union had fought this battle more sensibly, the ACW (the BEST CW!) might have only lasted a few weeks.....
ReplyDeleteThanks for adding your insights, Keith. While this was the first replaying of the battle, it will be interesting to see if tactics evolve with each battle experiment.
DeleteGreat, Jonathan! I really liked the report and the photos from the game! Being on a real battlefield is amazing!
ReplyDeleteValentine, your enjoyment of the report is gratifying. Walking a battlefield is equally gratifying. Thank you for taking time to read the report and comment.
DeleteExcellent table and splendid report Jonathan. The Union really pushed on through.
ReplyDeleteThanks, Richard! The Federals certainly pushed through, for sure.
DeleteMighty good looking game. Even though this isn't my favourite CW, those 10mm units en masse are a stirring sight.
ReplyDeleteThank you, Anthony! Which is your favorite CW?
DeleteA good topic question. Of the civil wars with CW in the title, I think it is the ECW. Of civil wars generally, maybe the Wars of the Roses
DeleteECW is a good choice too! I certainly enjoy gaming that period. I enjoy gaming WotR as well.
DeleteSorry about that anonymous post - Google playing up this morning.
ReplyDeleteThanks for the clarification!
DeleteInteresting how differently this played out to our re-fighting of the battle this week. I won't say any more at this point. Suffice to say it's a very well thought out scenario. Great batrep!
ReplyDeleteInterestingly different, indeed. Jackson's Brigade was wrecked seemingly with great ease. I wasted him completely in a most ineffective defense in this fight. I have recovered enough to begin to piece together your fight.
DeleteGlad to see you enjoyed this battle report. The battle report for your game will likely hold more interest for you. Having five players participate makes for a more different dynamic in a game setting. Both were great fun.
A great report Jonathan and an interesting reversal of history. I have played Bull Run half a dozen times and the Union has never won.
ReplyDeleteThanks, Mark! With the armies at near parity in both quantity and quality, what drives your result of a Confederate sweep on your gaming table especially when you consider that the Confederate brigades of Evans, Bee, and Bartow are wrecked early on?
DeleteA fine game and the hex terrain really comes into its own for remote gaming. Whilst not for everyone, it ihas certainly grown on me over the years, as it does help simplify game play. I will have to re-read up on this action to compare how this played out versus the historical result.
ReplyDeleteThanks, Steve. I agree that hexes may not be everyone's preference but using them sure makes a lot of game play simpler. Remote games can be played either on gridded or non-gridded surfaces with no problem. Hexes do speed play, I think.
DeleteIn your comparisons, remember that the historical outcome was only a single data point and this report offers another, single data point. More games (and data points) yet to come.
This game saw the first part of battle replicate the historical battle almost exactly.
A good point re: the data points to bear in mind for future games. I know when I've played Bloody Big Battles game before, you can often see why the action unfolded as it did, due to the terrain, appraoch roads etc. Sometimes you do wonder how one side won or lost, when they might have had a good position to begin with. This is where I find reading the history informative as maybe a commander got cold feet or a rush of blood to the head etc.
DeleteI often wonder what the triggering event was that pushed one side toward victory and the other toward defeat. Reading history can often provide the clues to providing answers to what we experience on the gaming table if our model is correctly built.
Deleteman, I am LATE to this post. apologizes; I was distracted by life.
ReplyDeletefirst off, Thanks Jonathan for a delightful game and it was my pleasure to play and to 'meet' you and interact in real time. I hope we get more remote games in the future,
secondly: you missed the BEST part of the game. It's when I deployed Franklin's Brigade and said smugly "now that, Mr. Jonathan sir, is how you set up a flank attack tut tut tut." only to have the very next thing happen being themselves being flanked ands having a regiment destroyed...
thirdly; I really like the FoH rules. Especially the broken brigade rule, and would like to play them again.
fourthly; the scenario was really well crafted and enjoyable and fit the battle well.
I'll be interested to see how the next game played out in the AAR. 😁
Never too late, Stew!
DeleteThis was a fun contest and very satisfying to
face you across the table, if only remotely.
I did not miss the best part of the game. I mentioned the flank attack upon Franklin. What I did not recount was your over-confidence in getting Franklin onto Jackson's left. While you could not see my face, there was a smile with thoughts of hubris and the surprise you were about to receive. All in good fun and you soundly defeated my Rebels.
Good to see the rules worked for you and thank you for playing along!
I know, you were just being polite not mentioning my verbal bravado right before the unit got smashed. You’re to much of a gentleman. I’m bringing it up now bc it’s hilarious. 😀😀
DeleteI do hope that in the next ACW (as we know the best CW) scenario our schedules will align again and I’ll be able to participate. IF there is room. You’ve conquered the remote gaming scene and I know there is a queue.
It’s like you’re a drug dealer who has handed out the free samples and now we’ve had a taste and we all want more. 😀
Yeah, it was funny...
DeleteImpressive game and, as we have come to expect, a very detailed and thorough well-illustrated account. Splendid! :-)
ReplyDeleteThank you, David! I have a second battle account to write game when time permits. Hopefully, the next one will meet your high expectations.
DeleteI'm sure it will, Jon! :-)
Delete