Friday, August 28, 2020

Pike Block #8 for Italian Wars

Off the painting desk today is the eighth pike block to march over into the completed column in the 28mm Great Italian Wars project.  Pike block #8 maybe the last too.  We will see.  How many pike blocks does one really need?  With 39 figures mustered in each block, that is a lot of Renaissance figures to paint and field for one unit.  Eight such blocks is most likely plenty to field for one army and even having two armies with four pike block each may be good enough for many battles.
This block consists of a real hodgepodge of figures from many manufacturers.  Being the last full grouping of pikemen remaining in The Lead Pile, many different figures were called to the colors.  I count figures form Artizan, The Assault Group, Wargames Foundry, Old Glory, Casting Room Miniatures, and several handfuls from a Kickstarter Jake participated in a few years ago whose name I forget.  Jake gifted the unknown Kickstarter pikemen at Christmas 2018.  Some of the Artizan pikemen were another gift from gaming buddy, Scott.  About time I finally got them into the painting queue and out for a parade.     
Having finished off this block, unpainted inventory for this project is minimal.  Perhaps a gun or two remain and enough Gendarmes to field two more BMUs.  Not much after that.  Well, I do have four, unopened bags of Old Glory arquebusiers and crossbowmen remaining in waiting but I have sufficient numbers of those class of troops painted already.  Perhaps, I will sell, trade, or even paint these figures some day?
Included with the 39 pikemen is one stand of four dopplesoldners.  These two-handed swordsmen sure look like Old Glory figures to me.
Next time, artillery for the 30mm ECW project should be coming out from the painting desk.  Of course, the next unit may be anything, really.

Tuesday, August 25, 2020

Steve's Simple Wargaming Q&A for Fields of Honor

Homework time.  Steve's Sound Officers Call blog recently featured a post on the Allure of Simple Wargaming.  In that post, Steve presented a case for simple wargaming and proposed a closer look into that genre of quick to learn, easy to play rules.  A handful of rulesets were identified as likely candidates and a list of post-battle questions posited to apply to each of the games played in his experimental study.

I took up the challenge and applied Steve’s questions to my recent games of Fields of Battle: AWI.  See battle report, Action at Mill Creek Redux for a blow-by-blow presentation of the battle used in completing the following Q&A.
Steve's post-battle questions (and a few of my own) with my responses follow:
  • Rules: Fields of Honor: AWI.
  • Rules' complexity: Simple.
  • Period: American War of Independence.
  • Gridded/Open:  Both GRIDDED and OPEN rules are included.  I used GRIDDED with four inch hexes.  Any conversion between hex and open form is easy.
  • Figure size: 15mm.
  • Table size: Small with a grid of 8x6 4 inches hexes. 
  • Method of play: Solo.
  • Scenario: Action at Mill Creek.
  • Scenario Author:  Derived from Norm's scenario of the same name as found in his Two Flags - One Nation rules.  Modified slightly and transported back into time for the AWI.
  • Victory conditions:  British player must take the bridge and have two regiments on the heights before sustaining 50% units lost. 
  • Game duration: About one and a half hours including note taking and photos.
  • Number of in-game rules' consultations:  Two.  One to check on leader casualty procedure and the second to confirm mechanisms for multiple attackers vs a single defender in melee.  No more than two minutes to find and interpret the answer in each case.
  • Battle victor: American defenders in a closely contested battle that went down to the wire.
  • Contributing factors to victory:  Attacking is hard work especially when only slightly outnumbering defenders in good ground.  The British suffered heavy casualties in the first fire exchange losing one regiment and having two others damaged.  Later, Smallwood's regiment destroyed two regiments in quick succession.  Having the American officer only wounded rather than killed by a sniper may have prevented an American defeat.  Although the British were clearing Rebels from the American right rapidly, it was too little too late. 
  • Game satisfaction (0-None to 5-Complete): 4.
  • Reason for satisfaction score:
    • Pros: Sequence of Play is straightforward without complication.  With nine units per side in this small battle, play was quick.  Only a handful of modifiers needed for each of FIRE/MELEE/MORALE resolution.  Not all modifiers are applicable in every situation and quickly can be committed to memory.  Resolution of each interaction is fast.  Unit quality modifiers highlight the differences between the various troop types.  British line definitely fight with different attributes than do American militia.  Unit attributes easily adaptable by Quality Modifiers to account for a wide variety of troop traits.  Total possible combinations of unique unit qualities is 125 (5x5x5).  Sequencing of the turn phases lends to dynamic game play.  A feel for a tense battle ebb and flow as each combatant takes a turn putting the enemy off balance before the turn reverts to the opponent.  The Events Table adds some uncertainty and creative randomness into the battle.  These events can aid in driving an interesting narrative.  The in-game narrative developed during play was engaging especially with the battle hanging in the balance on every turn.  System uses 1D10 having uniform distribution but in this case, 1D10 variability is no issue since there are no opposed differential computations.  Solitaire suitability very high.  Game was very enjoy as a solo exercise.  Rules work well with my single element BMUs.  
    • Cons: Rules have some ambiguity and are not as complete for all situations but omissions are easily resolved.  Leaders are all rated the same with a +1 DRM for FIRE/MELEE/MORALE CHECKS when attached.  When faced by a high ratio of leaders to units, leaders may become too effective in driving an attack or defense.  With sections of the rules written for both hex/counter and miniatures, there is some confusion and overlap.  Some inconsistency in the tabled values between text and back cover QRS.  
  • Extraordinary, noteworthy, heroic, or cowardly events:  See battle report linked above for a fully detailed examination of the action.  A few notable events include:
    • Pennsylvanians on first turn discover they are low on ammo with a Calamity Event.  They will remain so for the entire battle.
    • With the British left hitting the 7th Penn hard near the bridge with six hits and needing only three hits to destroy the unit, the PA boys shrugged off four of those hits to remain on the battlefield.
    • With the American right reeling under heavy pressure from the attacking British, Smallwood's regiment marches up the hill to plug the gap created by the retreating Americans.  Smallwood then proceeds to scatter the British 9th Foot before descending the hill to destroy the British 4th Foot and retake the bridge.
Having gotten Fields of Honor out onto the gaming table for two games, I plan to keep this easy to play game in my back pocket for days in which I want a light but satisfying gaming experience.  With the Fields of Honor AWI version fresh in mind, I am tempted to use the older and more detailed, colonial version to tackle the Spanish-American War.  I ought to capitalize on the groundwork laid learning the AWI version.  

Saturday, August 22, 2020

Action at Mill Creek Redux

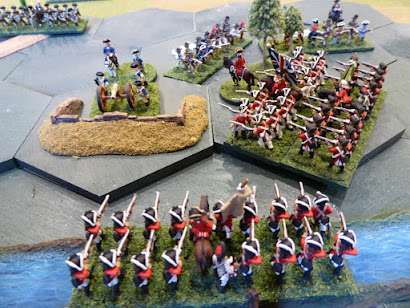
Having acquainted myself with the Fields of Honor rules in the first outing of Action at Mill Creek, I figured the best way in which to reinforce what I learned was to reset the battlefield and try again before those lessons slipped away.  That is what I did.

Initial deployments were as before with the Americans defending a bridge in an attempt to block an advancing British army.  The Americans had at their disposal two Continental line regiments guarding the bridge, two militia and a battery on a hill overlooking the stream.  Add to these forces, the possibility of up to three reinforcing Continental line regiments.  The British had three brigades arrayed for the attack against the American positions.  
Initial deployments
Victory goes to the British commander if he can control both the bridge and have two regiments upon the hill without first suffering 50% casualties.  In the first battle, the British saw a convincing victory by throwing the Americans back from the bridge and hill without exhausting its army.
British ready to step off
Turn 1
With the British as the aggressor, the redcoats act first.  To begin the battle, both players roll on the Events Table.  The Americans roll a Calamity Event.  With the specific Calamity result dictated by a second die roll, the British commander is allowed to choose the event to befall the Americans.  Out of Ammo is the chosen Calamity.  The Continentals defending the bridge will be forced to check ammo availability every time they attempt to fire.  Not a good start for the defenders.

The British begin their advance toward the American line.  Out of musketry range for now, the Militia choose to place themselves under Hold (Op Fire marker in the photo) orders so that they may react once the British march into range.    

Turn 2 
The British continue to advance.  The British gun, unlimbered toward the rear, targets the militia on the hill and causes one hit.  The Continentals advance to the stream in order to contest the British advance.  The 7th Pennsylvanians, defending the bridge, find the ammo to fire into the 4th Foot.  One hit is suffered by the 4th.   
Initial clashes begin
To the left of the 7th Penn, the 4th Penn finds the ammo to unleash a devastating volley into the 49th Foot.  The Pennsylvanians deal three hits into the redcoats.  The 49th fails three morale checks and the unit is destroyed.  Ouch!  Rules note: A unit may absorb three hits before being eliminated.  With each hit, the defender makes a Morale Check.  Pass the Morale Check and no hit is registered.  Fail and the unit keeps the hit.
Deadly volley into 49th
49th destroyed
The American gun on the hill reaches out and touches the British 9th Foot for one hit.  The British attack is not beginning well.
Guns find a target
Turn 3
The Americans suffer a second Calamity Event.  This time, a British sniper takes down an American officer.  Fortunately, he is only wounded.  No command bonuses this turn.  
British ready for an attack against the American left
On the British left, converging fire finds its mark.  The British Light Infantry, the 4th Foot, and the battery concentrate their fire onto the 7th Penn.  Out of six hits from incoming fire, the stout Pennsylvanians manage to brush off four of those.  Result is that the 7th Penn suffers two hits, still nearly wrecking it.  Heavy casualties, for sure, but a unit can take three hits before becoming ineffective.  The militia on the hill takes a second hit from the 9th.  It, too, is on the verge of collapse.
Concentrating fire onto the Pennsylvanians
With enemy upon its left, a battered friend upon its right and rear, the 4th Penn withdraws.  The battered 7th Penn does likewise.  On the brink of collapse, the militia falls back as well.  To fill this void, Smallwood's regiment climbs up onto the heights.
The 4th Penn is outflanked
Much of the American line falls back
As Smallwood crests the hill, the weakened 9th foot is seen below.  Surprised by the arrival of fresh reinforcements, the 9th Foot is scattered by Smallwood's volley.
Smallwood fires into the 9th Foot
9th foot is scattered
Turn 4
On the British left, both the Light Infantry and 4th Foot pour volleys into the 4th Penn.  The Pennsylvanians suffer two hits.  Now, both the 4th and 7th Penn are teetering on destruction.
The American right is taking a beating
On the British right, the 24th and 17th Regiments of Foot go in against the militia on the heights.  In brutal close combat, the militia are pushed off the hill in retreat having suffered two hits.  The British take the heights.
British attack the heights on the British right
and succeed!
Having dispatched the 9th foot moments before, Smallwood comes off the heights to retake the bridge.  With fire from both the wavering 4th Penn and his own regiment, Smallwood scatters the 4th Foot with seeming ease.  The 4th Foot's commander falls from the saddle, dead.  Control of the vital bridge is once again contested.
Volleys pour into the 4th Foot
and the 4th is destroyed.
Turn 5
With one end of the heights secured, the British attack the American guns in the earthworks.  Fighting their way into the earthworks, the 17th and 24th Foot suffer heavy casualties as the defenses and canister cause great destruction.  While casualties on the guns are brutal, the British are thrown back.  The redcoats retreat back down the hill.
The British go in against the guns
On the British right, both wavering Pennsylvanian regiments are scattered as the British close in with aggression.  Both Pennsylvanian regiments are destroyed.
Heavy fighting on both flanks
On the British right, one of the American militia retakes the high ground. 
Militia reclaim the heights
Turn 6
With both sides sustaining powerful body blows to their forces, the battle appears in the balance.  In the balance except that the British have lost four units including a general.  The British 50% breakpoint is five units lost.  The Americans, while holding the high ground with units badly beaten up, still have victory within their grasp.  The British units control the bridge.  If only one more British unit can be destroyed before losing the heights for a second time victory can be secured.  In desperate firefights, the militia in the center is destroyed.  Now three American units are lost.  To push the British over the breakpoint, the remaining militia scores a hit against the 24th Foot.  The 24th is destroyed.  The Americans hang on for victory!  
Americans hold on!
The outcome of this contest came down to the wire.  The Americans managed to push the British to the breakpoint but three of the remaining American units were one hit away from destruction.  Very close result and a good test of the rules.  

As for the rules, Fields of Honor offered up a quick playing game with only a few rules.  A simple game, I think.  With each unit having differing characteristics with respect to FIRE, CLOSE COMBAT, and MORALE, distinctions between the British line and its American counterparts came into play with little overhead.  Militia cannot be expected to fight toe-to-toe with the British but they can get a lick or two in before being driven off. 

Play for this contest was entirely off the QRS with no need to look up anything in the rules booklet.  Even if I had referred to the book, it would not have taken long.  The rules are only a few pages in length. 

With FoH being at the Simple end of the gaming spectrum, I will use this replay to answer Steve's Allure of Simple Wargaming questionnaire.  Those responses next time.

By the way, this was a great excuse (if one every really needs one) to get the 15mm AWI collection out of storage and onto the gaming table.  It has been far too long, for sure.  Hopefully, these troops will return to the table in the not too distant future.

Thursday, August 20, 2020

Bavarian Kurprinz IR

After a brief diversion to make sense of the latest blogger "feature" of absent thumbnail sketches, back to the painting table for a return to the 18mm SYW project.
Mustering off the painting table today is the second battalion of Bavarian Infantry Regiment Kurprinz.  Of all of the variety of SYW uniforms, I place the Bavarian cornflower blue coat with white breeches among the most handsome.  With the white cuffs/lapels/turnbacks and yellow hat lace, the Kurprinz cuts a striking presence.  Battalion #1 came off the painting desk in March of this year so high time that its sister battalion marched out to join it.  Foot figures are from the excellent Lancashire Games' stable led by a Eureka mounted officer.
Still much action at the painting table but it appears the next unit to emerge from the workbench will be a large pike block for the Italian Wars collection.  By my count, this will comprise 43 figures in 28mm.  Before the pike block makes an appearance at the photo booth, there is a battle report to write on the second running of the Action at Mill Creek for the AWI.  Like the first action, rules in play will be Fields of Honor: AWI.

Until next time...

Monday, August 17, 2020

Blogger: Under My Thumb(nail)

When Google announced that Blogger would be getting a new user interface (UI) and that the existing UI would become legacy, I figured I would give the new version a try since reverting back to legacy was a promised option.  At first, I found the new UI somewhat clunky but quickly grew to appreciate the enhanced analytics and formatting options.  Soon, editing in the new UI seemed an improvement over the legacy app.  All worked well until last week.  At that time, I noticed that the thumbnail sketch of my lead photo was no longer appearing on my Blogs Followed list.  Curious.  Even more curious was that I noticed thumbnails missing from many other blogs I follow.  Had these bloggers switched to the new UI too?  Perhaps, the legacy UI experiences the same?
Sample of posts missing thumbnail sketches
Accustomed to seeing a thumbnail sketch of my latest post and those of others, I set out to find a remedy.

During an exploratory, I discovered that the way in which Blogger references embedded images has changed.  To see these differences, one must examine the underlying html.  I will use the leading image from my last post as an example.
From the post editor, select HTML view,
The script for the above image will look something like this:
Notice the highlighted bit of code.  This references the image size with width=410 and height=345.  Before thumbnails stopped appearing, the lead image size for the thumbnail would be translated implicitly as a square rather than as a non-square rectangle.  Without this implicit translation, Blogger does not know how to render the image as a thumbnail.  If your lead image is not square then to resolve this "feature" edit the lead image source ("src=" parameters) from 'wxxx-hxxx' to 'sxxx' where 's' signifies 'square'.  See below:
With this change (make sure to save it!), the lead image will now appear as a thumbnail sketch when published.  Until Blogger accounts for this feature, the above provides a work-around for now.  If your thumbnails have disappeared, give this technique a try.  This technique works for me.  Of course, YMMV.

Sunday, August 16, 2020

Clearing Out The Bins

As mentioned in an earlier post (see Cretan Archers & Survey Time) on the need to consolidate and organize The Lead Pile, work on that front sees progress.  Continued digging surfaced the following three candidate bins for completion.

First up are two stands of Assyrian heavy slingers from Wargames Foundry.  As expected, this venerable range of figures continues to set the benchmark as a superb range of Biblicals.  While more Foundry Assyrians remain in inventory, these represent the last of the slingers.  Being out of slingers is good since already more slingers are present than recommended for most Army Lists.
Next off the painting desk are more skirmishers.  This time, I switch gears to field Celts for the Punic Wars project.  One stand each of slingers and bowmen can take to the field.  Perhaps when conditions allow for a reconsideration of Telamon these lads will see action?  These eight figures are from Crusader Miniatures and Black Tree Design.

Finally, I dug out six Cuban Rebels for the Spanish-American War project.  While not enough on their own to form a BMU, I can add these two stands to existing formations to bolster numbers.  Figures are Old Glory.
Besides these half-dozen rebels, the Spanish-American War project is seeing increased activity at the painting desk.  In work are a couple of units of Spanish infantry and a couple of units of American volunteer infantry.
Old Glory's SAW range of figures is always a joy to paint.  The figures are big and easy on the eyes.  Few uniforms are as smart looking as the American uniform during this conflict.  Quite a practical outfit too.

After allowing my Old Glory Army Card to lapse several years ago as I moved away from projects based on Old Glory figures, I renewed my card recently.  After considering my options, I moved on an impulse to expand an existing project using Blue Moon figures.  I am sure to find other Old Glory products to add to The Lead Pile over the coming year.  No matter how fast I paint, my Lead Pile may never shrink...

Thursday, August 13, 2020

French Line for 1859

I sometimes find myself puzzling over which unit to push into the painting queue next.  Not that I lack choice.  The problem is that I have too much choice.  With one or two projects from which to choose, finding something to paint is easy.  A dozen or more projects on tap poses some bigger issues.  When I reach such indecision, I often prep three dozen French or Austrian infantry for the 1859 project and push them straight away onto the workbench.  Simple but colorful uniform buys time while I contemplate what next.
This week saw one of those times.  Rather than waste valuable painting time wondering what to paint next; pondering all of the useful possibilities; and going through The Lead Pile in search of just the right unit; I dove into work on a regiment of French line.  These Frenchmen are from Lancashire Games.  As I say every time I paint a few, the French and Austrian infantry for this period are my favorite Lancashire figures.  Really great figures.
Now that this unit is finished, did the time spent working up another French regiment clear my head for what to paint next?  I think so!  In addition to clearing out the figure bins of more skirmisher figures from an assortment of projects (like I did recently for Cretan bowmen), expect more Hittites to enter into the painting fray.

Does indecision on what to paint next ever grip anyone else?  I would enjoy reading your thoughts.

On the cycling front, weekly mileage remains at a little over 200 miles with each day averaging about 33 miles.  At this pace, August will come in with roughly the same totals as July.  Weather has been pleasant but cycling is not without hazard.  Witnessing a crash unfold is a rare event.  This past weekend, that rare event came to pass.

As I entered Riverfront Park, I saw a cyclist approach the street from the park.  Making the transition from park pedestrian/cycle path to the street, he failed to notice a missing pylon from one piece of road furniture barring vehicles from the path.  The event unfolded in slow motion for me as the cyclist's rear wheel clipped the offending pylon bracket.  His back wheel slide out from under and he went crashing to the ground, landing in the street.  He appeared uninjured.  Perhaps his dignity suffered a bruise or two?  Ouch!  After confirming all was OK, I continued on.  One must remain ever vigilant.
The Victim
The Perp
The Fall
The Crash