Following up on the Combat at Foz d'Arouce played on Tuesday, Matt agreed to give the scenario a whirl on Sunday. Being the fair-minded gamer that he is, he opted not to read the battle report from Tuesday's game in order to not bias his decision-making.
As a brief refresher on troop deployments, the armies are positioned as they were in Game 1. French deployed in and around Foz d'Arouce and the Anglo-Portuguese deployed along the bottom of the map (see game photo below). Matt would command the Anglo-Portuguese and I would command the French. After witnessing the French scrape out a victory in Game 1, I hoped to repeat this feat.
 |
| Initial deployments |
In Game 1, Picton, leading the Anglo-Portuguese army, planned to swing around the French right in attempt to cut the bridge with a general advance across the battlefield elsewhere. For the French, I wanted to counter this threat but stick with the French plan from Game 1 that produced a victory.Would history (on the game table) repeat?
 |
| The French wait |
 |
| while the British advance. |
 |
| View from behind French lines. |
The action begins as both combatants race forward to secure and control the center. In a repeat of Game 1, Mernard's Brigade advances quickly to garrison the farm to his front and threaten the allied right. MacKinnon advances on the Allied right more cautiously and the French seem to have gained a march on their adversary.  |
| No time is wasted to gain the center. |
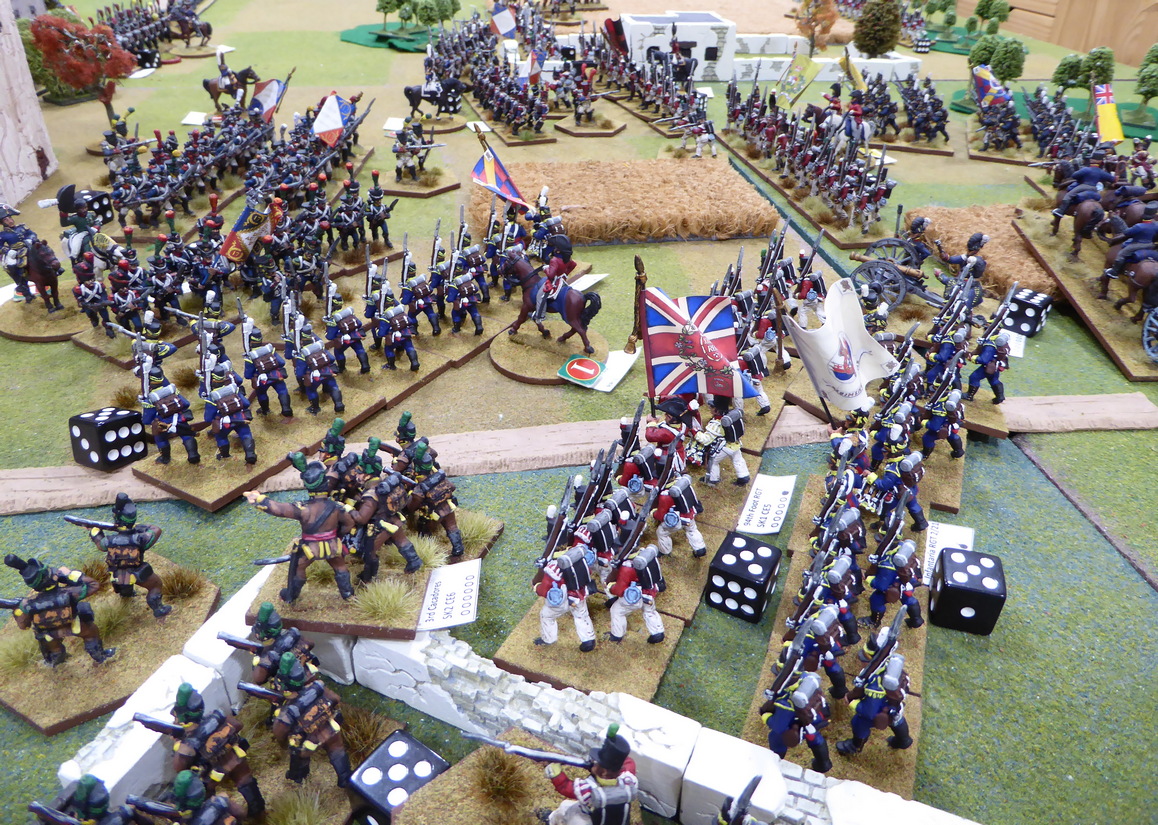
In the center, both armies step forward to contest the ground while Beckwith and his light brigade move quickly to envelope Poisao. Colville quickly reaches Poisao with the 94th and is targeted by both artillery and musketry. The British do not waver.
 |
| Maucine brings over the 69th Ligne. |
Seeing the growing threat to the defenders in Poisao, Maucine orders the 69th Ligne to move over the Ceira River to the south bank and join the rest of his brigade. With Beckwith's light troops working their away around Poisao, only one battalion of the 6h Legere blocks the way to the crucial bridge. While stout, the 6th Legere will require support when facing such odds. |
| Firefights erupt all along the front. |
 |
| The Allies reach Poisao. |
 |
| 69th Ligne marches over the Foz d'Arouce bridge. |
 |
| Beckwith works to encircle Poisao. |
With the firefight in the woods to the west of Poisao intensifying, the 1st Cacadores pick off French gunners manning the artillery in Poisao. Sensing opportunity, the Cacadores charge into the depleted gunners. The result was never in doubt. The Portuguese overrun the guns and drive off the surviving gunners. Poisao is in allied hands!
 |
| Cacadores attack the guns in Poisao. |
 |
| Firefight in the Poisao Woods. |
Away in the distance, MacKinnon and the British right have been augmented by a battery of horse artillery. The French attack upon this flank has been stopped in its tracks. MacKinnon has also succeeded in evicting French legere from the farm as the French are last seen fleeing the compound pell-mell. They are finished for the day. The 88th Foot draws up on the western approach to the farm to prevent 74th from becoming isolated. Fighting in the center intensifies as casualties rise uniformly across all combatants. Both sides are taking a pounding but stubbornly holding ground.
 |
| MacKinnon evicts French from the farm (in background). |
With the situation on the Allied right stabilized by first halting the French advance and then counterattacking, Powers' Portuguese infantry brigade is directed toward Foz d'Arouce, itself. Four Portuguese infantry battalions come up in support of Colville. Ney wonders how he can stem this tide before it washes over him and carries him away.
 |
| Portuguese arrive! |
 |
| French are pressed on all fronts. |
With Colville and Powers' brigades forming up along the main road and a second battery racing up in support, Picton prepares to deliver what he expects to be the final attack. A quick stab toward the bridge could seal off the French escape route and bag what remains of Ney's command.
Taking a severe pounding from Beckwith's Brigade, Maucine is forced to retire. Two battalions cover the withdrawal but two battalions make their retreat over the bridge and to safety.
 |
| Allies prepare to attack. |
 |
| French infantry waver as pressure mounts. |
 |
Two of Maucine's badly beaten battalions
slip over to the north side of the Ceira. |
Trying to slow the inevitable, Ney joins the rearguard to bolster their resolve. Outnumbered, Ney's position looks futile. With more than enough infantry to cut the escape over the bridge, Picton diverts two Portuguese infantry battalions to reinforce the center. Will Ney make good his escape?
 |
| Ney joins the rearguard. |
 |
| Portuguese attack! |
 |
| Portuguese reinforce the center. |
Having played six turns and now seeing little chance of stemming the Allied tide, Ney concedes the battle.
Victory to Picton and the Anglo-Portuguese!
While this action saw hard fighting, the casualty count at the end of the day fell decidedly in favor of the Anglo-Portuguese. How this happened? I know not but the French lost two battalions to unexpected routs that did not help the situation.
In this contest, the Anglo-Portuguese (Matt) was able to outlast, outwit, and outplay the French (me!).
Congratulations on the victory, Matt! Maybe I can get you next time?


A rather splendid replay and great to see more photos of your Napoleonic troops in action. Another hard fought action but going the way of the allies this time.
ReplyDeleteThank you! Perhaps I can get the Napoleonics back into a more regular rotation?
DeleteAnother superb hard fought action and with a different outcome
ReplyDeleteRight you are!
DeleteFantastic looking game as always Gents! Congrats for a winner :-)
ReplyDeleteThanks! Yes, congrats to Matt for the win.
DeleteThanks Jon an excellent write up of the action. Great to see your lovely Napoleonics close up…inspiration for me. As to the victory the British were able to avoid the collapse of any troops , where you forced me back occasionally, it gave those units a chance to regroup, whereas the french were under pressure the whole time. Very enjoyable 👍
ReplyDeleteGlad you enjoyed the write-up and thank YOU for the game!
DeleteYour Anglo-Portuguese had my French backfooted much of the contest. British firepower was too much to withstand or stand for long.
Great victory for Picton and the allies!
Good to provide some inspiration for your own Napoleonic project.
Is it unkind that my first thought was I hope Matt isn't in command of the British? It looks as though he didn't suffer from the usual bad luck that has dogged him in your AWI games. Nice to see that Ney survived this time though.
ReplyDeleteFunny, Lawrence!
DeleteNot much bad luck for Matt and the British in this fight. The arrival of Powers and his Portuguese seemed much earlier than in Game 1 but he arrived on Turn 3 in both games. The French did not have the early success of putting the British under pressure soon enough. That may have factored into the different result.
Ney survived this time but he did suffer a non-debilitating wound.
Thanks Lawrence clearly my Napoleonic leadership is better than my AWI 😀
DeleteLovely to see this second outing. At least Ney ended this one alive... if humbled. Really enjoyed the report and photos. Nice to see that the game was winnable by both sides. That is a credit to the scenario designer.
ReplyDeleteRichard, pleased to see that you enjoyed a replay!
DeleteThanks for your encouraging comments! They are much appreciated.
A great looking game and nice to see it go the other way. The strategies employed by both sides in both games appeared relatively similar, so perhaps the only real difference was provided by the Dice Gods? Last time, the Brits seemed to have quite a few units rout, whereas this time, the boot seems to have been on the other foot!
ReplyDeleteThanks!
DeletePerhaps for the Anglo-Portuguese, there is but one strategy. Maybe the same holds for the French?
As Ney, I wanted to see if the winning strategy adopted by the French in Game 1 was repeatable.
IT WAS NOT!
Well, at least by me...
Yes, the French had two very unfortunate routs from units that should have been able to withstand the pressure. Maybe next time?
Thanks for your comments!
I love your attempt to look on a battle from different points of view. Now finally the Allies can win. Great battle report.
ReplyDeleteThank you, Andrè!
DeleteAs you know by now, I will play a scenario over and over. Perhaps some think I overdo it?
I would never they that you overdo it. I'm playing and changing my own scenarios again and again and I love it. :-)
DeleteBrave decision to adopt the same plan as the MNG boys. Very few of us have the same sort of elan as Phil, once he gets going. I didn't feel that the luck was outrageous for either side when we played the game, so perhaps you were undone by some unfortunate routs. I don't understand why neither you nor Ian put infantry into Poisao to make it a strong point.
ReplyDeleteGraham, as noted above, I wanted to see if your French winning strategy was repeatable. With me in command, it was not!
DeleteAs for the defense of Poisao, two thoughts drove that decision. One, I wanted to replicate Ian's strategy and, two, I thought pushing infantry into the village might trap two units therein rather than just the gun. I figured there was a real risk to having Poisao completely isolated with no support. Could the British contain and bypass Poisao and held straight to the bridge? That was my concern. Oh, and I do not think as clearly when hosting and playing! Yeah, that is my excuse.
Funny how the same scenario with the same forces goes differently. That’s why war gaming is always entertaining!
ReplyDeleteHow was it going from 6 players to 2? And you still had to do all the troop movement! 😀
Stew, combat is uncertain. That is why we play the game!
DeleteGoing from six players plus GM to two players (including GM) offer different challenges.
With six players, the GM is quite busy and downtime for each player can be large since everything takes more time when playing remotely.
In a two-player game, there is not much downtime for the players but the GM is still quite busy. What I find most difficult is switching hats between GM and active player in a two-player game. My tabletop actions are not as carefully planned and executed as they ought to be.
After some consideration, when Matt hosts, I tend to win. When I host Matt tends to win. Coincidence?
An interesting and good-looking game - and a much more historical result too! (I confess to a certain bias...) At least in the first game Ney died in action, certainly preferable to being shot by his own side in 1815! (But we would have missed his heroic actions with the French rearguard in Russia 1812, of course...) I'll try not to let your Napoleonics distract me from working on my own SYW setup; I can't possibly manage the juggling of different periods which you seem to do with ease!
ReplyDeleteCheers,
David.
Thanks, David! Not ready to dive into Napoleonics yet? Give it time. Give it time...
DeleteYou would be surprised how easily it is to juggle multiple projects.
Oh yes, I will eventually. :-) I just don't seem to have the energy (or time) to do flags and try to prepare for more than one wargames period at present. Never was terribly good at juggling! ;-)
DeleteCheers,
David.
Great to see another closely fought game and with an Anglo-Portugese win this time. As before the figures and buildings etc look superb:).
ReplyDeleteYou make a good point about the host maybe losing due to not being able to concentrate on the game per se, given the duties of being GM etc. I know when I've played FtF game and paused to take photos etc, that my train of thought has been disrupted etc. A poor excuse for losing of course;)!
Steve, good to see that you did not tire of seeing a repeat of this battle. I appreciate your encouragement on troops and terrain.
DeleteI make no excuse for losing but sometimes, a poor excuse is all we have! Matt beat me fair and square. I was clearly outplayed. Ney paid for his brashness.
At least this time, the bravest of the brave survived!
ReplyDeleteTrue!
DeleteInstances shown in the two AAR of the same situation favor belief in Belladonna rather than Mars as the war deity.
ReplyDeleteGreat fun, lots of fine miniatures and scenery...thanks Jonathan for the reports.
Joe
The games were great fun, for sure. Glad you liked the battle reports. I ought to get the Napoleonics back into a more regular rotation.
DeleteGreat looking game once more and nice to see the Brits(and Matt) win this time,he's owed a few more to make up for all those AWI defeats!
ReplyDeleteBest Iain
Thank you! The tables have been slowly turning on the AWI front.
DeleteAnother great looking game Jonathan…
ReplyDeleteAll the best. Aly
Thanks, Aly!
DeleteNey survived the battle this time, tho loses the day. I wonder if his superiors will be kind to his poor judgement tho after the fact?
ReplyDeleteMassena will not be pleased.
Delete