Last week, Peter (Grid based wargaming) joined me in a remote refight of the Battle of Mortimer's Cross. Peter's account of the battle can be read at the link above. Before the game, Peter, announced that he would take command of the Yorkist Army (red dice).  |
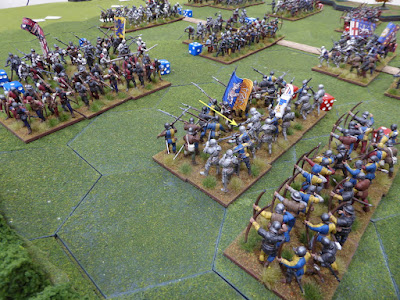
| Edward's Central Battle |
The reason given for choosing that army was that the briefing showed the table layout from behind the Yorkist lines. I clarified that there were cameras behind both army lines, so he did not need to stick to commanding the Yorkists. Peter remained steadfast and commanded the Yorkist Army in this refight. The Lancastrian Army carries the blue Combat Effectiveness dice. The objective is to break two of the three enemy Battles before the enemy can return the favor.
 |
| Army deployments |
 |
| Army deployments |
Let's see how the battle played out.
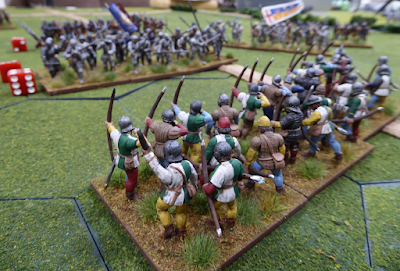
The battle opens with Tudor's advance on the Lancastrian Right. Herbert counters that movement by putting his own ward into motion. Herbert's archers hit Tudor's archers will missile fire. Rather than retiring in the face of volleys, Tudor's archers absorb the damage and stay put. Within striking range of Tudor's Battle, Herbert's melee line attacks. Faced with unfavorable odds against Herbert's MAA, Tudor smartly withdraws his archers having delayed the enemy just long enough to prevent them from closing this turn. Perhaps retiring the bowmen earlier would have been a better choice?
 |
| Herbert attacks! |
In the center, Pembroke's archers send a volley of arrows into Edward's archers. Perhaps a bit surprised by this long-range missile exchange, Edward's bowmen turn and break for the rear. The archers' response was so chaotic that even Edward's leadership could not stop the race to the rear. Not a good start for Edward although he does press forward toward Pembroke with his main melee line. On the Lancastrian Left, Wiltshire's poor archers are driven off by Devereaux's bowmen.  |
| Edward's archers break... |
 |
| and head to the rear. |
 |
| Wiltshire's archers are driven off! |
On the opposite wing, Tudor advances into Herbert as both melee lines collide. In frenetic hacking and slashing, both Battles are worn down before Tudor's infantry are forced back. Exhausted, Herbert cannot follow up to press his advantage.
 |
| Tudor crashes into Herbert! |
 |
| Melee grinds on... |
 |
| as casualties rise... |
 |
| until Tudor is driven back. |
Action in the center sees much the same. A tremendous clash between Pembroke and Edward puts Pembroke's main melee line to flight. Only Pembroke's household prevents Edward from pushing straight through the enemy to his front.
 |
| Pembroke's melee line breaks! |
With both Tudor and Pembroke teetering off balance, only the Lancastrian Left hangs on. That stability quickly does an about face when Devereaux drives Wiltshire back. All across the battlefield, the Lancastrians are hard pressed and being shoved backwards. Could the battle be over almost before it begins?
 |
| Wiltshire driven back! |
Even though knocked about by Herbert, Tudor does not give up his position easily. Still under orders to engage the enemy to his front, Tudor's melee line moves through his archers. To counter Tudor's ambitions, Herbert's melee line passes through its archers to take the fight to Tudor. Swapping positions as they bear down on the enemy, Herbert's billmen take the lead. Hitting Tudor, Herbert forces Tudor's melee line backwards. This retrograde uncovers Tudor's bowmen who choose to stand firm. Letting loose a volley of arrows as Herbert closes, Tudor's archers stop Herbert's attack! Hoorah!
 |
| Tudor's melee line advances... |
 |
| only to be pushed back... |
 |
| but Tudor's archers halt the enemy's attacks. |
In the center, both Pembroke and Edward bring forward their Household to contest the ground. After a lengthy and very costly melee, Edward's Household troops retire. On the Lancastrian Left, Wiltshire, having already taken heavy casualties, once again dives into Devereaux. This time, Wiltshire prevails and Devereaux falls back onto his archers.
 |
| Households smash each other in the center... |
 |
| while Wiltshire fights Devereaux. |
 |
| Situation from west as both armies are ground down. |
Having seen his Household thrown back in the center, Edward orders his melee line of MAA and billmen forward into Pembroke's Household troops. In hard fighting, Pembroke's Household holds on to see Edward call off the attack. Edward retires. This reprieve allows the Lancastrians a chance to rally.
 |
| Edward counterattacks in the center... |
 |
but makes little progress
as both combatants grind each other down. |
 |
| Pembroke gets a reprieve in center. |
Back on the Yorkist Left, Herbert continues to press Tudor vigorously. Already weakened from earlier efforts, Tudor's melee line crumbles when Herbert's archers deliver a punishing volley. Tudor's MAA scatter as his billmen fall back behind the cover of his own bowmen.
 |
| Fighting on the left... |
 |
| leads to the destruction of Tudor's MAA. |
 |
| Lancastrians pushed back everywhere! |
In an attempt to reverse recent fortunes, Pembroke gathers his Household supported by MAA and lunges forward into Edward. While Edward's MAA are destroyed in the fighting, his billmen cling on and see Pembroke's heavy foot repulsed. Poor Pembroke!
 |
| Pembroke attacks in the center... |
 |
| and is repulsed! |
By this time in the action, both armies are becoming brittle. A good shove anywhere might send one Battle over the edge and then to the rear. This is exactly what happens in the fight of Wiltshire against Devereaux. In hand-to-hand, Wiltshire's melee line pushes into Devereaux's billmen and the billmen scatter. Devereaux's Battle breaks!
 |
| The destruction of Devereaux. |
Getting word that the Yorkist Right has collapsed, Herbert, on the left redoubles his efforts against Tudor. In the fighting, Tudor's billmen are driven back but Herbert's Battle is wavering as well. Even in a weakened state, Herbert presses on. First his melee line forces Tudor's archers back uncovering the barely hanging on billmen. Moving his archers forward, Herbert delivers the coup de grace to Tudor's billmen. Tudor breaks!
 |
| Herbert drives Tudor back! |
 |
| Tudor breaks! |
With each army now having a wing broken, the race is on to break one more formation. Wiltshire, on the Lancastrian Left, and Herbert, on the Yorkist Left, turn inwards toward the center of the battlefield. Wiltshire is on Defend orders so must change orders before attacking inward toward Edward. Herbert, however, remains on Engage and pushes on!
 |
| The wings turn in. |
With Pembroke already locked into combat against Edward, turning to face the new threat from Herbert is not possible. Wheeling to his right, Herbert's bowmen send a volley of arrows into Pembroke's already weakened retinue. His household routs! The clash in the center is fierce but Edward gains the upper hand and sends Pembroke's billmen packing. Casualties mount as Pembroke's MAA finds themselves in an uneven affair. Finally, the Lancastrian MAA scatter and Pembroke breaks. Wiltshire is confined to the role of spectator as he cannot change his orders to possibly save the day.
 |
| Herbert turns in toward Pembroke. |
 |
| Scrum in the center between Edward and Pembroke. |
 |
| Edward gains the upper hand... |
 |
| as Wiltshire looks on. |
 |
| The Lancastrians see defeat! |
This battle is over!
Congratulations to Peter for a very well-fought and battering contest. Both armies put on a good fight but Peter and his Yorkists prevailed in the end. There must have been a leader casualty or two along the way, but any such casualties are lost to time. Did Wiltshire's reluctance to join into the center fray spell defeat for the Lancastrians? We will never know. In the words of Nathaniel Bedford Forrest, Peter got there the firstest with the mostest!
 |
| Only Pembroke's archers remain. |
Great job, Peter, and thank you for a very enjoyable game. The Butcher's Bill does not look too lopsided but Peter caused casualties where they mattered most. with such a back and forth clash, an even allocation of casualties is not surprising. Play time was about two-and-a-half hours.
Great fun!


A close run thing. Where will we go next? Other choices begin to become more complex in terms of terrain or troop types or even weather.
ReplyDeleteWell, there are at least two more trials at Mortimer's Cross to complete. I now have artillery to field and a body of mounted troops are on the painting desk. What's next? Any suggestions?
DeleteGiven the kit you now have or have in progress, how about Tewksbury? We have some information on this battle and some idea of the battlefield (though it is, as usual, general and allows some speculation). Useful features include difficult terrain (hedges and foul lanes), some potential for fieldworks, a body of cavalry in a hidden flanking position (potential to play as ambush or off table flank march).
ReplyDeleteThanks for the suggestion, Anthony! I will look into Tewkesbury.
DeleteGreat report. All the games are close ones with a great deal of action, ebb and flow, and drama. Great fun.
ReplyDeleteThanks, Richard! all of the games have been close, tense, and even a little unpredictable. All good fun!
DeleteNice try to palm off the Loosers....err....Lancastrians onto Peter! ☺
ReplyDeleteWhile they fought better I think they need some new contingents.....or a boost of some kind!
Neil
Well, can't accuse me of not trying! Peter is a cunning one. He did not fall for my ploy, and he beat me fair and square. The Lancastrians make a comeback next time.
DeleteAnother hard fought and another bloody one too, another fine read as well.
ReplyDeleteGlad you liked the report, Donnie! It was a tough fight.
DeleteAnother great looking battle report Jonathan!
ReplyDeleteThanks, Michal!
DeleteLovely WotR gaming again, Jonathan. The flags and banners really make the battlefield pop.
ReplyDeleteThank you, Dean!
DeleteAnother fantastic, close fought game, Jon....your figures look top class, too! Well done to Peter for just managing to gain the upper hand.
ReplyDeleteThank you, Keith! The game was a close one, no doubt. One of these days, I may beat Peter in a game.
DeleteIn these tight tussles choosing the right moment for leader dice re-rolls can just tip the game in one’s favour. As always you hosted a most enjoyable game.
ReplyDeleteTiming when to use a re-roll can be key. However, using a re-roll also increases the chance of leader casualty. Use with caution! Glad you enjoyed the game. I sure did!
DeleteYour rules really seem to be providing some exciting contests Jonathan, and the scenario seems perfect to show them off. Another gripping encounter.
ReplyDeleteThe rules are working smoothly, Lawrence, and the results have been close.
DeleteA very clear and enjoyable account of a nail-biting game. An encouragement to all gamers.
ReplyDeleteThank you, Kim! Good to see you back!
DeleteA great game Jonathan. Glad you were able to come back after the initial shock of the Yorkist advance.
ReplyDeleteThanks, Ben. I came back but that come back did not last long. Peter turned inward to ravage my center before I could work from the same playbook and take out his center.
DeleteAnother excellent game Jon and a close run thing, but Peter just got the upper hand when it mattered the most it seems. At list the butcher's bill looks more even this time. The game certainly had the look and feel of a right old ding dong fight about it:).
ReplyDeleteThank you, Steve! Losses were about even this time although Peter's losses were where they needed to be. It was a good fight, indeed!
DeleteWars of the Roses seems to be everywhere at the moment. I even visited King Richard’s tomb a few days ago. Nice battle.
ReplyDeleteWell, WotR games are here, for sure. Hard to move on to another period when working on rules development. Did the visit to the tomb inspire you to pick up the brush for a new WotR project?
DeleteI was inspired but didn’t want to start back at square one. I need to concentrate on what I have now.
DeleteExcellent news piece and great job with the day. Such a hard fought game and so much to enjoy looking at on the table. The interplay of the archery and the melee based units really had me watching to the end. No treachery on the field.
ReplyDeleteMaybe the next time!
Glad you enjoyed the battle report and approve of its delivery! Interplay between the Battle components presents an interesting decision matrix. No treachery but did it happen all that often? The possibility for treachery is built into the rules through personal priorities and leader ratings. Once players become more familiar with the rules and play to their character, we may see some treacherous acts.
DeleteA very tight contest and no mistake with the Lancastrian side blinking first. The rules appear to be shaping up nicely from how the games are panning out. It would certainly be a treat to see Tewkesbury unfold on your table. A York!
ReplyDeleteWhen each army had one broken Battle, I figured the Lancastrians had a shot in this one. Alas, it was not to be.
DeleteA very close and hard fought encounter
ReplyDeleteIt was!
DeleteGlad you two enjoyed the game. That Bedford was always a medieval strategist disguised as a cavalry man. 😀😝
ReplyDeleteThe game presented some interesting situations. Bedford as Medieval strategist, hmm.
DeleteNice open flat field. Excellent for heavy troops. I'm jealous to see you gaming so often. Hurrah!
ReplyDeleteWhile the field was open, both flanks were hemmed in by terrain. Looks like three games on the schedule for this week.
DeleteGreat looking game, you wouldn't want to be Lancaster though it seems! Do Barnet, artillery, fog, confusion, betrayal assumed or otherwise, all good fun, as my blog is named for it or St Albans another Hertfordshire battle but a running street battle for the first one, outside the town for the second.
ReplyDeleteBest Iain
Thanks for the suggestions, Iain! I will add Barnet and St. Albans to the list of battles to explore. Not sure how I could manage street fighting, though.
Delete