After unplanned delays, the Mortimer's Cross battlefield, laid out on table for a couple weeks now, saw its first action. Vol (A Miniatures Hobby Room) came round on Wednesday to catch up and have a game. While Vol came by the house a few weeks ago to drop off some 3D printed vehicles (thank you!), we had not faced each other across the gaming table in a very long while. I would have to dip into the archives to confirm but I bet it has been at least a year. Anyway, good to see Vol at the gaming table to test out the latest iteration of rules.
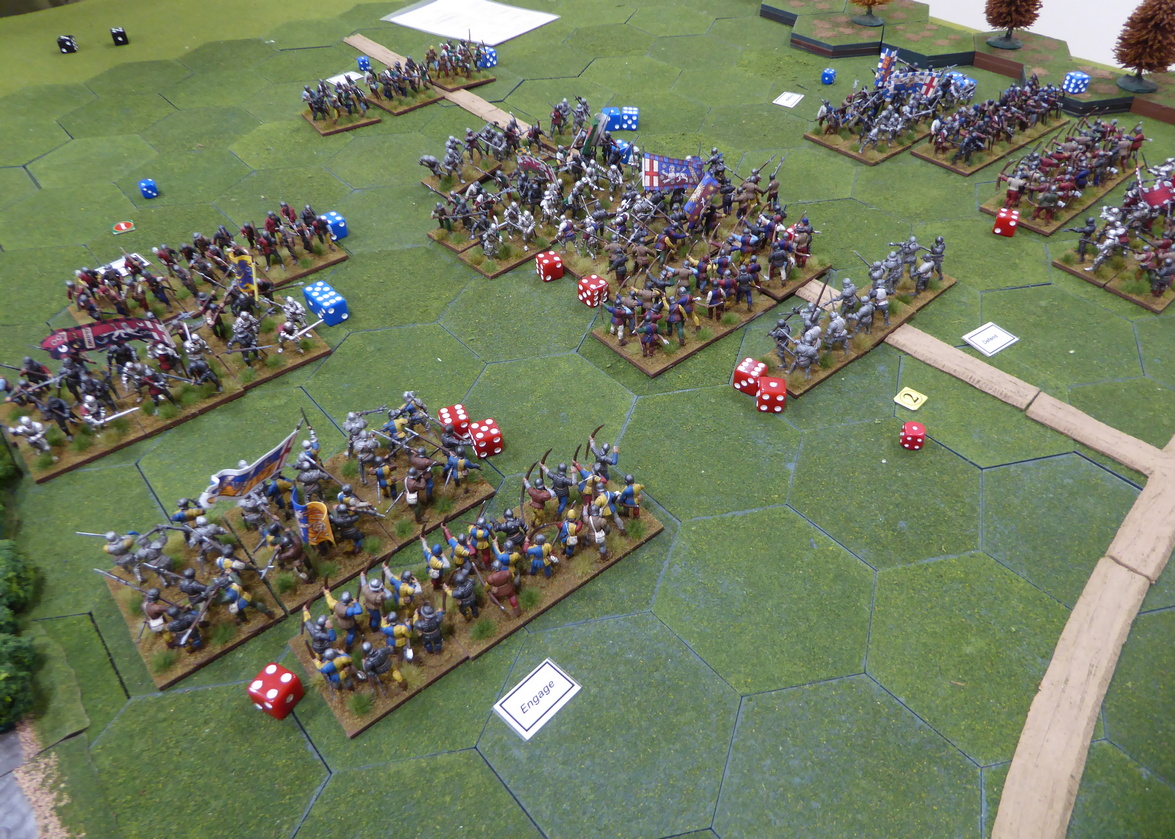
As a reminder, the two armies are arrayed for battle as shown in the photos below:
 |
| Armies deployed for battle. |
 |
| Army deployments |
Vol chose to take command of Pembroke and the Lancastrian Army (blue dice) leaving me with Edward and the Yorkists (red dice). Since today's game saw me playing with a live F2F opponent, opportunities for photos were reduced. I find that F2F games offer much less down time for photo ops than do the remote games. That explains the fewer photos presented in this battle report. That is my story, and I am sticking to it! Anyway, on to the game.
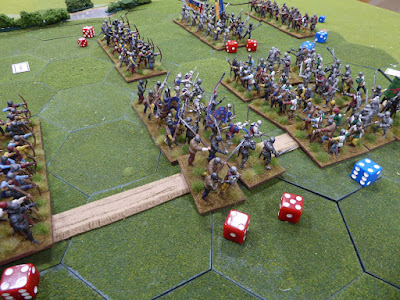
Both armies begin by advancing toward the enemy. On the Lancastrian Right, Tudor's archers manage to drive Herbert's archers away as the Yorkist archers fall back through their own melee line. Edward's archers in the center pull off a similar successful volley into Pembroke's bowmen. Pembroke's archers must have been stunned by the incoming missiles. They turn and break for the rear. Luckily, they do not disorder any of Pembroke's melee troops as they rush through. I think I heard a gasp of despair from Vol as his archers turned and ran so early in the contest.
 |
| Armies move forward. |
No time for despair, though. Edward's melee line of MAA supported by a body of billmen passes through his bowmen and crashes straight into Pembroke's MAA. Pembroke's MAA are similarly supported by billmen. While the hacking and slashing continues in the center, both wings move forward to engage. |
| Edward v Pembroke fighting in the center... |
 |
| while the wings close to engage. |
Striking first on the Yorkist Left, Herbert smashes into Tudor. In a hard-fought melee, Herbert gains the upper hand. Tudor recoils. Herbert presses on but Tudor slips away to lick his wounds. |
| Herbert smashes into Tudor! |
 |
| Tudor slips away from Herbert as Herbert presses on. |
On the other wing, Devereaux and Wiltshire collide. In heavy fighting with casualties high to both, Wiltshire retires. Exhausted, Devereaux does not pursue.
 |
Wiltshire and Devereaux bash each other
on the Yorkist Right. |
Back in the center, the melee between Edward and Pembroke continues. Edward is getting the stuffing knocked out of his main melee line. Before Pembroke can deliver the finishing blows, Edward's MAA fall back behind the archers and household knights. Edward needs time to recover.
 |
| Edward getting a pounding. |
In a counterattack, Edward's bowmen let loose a volley into Pembroke before Edward's Houshold steps forward to join the fray. In wicked hand-to-hand fighting, Edward's Household troops are destroyed as are Pembroke's MAA. Pembroke, himself, goes down in the action with a severe wound. In the chaos, Pembroke is captured and carried from the field by the enemy. While Edward loses his Household in the fight, this prolonged clash allows enough time for Edward to rally his main melee line and bring them back to the action.  |
| Edward recovers and moves back toward Pembroke. |
 |
| Edward faces Pembroke's archers. |
As news of Pembroke's fate spreads, the Yorkists renew the pressure all across the battlefield. The Lancastrians are driven back taking losses all along the path of retreat.  |
| The Lancastrians fall back with Yorkists in hot pursuit. |
 |
| Lancastrians fall back. |
As the Lancastrian Army is pushed back, first Wiltshire's Battle breaks and then Tudor breaks. With two of three Battles broken and in flight, the Lancastrian Army dissolves. This battle is over. |
| Lancastrian Army breaks! |
 |
| Lancastrian Center still clings on but all is lost. |
Edward and his Yorkist Army are victorious. Not only has the Lancastrian Army been beaten but Pembroke, himself, is lost. His fate is in Edward's hands. |
| Butcher's Bill |
The Butcher's Bill is high for the Lancastrian Army but total losses do not illustrate how close this battle actually was. There were times when I thought Edward's Center was done for.
While Vol and his Lancastrian Army saw defeat, Vol put up a good fight. Very enjoyable contest too! Vol is looking forward to another battle in which he attempts to turn the tables. Game lasted around two hours and ended in an historical result.
Great fun! Thank you, Vol!
With one Mortimer's Cross Battle Report finished, time to think about getting to work on the second Battle Report. That report will chronicle my action with Peter on Thursday.


Paraphrasing "when FtF game....fewer photos can be taken..." Precious, welcome to my world.
ReplyDeleteIn the remote game with Peter on the following day, I more than doubled the number of photos taken.
DeleteA splendid hard fought action and a crushing defeat for the Lancastrian cause with certainly enough photos to carry the narrative along.
ReplyDeleteThe battle was hard-fought, for sure. Relieved to see that the reduced number of photos still managed to support an intelligible narrative.
DeleteGreat looking game Jonathan !
ReplyDeleteThank you!
DeleteA great game and a hard fought victory for the Yorkists
ReplyDeleteGetting a victory was a nice bonus! Having Vol ready to comeback for another game was an even bigger win.
DeleteThe curse of the Lancastrians continues!
ReplyDeleteClearly if you want to win, don't pick that side!
You obviously need to give them new flags or some other form of TLC.....☺
Neil
It sure does although the Lancastrians were short on good commanders and Wiltshire’s Battle was slightly below par. Coming out of the fracas with an historical result is good, I reckon. When will the Lancastrians see a victory?
DeleteGood looking game and a fine read too, seems like it was a hard fought win for the Yorkist cause. Look forward to seeing the next take on this battle.
ReplyDeleteThanks! The battle was a good one. Peter already has his account of battle up on his blog. Mine is still unwritten.
DeleteExcellent looking game and report Jon and I thought there were enough photos too, tha butchers bill image was a shock, after reading how close the game seemed!
ReplyDeleteThanks, Keith! The loss differential is jarring, indeed.
DeleteFantastic looking armies and great battle report!
ReplyDeleteThanks!
DeleteGreat looking game Jonathan and well done on the win.
ReplyDeleteThank you in both counts!
DeleteFine report Jon and well done on a win, ditto having a FtF game with Vol:). The Butcher's Bill does look semewhat one-sided, but I know in many of my games, units left on the table are often close to breaking too. Looking forward to your AAR of the game with Peter.
ReplyDeleteThanks, Steve! Many of the remaining Yorkist units were not in such good shape, for sure.
DeleteGood lookin' bash (literally) and a bloody day for the Lancastrians. Yippee for them Yorkists!!
ReplyDeleteBest wishes, James
Glad you liked the game, James!
DeleteGreat report, Jon - and it looks like you’ve managed to capture the feel of a late medieval battle very well indeed. Congrats! (…and on the win, of course 🙂). I didn’t feel the report lacked photos…in fact, from my personal viewpoint, it was ‘just right’, in terms of length of post.
ReplyDeleteThank you! As we have read from others, a Medieval battle is tough to simulate on the table. If this report imparts a sense of fighting in that period, then that result is a step in the right direction. As for length, you are correct. Overdrawn reports can be tough to wade through. Still, it is difficult to know what parts to cut, which to emphasize, and which to abstract. It is a balancing act made easier by not having as many photos from which to choose.
DeleteYou get through a power of games, Jon. Most impressive! Sounds like the rules are developing well?
ReplyDeleteCheers,
Aaron
I do get through a lot of games! Players are the ones to judge the rules but I think they are working to produce a good game.
DeleteA splendid AAR and photos Jonathan, and just as I've started out on my own Wars of the Roses project too!
ReplyDeleteThanks, David! I am following your WotR project with great interest.
DeleteAwesome WotR gaming, Jonathan. I might try out this battle when I return to this period.
ReplyDeleteGive it a try, Dean!
DeleteGreat to see the AAR on this one Jonathan, and the casualty count belies what a close game this was. At least you got enough photos in to tell the story, which is something I seem unable to do.
ReplyDeleteHappy to oblige! My report on the next day's game with Peter will have to wait until after my game with the Rejects on Monday. Until then, you can read Peter's account of our fight from Thursday.
DeleteFantastic looking battle, nice to see some WotR action! Not familiar with the rules but I'm intrigued with any sort of grid/hex game.
ReplyDeleteThanks! The rules are my own doing.
DeleteOh Vol! Nice of you to give Vol a game. I bet he enjoyed it. 😀
ReplyDeleteHe did!
DeleteSuperb report. Very entertaining. I hope that I will be on the right side of the butcher's bill.
ReplyDeleteThank you! As for your game, we will soon find out who picks up the tab for the Butcher’s Bill.
DeleteA splendid looking game and an entertaining AAR Jonathan
ReplyDeleteAll the best. Aly
Thank you, Aly!
DeleteGreat looking game with plenty of photos and of course a great result!
ReplyDeleteBest Iain
Thanks, Ian!
DeleteGreat report, Jon; looks like your rules have captured the right 'feel' for battles of the period ( as far as anyone can know!).
ReplyDeleteThanks, David! Comments have been positive, thus far.
Delete