 |
| photo courtesy gridbasedwargaming |
To allow the EEF in Peter's WWI Palestine campaign (see Grid based wargaming) a chance to regroup, Peter offered up another game using his D3 OHW rules.
Which period of conflict this time?
Samurai battles in Feudal Japan!
Peter has developed yet another variant of Neil Thomas' One Hour Wargame (OHW). I have lost count how many he has but I recall playing at least three versions. Each variant offers a distinct flavor with slightly different twists to the original OHW game engine. I leave my commentary and assessment of Peter's rules for another time as there is much to consider. For now, let's recap the latest remote battle between Peter and me.
The OHW scenario selected for this contest was Scenario 6: Flank Attack (1). In OHW, the flank attack map looks like this:
 |
| Scenario 6 copyright Thomas OHW. |
 |
| Scenario 6 Flank Attack Copyright Peter Gridbasedwargaming |
Quite a transformation! I marvel at and envy Peter's talent.
Peter chose the defending Red Army and deployed his first three units into Red Zone A. Seeing Red Army place two Ashigaru and one skirmisher into Red Zone A, the two Samurai units and the two remaining Ashigaru units must deploy into Red Zone B. Knowing the Red Army's deployment, I quickly formed a plan of attack.
 |
| Blue Plan |
Did this plan survive contact with the enemy? Please read on.
 |
| Blue Army advances north coming into range of enemy. Opening volley sees one unit out of ammo! |
 |
| The Blue Ashigaru alongside opens fire. It too is out of ammo! Blue will have to take the fight to the enemy. Red failed an activation thwarting much of its turn's moves. |
 |
| Red responds with volleys from its blocking position. Blue suffers casualties but holds firm. |
 |
| Red flanking force finally begins to move out. |
 |
| Blue screening force places itself into blocking positions. This ought to slow down Red reinforcements. Now, Red must be defeated at the exit before Red's flanking force can intervene. |
 |
| Taking advantage of a tactical card, Blue attacks, falls back and attacks again. Red Ashigaru astride the road is destroyed! |
 |
| With fighting escalating on Blue right, Blue Samurai horse finds itself boxed in by the woods. It must retire and make its push up the road. Blue Samurai foot attacks Red skirmishers repeatedly (playing a second tactical card). The skirmishers scatter. |
 |
| Having held up Red's flanking force, Blue main force advances toward the exit. Red Samurai horse works its way around the woods and is poised to attack. Is this too little too late? |
 |
| Red cavalry attacks and is driven back! |
 |
| Blue Army completes the exit of three units off of the north board edge for victory! |
When I saw that Red Army placed all of its powerful units into the flanking force, I figured the outcome was heavily in Blue's favor. Blue really only had to fight through two Red units (one of them skirmisher) before the road north was open.
Great game enhanced by Peter's variations on the rules and scenario.
This is a scenario that would be fun to swap sides and replay now that the rules' nuances are fresh in mind. I reckon we may be back in Palestine next, though.
Thanks for another great game, Peter. Very fun!
A superb encounter
ReplyDeleteThank you, Neil!
DeletePeter’s rules no doubt helped this scenario along - his maps do a great job at interpreting the tabletop and have an old school delight about them (plus colour!).
ReplyDeleteI played it with WW2 forces and struggled to get a good implementation - I suspect it was the WWII weapon ranges that did for me (can’t recall what rules I used).
Peter's amendments add some needed punch and interest to the core OHW engine. Really, there is not a lot left of the original beyond an over-arching game philosophy. I LOVE Peter's hand drawn maps.
DeleteI have a scenario almost ready to play and did consider using BKCII, but I think the possible movement and weapon ranges might spoil things. HoW is now the ruleset I aim to use.
DeleteLooking forward to it, Steve!
DeletePeter's table is as lovely as his maps. Enjoyed the report Jonathan.
ReplyDeleteGlad you enjoyed the brief battle recap! Peter displays a fine arts talent in many facets of the hobby.
DeleteAn entertaining scrap Jonathan.
ReplyDeleteGood! This was an interesting fight that has some replay value, I think.
DeleteInteresting game, which Peter’s artwork really brought to life. Wsh I could do maps like that. Congrats on the win too!
ReplyDeletePeter's artwork really brings new life into the original scenario presentation, doesn't it? Marvelous!
DeleteI am very envious of Peter's talent.
A great looking game, John, Peter certainly has some nice collections. One thing confused me though, the colours of the armies did not seem to correspond with the uniforms the figures wore....was your "blue" army, in fact, wearing red and carrying red and white banners? That's the only way I can make sense of the images v's description of the action?!
ReplyDeleteKeith, now that you mention it, the Red Army in the scenario presentation is actually the Blue Army on the table and the blue Army in the scenario is the Red Army on the table. No wonder you were confused!
DeleteAll of my descriptions were based on the army naming convention in the scenario and not what is seen on the table.
You gonna believe me or your eyes?
Lol....it's funny how people's mind work differently isn't it Jon? I know Blue and Red are military conventions , as in Blue on Blue for a friendly fire incident, but if I was setting up a game of blue v red, and the armies happened to wear those colours, I would align the army with uniform eg AWI...Brits would be Red; Napoleonic, French would be Blue, etc!
DeleteTo you and I, that might make sense. Would you expect such mundane and pedestrian conventions from an artist in the advant-garde?
DeleteI guess not Jon - but then, I am a Philistine, and prefer my art in the style of Rembrandt or Turner, or dare I say it, Socialist Realism! :)
DeleteSocialist realism? Hmm.
DeleteThat looked like fun and I really like Peter's maps and notes. It put me in mind of some vintage Donald Featherstone scenarios which now have that beautifully classical look to them.
ReplyDeleteThe game was quite fun. I reckon everyone enjoys seeing Peter's handiwork with his mapmaking skills. The maps have a beautifully classical look just as you note. If I ever produce a scenario book, having Peter illustrate it would be fab.
DeleteAnother fine game and great write up of the action Jon. I too love Peter's hand drawn maps that do have that Old School feel to them, but now in glorious technicolor! Sadly my shaky arm prevents me from coming up with nice drawing like these, but may try them in monochrome (aka pencil) which is a bit easier for me now.
ReplyDeleteThank you, Steve! Yes, Peter's maps are da bomb (does anyone still say that?).
DeleteI wish I had some of the talent of you guys...
Excellent game with great looking Sengoku armies, Jonathan. Love how you adapted the rules to the period.
ReplyDeleteThank, Dean! All of the work on this game is Peter’s doing.
DeleteGreat looking game as always Jonathan!
ReplyDeleteThanks, Michal! This time, it is Peter’s table we are playing on.
DeleteLove it all, the map, the backdrops, the terrain, da bomb (that's for you Jonathan) ...it all shows in the details. Even if blue is red and red is blue. Looked like fun, which is the idea, no?
ReplyDeleteThanks, Joe! Yes, having a good time is the idea, for sure.
DeleteMany thanks for the game - most enjoyable and the OHW scenario is definitely worth a replay.
ReplyDeleteMy pleasure! The game was great fun. I would enjoy a replay, for sure.
DeleteA super Samurai set too there.
ReplyDeleteNice alliteration!
DeleteNice looking game Jon and an interesting scenario perhaps worth adapting for other theatres ?
ReplyDeleteThese OHW scenarios are perfectly suitable for many periods and many theatres.
DeleteAgreed - One Hour Wargames is one of the best aids to wargaming in all eras I’ve seen published for many decades. A classic in the making.
DeleteEnjoying reading both blogs, Jon 👍🏼👍🏼👍🏼👍🏼
Thanks, Martin! Good to see you back.
DeleteThat's a good scenario and flexible too. We played it as part of a double header nearly 18 months ago, using my RCW figures. You took the Whites, and lost out narrowly as the escaping force, partly because I was trying to put the rules onto squares, and the system was broken by ZOC rules.
ReplyDeleteThis is a good scenario offering a lot of interesting options.
DeleteI do remember our RCW doubleheader. Seems I just could not quite reach my objective since I was locked into EZOCs. So close!
A fine looking game with great commentary Jonathan!
ReplyDeleteChristopher
Thanks, Christopher!
DeleteA fine plan, a brilliant plan, I would of done the same thing. Sun Tzu can eat his heart out. 😁
ReplyDeleteA good scenario. flank attack scenarios need to be like this; kinda sort flank attacks. otherwise the game can get no fun for the flanked player.
Stew, you may want to save up your money for my version of The Art of War...
DeleteHad the blocking force been able to hold out, the flanking attack may have been able to develop. I tried to ensure that situation would not happen!
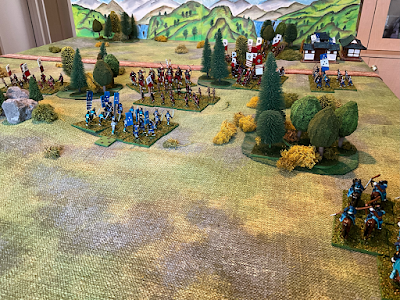
Great report Jonathan. That's a real nice looking tableltop.
ReplyDeleteThanks! The table is Peter’s handiwork. Isn’t the landscape background terrific?
DeleteThe scenario is looking very interesting. Flank attacks are something I love to see in historical or fictional scenarios too. Maybe that's the reason why we play Simbach so often. Your photos are perfect to understand the game.
ReplyDeleteThanks, André! Despite the possible confusion between the scenario map and the unit colors on the table, I am very happy to see that you could follow the action.
DeleteIn this fight, the Red army really did not get a chance for its flanking attack to develop fully. Hopefully, we will see a replay.
Great looking game and congratulations on the win, as Keith pointed out it's the same scenario as one of the games I posted( nothing gets past him!) Although without the delightfully hand drawn maps!
ReplyDeleteBest Iain
Thank you! Peter’s hand-drawn maps are fine pieces of art. I love ‘em!
DeleteSimple scneario with added flavour in a lovely way by the host. A great game and nicely played by yourself in a fashion much the same as I would have.
ReplyDeleteA replay would be very welcome.
Righto, Dai! Peter said a very handsome table and I was able to sneak in a victory.
DeleteWe plan to swap sides and replay this scenario next week. How would you play the defenders?
Hrm... I'd place 2x Ashigaru units in the north village supported by a the Foot Samurai to soak and hold the Blue advance north until the flanking units can aid the effort. Here’s where you hope your dice rolls are at least average so you can tie up Blue’s advance north and cause a blockage to any units behind. This should slow their advance and create time enough for the flank force to arrive and reinforce.
DeleteIn the flank area I'd have cavalry units as far north in their deployment area as possible, with a primary goal of initially ignoring Blue units on the road so they can be better situated to reinforce the 3 Village units. Their secondary function would be to deal with the enemy skirmisher unit, hoping their better speed and maneuverability will keep them away from the big infantry formations.
Your skirmishers I would have fly directly at an Ashigaru unit to tie them up using your own Ashigaru to support. The last Ashigaru I will initially march north behind the Cavalry, then wheel quickly west to smash into the enemy formation in the hopes a unit’s flank presents itself.
Lots of hopes in here I know, but that’s how I play a lot of the time. :)
Brilliant plan! I am thinking of a path very similar.
Delete