Wednesday, August 9, 2023

Sickles, Hammered!

The fight over the Hallowed Ground at Gettysburg continues.  Having fought Hood's Attack now at four games and counting, the tally shows two games apiece for the armies.

For Game #5, many of the fine campaigners from earlier remote battles return to the table.  The players are:
USA:
David C (St Cyr on Wheels).

All but David B have fought this battle before (see Hammerin' Sickles).  In that contest, the Federal Army eked out a victory on the last die roll of the game.  Thrilling stuff.  Would this battle be as hotly contested as the first match-up?  Let's see.

As a reminder of the overall situation, 
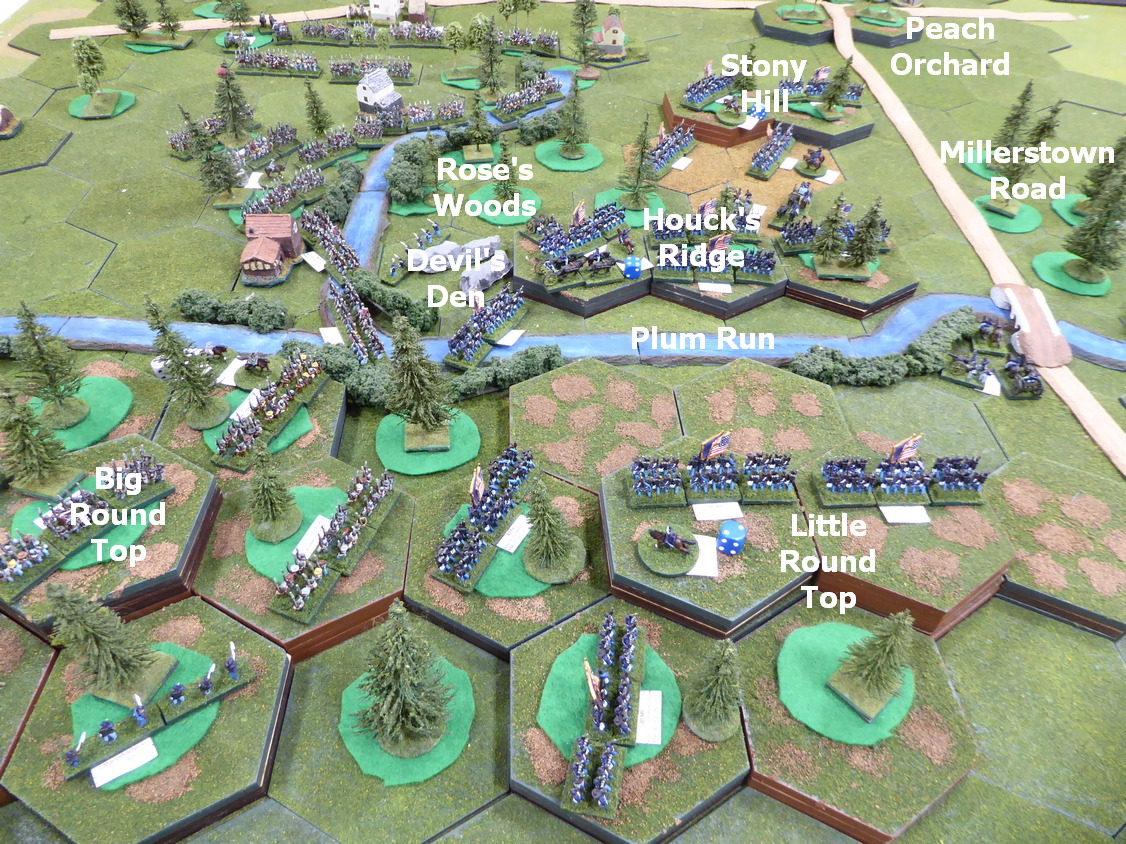
Battlefield geography and place names
Initial army concentrations
Army deployments
Having read through accounts of the other battles, both armies had plans for how to fight.  The Federals would start with most of the units on Reserve while the Confederates were set on bringing the fight to the Bluecoats as quickly and with as much force as possible.
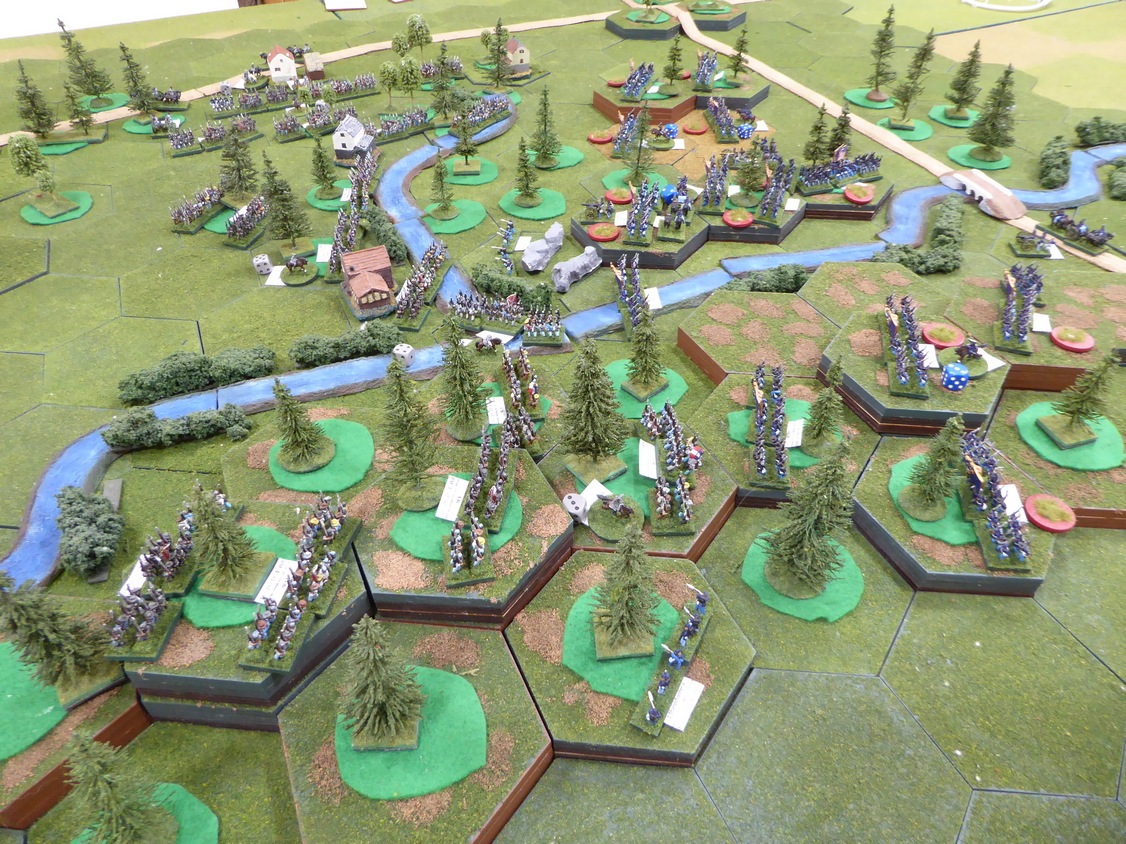
Federal Army in waiting.
Battlefield viewed from southwest.
Battlefield viewed from east.
On to battle!

With Hood under attack orders, the Rebels have initiative on the first turn.  Although the Devil's Den salient is within General Law's grasp, Hood uses his initiative to open the battle by activating Robinson and his Texans.  Robinson has two regiments of Texans on Big Round Top and two regiments along Rose's Run and out of command. 

Robinson leads his Texans in an attack against the 83PA positioned in the woods on a saddle of Little Round Top.  The Texans suffer heavy casualties but the Pennsylvanians are sent packing.  They are done for this battle.  Vincent, on Little Round Top, sends the 20ME down to sweep around the Texans' right.  The remainder of Vincent's Brigade remains calm and stationary atop the heights of Little Round Top.  

Panning back to Devil's Den, Law attacks the sharpshooters among the rocks with the 44AL.  The Alabamans are repulsed but casualties are light.  Attacking from Plum Run, the 48AL goes in against the sharpshooters.  Ward attempts to reinforce Devil's Den with the 124NY on Houck's Ridge but they refuse to respond.  The second attack carries Devil's Den.  The sharpshooters are scattered.     
US Sharpshooters hold Devil's Den.
Rebels attack Little Round Top and Devil's Den.
Devil's Den falls!
With the crucial ground at Devil's Den in Confederate hands, Benning's Brigade is brought up in support of Law.  Hood is not content to only consolidate his gains.  Benning is ordered to take the heights of Houck's Ridge.
Benning comes up to support Law behind Devil's Den.
Benning prepares his attack up Houck's Ridge.
Hearing reports that Devil's Den has fallen and Houck's Ridge is under attack, de Trobriand advances into Rose's Woods to threaten the enemy's left.  Feeling pressure from the left and not wanting to over-extend his position, Benning chooses to fire up onto Houck's Ridge from the valley below.  No assault up onto the heights, for now.  Benning's decision pays off. Federal infantry supporting the guns on Houck's Ridge are driven off in confusion from Rebel musketry.  
De Trobriand counters Benning's push to Houck's Ridge. 
Support for Smith's guns are driven off
while Winslow's guns give Benning a blast of canister.
Sensing a weakening of Ward's Houck's Ridge position, de Trobriand calls up Winslow's guns to stop the enemy.  Blasted by canister and musketry, Benning's Brigade takes heavy casualties but they stand firm.  With the other half of Robinson's Brigade positioned along Rose's Run, Hood orders them to advance against de Trobriand to ease pressure on Benning.  Anderson's Brigade comes into action against the Federal right and de Trobriand.  With many soldiers crammed into close quarters in the woods, casualties rise quickly.  In this sector, the battle ebbs and flows as first the Rebels are pushed back and then the Federals are pushed back.  Regiments on both sides are stretched to the breaking point.  In the confusion of the heavy fighting below Houck's Ridge, Ward manages to slip a regiment in to join Smith's guns.  Stalled under heavy fire, Benning begins to give way.  Part of his brigade is thrown back to Rose's Run.  Has the battle turned?
De Trobriand is hotly engaged in Rose's Woods.
The battle ebbs and flows in Rose's Woods.
Benning is thrown back from Houck's Ridge.
Not yet!

Benning redoubles his efforts throwing two more regiments against Houck's Ridge. This time, the Rebels prevail.  Federal infantry are scattered and Smith's guns are overrun.  The southern end of the ridge is in Rebel hands.  Following up on this success, the 1TX and 3AR from Robinson vigorously attack de Trobriand's 17ME and Winslow's guns in the woods on the western slope of Houcke's Ridge.  The two fresh Confederate brigades put the Yankees to flight.  General Birney, directing the defense, falls.  The Federal right is crumbling. 
Rebels take Houck's Ridge!
de Trobriand's Brigade crumbles
 as the Rebels clear Rose's Woods.
Over on Little Round Top, Law and Robinson continue pressing up the slopes.  Fighting is intense as units from both sides waver and then break.  Vincent sees Hazlett arrive with his guns and orders them up onto Little Round Top.  From the heights, Hazlett pours fire onto Houck's Ridge.  Perhaps in desperation, Vincent leads two regiments down from Little Round Top into the Texans below.  The Texans skedaddle but Little Round Top is now garrisoned only by Hazlett's guns.  Vincent's Brigade is broken in the effort.

Law pushes infantry onto the heights and attacks Hazlett's guns.  Hazlett is overrun and his guns lost.  In an attempt to throw the Rebels off from the heights, Ward crosses Plum Run at the head of one regiment and attacks the Rebels.  Ward's attack is in vain.  His regiment is lost; his brigade broken, and he is dead on the field.
Hard fighting on Little Round Top.
Vincent sees success
but is short-lived as Little Round Top is lost.
Hazlett's guns are overrun and Ward killed.
With Little Round Top securely in Rebel hands, the Confederates turn to throwing Vincent's remnants off of the heights.  Weakened from heavy fighting, Federal infantry offer not much resistance.  Here, it becomes a mopping up action.

Back along Houck's Ridge, the Rebels press on.  The remnants of de Trobriand's Brigade make a couple of spirited Last Stands but they soon fall under the weight of Rebel numbers.  With three Federal brigades broken and Weed's Brigade still to appear, the Union troops in this sector are compelled to retire.  For them, this battle is lost.
Mopping up on Little Round Top.
Houck's Ridge cleared of enemy troops.
Here the battle ends with a clear Confederate victory.  Congratulations to Mark and Chris as the Rebel commanders in a stunning success.  My condolences to the hard fighting Federals under the Two Daves' leadership.  In this fight, Sickles was truly hammered!
The Merry Band of Brothers.
With the battle still in vivid memory, having concluded less than twelve hours ago, it may be too soon to consider a retrospective of the action. 

This was another exciting battle in which momentum swung to and fro with each Brigade activation.  The result seemed up for grabs until the Federal position collapsed everywhere, at once.

Great game fought by a great group of players.
Thanks all! 

Playing time about three hours.

Sunday, August 6, 2023

Adding Some Artillery

Having pushed out a handful of Hanoverian infantry regiments, I figured time to field a few guns to add variety to the painting queue.  Actually, painting production sagged badly in June and July so there was not much need for variety.  August is looking better on the painting front with work being accomplished in at least preparing a bunch of figures for painting.  Figures from many different projects are being given the black undercoat.  This prep work reminds me of my annual fall push to prep figures to hold out during the long winter months.  Perhaps this is the annual press only a few months early?
Anyway, off the painting desk today are six Hanoverian artillery pieces and crew for the SYW/WAS project.  Figures are Old Glory from 19th Century Miniatures.  This pack of six guns contains a mix of calibers.  Good looking models.  Quite functional.  More SYW/WAS figures are lingering on the painting desk awaiting their lick of paint.  Having focused mainly on 15/18mm figure painting thus far in the year, I am making an effort to get some 28mm figures prepped and pushed into the queue.  A return to Biblicals may be next.
On the gaming front, another rematch of the Gettysburg Hammerin' Sickles scenario is on deck this week. This week's game is number five in this series featuring a rematch for a four-player group from UK and France.  Some are swapping sides for the replay.  Should be interesting.

Thursday, August 3, 2023

Sickles Rejects Hood!

After fighting Hood's attack at Gettysburg a week ago (see Hammerin' Sickles, Again), Reject Central expressed an interest in a rematch.  The Confederates wanted to reinforce their winning streak.  The Federals wanted to upend the Confederate juggernaut's plan.  Monday saw a return to Hood's attack at Gettysburg.  Wanting a true rematch, players remain with the same commands as in the previous edition.  That is,

USA

CSA

Would the Confederates see a continuation of their success in a rematch or would the Federals turn the tables on the Rebels and sneak out a victory?  From post-game discussions and email exchanges, I sensed Federal confidence was not high in overturning last week's results.  However, there was hope and a plan was percolating.  Throughout the week leading up to Monday's game, I received emails from the Federal players asking about how to put the notion of using Reserves into practice.  In previous games, I suggested that using Reserves may be a useful tactic to interrupt the opponent's decision cycle.  I could see the wheels of evolution turning as our discussions continued.  For Richard's riveting battle account, please visit, Hammering Reserved.  Really, don't bypass Richard's retelling of the battle from the Federal perspective.  Great stuff.

As a reminder of the overall situation, 

Battlefield geography and place names
Initial army concentrations
Army deployments
When the curtain lifts on the battle, the Confederates are greeted by a different sight.  Almost the entire Federal Army has been placed upon Reserve (small red discs).  What this means is that a Federal unit has a chance to activate and respond during its opponent's activation.  Will this small tactical change affect the battle's outcome?
Federal Army in waiting.
Battlefield viewed from southwest.
Battlefield viewed from east.
On to battle!

The battle opens with the Confederates activating General Law's brigade positioned on Big Round Top and opposite Devil's Den.  Law leads two regiments in against the US Sharpshooters hiding out among the rocks in Devil's Den.  Before the Rebels can close, General Ward reinforces the sharpshooters with the 124NY moving down from Houck's Ridge.  The presence of the New Yorkers makes no difference.  The defenders of Devil's Den scatter as they are overrun.  The sharpshooters retire in good order back up the ridge.  The New Yorkers are not seen again!  Not the start Sickles expected.

Hood then sends General Robinson and his Texans into action against Little Round Top.  Again, General Vincent slips in a supporting regiment to bolster the 83PA before the Texans strike home.  In fierce fighting, the Texans are repulsed with heavy casualties.  Vincent is relieved to see the Rebels driven off.  Somehow, Robinson's Brigade became separated during the approach march.  While two regiments were present in the attack on Little Round Top, the 3AR and 1TX find themselves deep in Rose's Woods to the west.  These two regiments splash across Rose's Run only to be greeted by a hail of bullets from de Trobriand lined up in the woods.

General Law attacks Devil's Den.
Robinson is repulsed at Little Round Top.
Elements of Robinson's Brigade cross Rose's Run
only to immediately come under fire.
To thwart the Rebel advance, General Birney personally leads a regiment to a position below and south of Houck's Ridge.  Ward sends reinforcements into the Valley of Death along Plum Run between Houck's Ridge and Little Round Top.  Casualties rise as the two armies exchange volleys at close range.  Facing canister from the ridge above and fire from Plum Run, the Rebels in Devil's Den begin to waver but hold on.  To relieve pressure from the fire coming from Plum Run, Law brings the 47AL forward.  

The Rebel advance is blocked.
Heavy fighting along Plum Run.
View looking from south.
Sensing that his attack against Little Round Top has stalled, Hood sends Benning into action to clear Rose's Woods and press on toward the Wheatfield.  Benning takes his charge with gusto.  His entire brigade of four regiments attacks.  Taking heavy casualties from de Trobriand from the front and Smith's guns from above, Benning stands firm.  His attack pins de Trobriand in place while Robinson charges Winslow's guns on Stony Hill.  The guns are overrun by the 3AR.  The 1TX pushes de Trobriand back from the Wheatfield.  The Federal right is getting perilously stretched.
Benning prepares his attack
as Robinson prepares his.
Winslow's guns are lost as Rebels
reach Stony Hill and the Wheatfield. 
While Benning's pinning action allows progress against the Federal right, it comes at a high cost.  His regiments are beginning to melt away from the heat of combat.  In an attempt to reduce pressure on his brigade, he leads an attack up Houck's Ridge to dislodge enemy guns and skirmishers.  While his attack succeeds in overrunning the guns and scattering the skirmishers, Benning falls and his brigade is broken.  Confronted by enemy to its front, much of Benning's Brigade falls back, spent.  Anderson comes up in support of the Rebel attacks against the Federal right. 
Heavy fighting at the southern end of Houck's Ridge.
Benning attacks up Houck's Ridge to take the guns.
While successful, Benning dies and his brigade broken.
With the Federal right stretched, the elastic finally snaps and de Trobriand collapses.  One regiment scatters while a second falls back to Houck's Ridge to regroup.  Unfortunately for de Trobriand, he goes down and his brigade is broken.  The 3AR presses on to the foot of Houck's Ridge.  Not only is the south end of this vital ridge in Rebel hands but the north end is under heavy pressure.

To alleviate this pressure on Houck's Ridge and hopefully stabilize the situation, Birney grabs the nearest regiment and counterattacks.  Catching the Rebels by surprise and in flank, the Rebels recoil.  Robinson's Brigade breaks. Hoorah!  This success is short-lived.  Anderson gathers his brigade and storms the heights of Houck's Ridge.  The Federals are driven back.  Ward's Brigade breaks.  
The Federal right is driven in.
Rebels reach Houck's Ridge
before a surprise counterattack drives them off.
Anderson presses onto Houck's Ridge.
Federal hold on Houck's Ridge hangs by a thread.
Back in the Valley of Death along Plum Run, the Rebel attack stalls although Confederate troops are seen on Houck's Ridge and Little Round Top. With Weed's Brigade of blue-coated infantry finally arriving on Millerstown Road to shore-up the collapsing Federal right, Vincent strikes!

Leading the 20ME and 83PA in an attack, he sweeps down from Little Round Top scattering the wavering Rebels in his path.  Reaching Plum Run, he finds Law and his Rebels in disarray. 
Heavy fighting along Plum Run.
Vincent prepares to clear Little Round Top
of the weakened enemy.
Remnants of Law's Brigade scatters as Vincent storms on.
Robinson and Benning's Brigades are broken and Law's Brigade teeters on the edge.  Taking Little Round Top is beyond Hood's grasp.  With the Federals having two unspoiled brigades ready for action, Hood calls off the attack.

This fight is over.

Congratulations to all for a very well-played and exciting battle.  The Federals came out on top in this rematch but like the previous contest, the fighting was fierce and casualties high.

To Richard and Ray, as Federal commanders, your change in tactics and strategy carried the day.  Grasping how to use reserves, I reckon, helped towards seeing victory this day.  To the Rebels under Lee and Surjit, you played a solid game and you nearly saw victory once again.  I wager we do not see a return to the Old Tactical Ways again.  

Great game!  Thank you all!

For those keeping score at home, current tally for this scenario shows each army has two victories.  We stand at 2-2.  Another game on Wednesday.

Tuesday, August 1, 2023

The Great Wargaming Survey 2023

If it is August, it must be time for the next edition of Wargames, Soldiers, and Strategy Magazine's The Great Wargaming Survey.

Link to the 2023 survey is, 

The Great Wargaming Survey

A handful of new questions in this year's survey, a few tweaks, an easy user interface, and lots of interesting prizes in the raffle.  Completing the survey only takes a few minutes. 

If interested, I encourage readers to take a few minutes out of their day to complete the survey and enter into the raffle.  You will be required to enter an email address to win.  Email will be purged afterwards.  If my post-survey analyses are of interest, jot down your responses for later reference when I present these summaries and inferences.  All responses are anonymized and reported as summaries only.

Let your preferences and thoughts on the hobby be counted!  Did you vote?

Survey runs through 31 August.

Thank you.