 |
| The colonials drive off the Redcoats Photo courtesy wargamesinthedungeon |
For the second action in the continuing Rebels and Patriots mini-campaign set during the early stage of the war, Concord's South Bridge is the scene. The scenario as laid out was:
Concord – Action at the South BridgeAmerican Briefing
As reports of the action at Barrett's Farm filters out into the countryside, local militia and minutemen answer the calls to arms. Marching on Concord from the southwest, these militiamen encounter a British scouting party sent from Concord across the South Bridge. Having driven off this small party, the Americans draw up their forces centered on a small hill overlooking the bridge. Included in this collection of rebels is a section of light artillery. Placing the artillery behind hurriedly prepared breastworks, the Americans settle in to await the attack they figure is coming. The major of this ad hoc group is determined to make a stand upon this ground.
British Briefing
After scattering the colonials at Barrett’s Farm, the British gather their dead and wounded and return to Concord where the main, expeditionary force is stationed. There was no interference from the rebels on the two mile march back to Concord over the North Bridge. Good thing. Following these exertions, the British are battered and fatigued.
Having returned to Concord, the major is congratulated on the success at Barrett’s Farm but cautioned on the casualty count suffered in overcoming the rebels. After sending the wounded off for care and making arrangements for the dead, you are informed that another patrol, mostly of skirmishers has encountered organized resistance near the South Bridge. This patrol has been driven back to the east bank of the river, fatigued. The skirmishers report that the rebels have a section of guns overlooking the South Bridge and its position threatens the security of Concord, itself. A fresh unit of combined grenadiers and another of light skirmishers are allocated to your mission as replacements since both of your units saw heavy action at Barrett’s Farm and suffered heavy casualties.
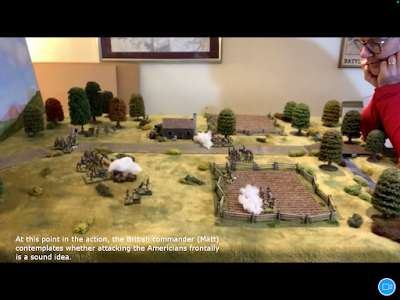
As the British patrol reaches the South Bridge, the situation becomes clear. Rebel artillery and a militia unit are deployed upon the crest of the hill with supporting skirmishers deployed to the front. How best to tackle the enemy positions and drive these damned rebels from the field?
The Map:
The area shows the farm and hill on the west side of the South Bridge. Since it is April, the fields have been plowed but no crops are up. It is about midday with plenty of time to see a conclusion to this skirmish.
Quite an amazing transformation, don't you agree?
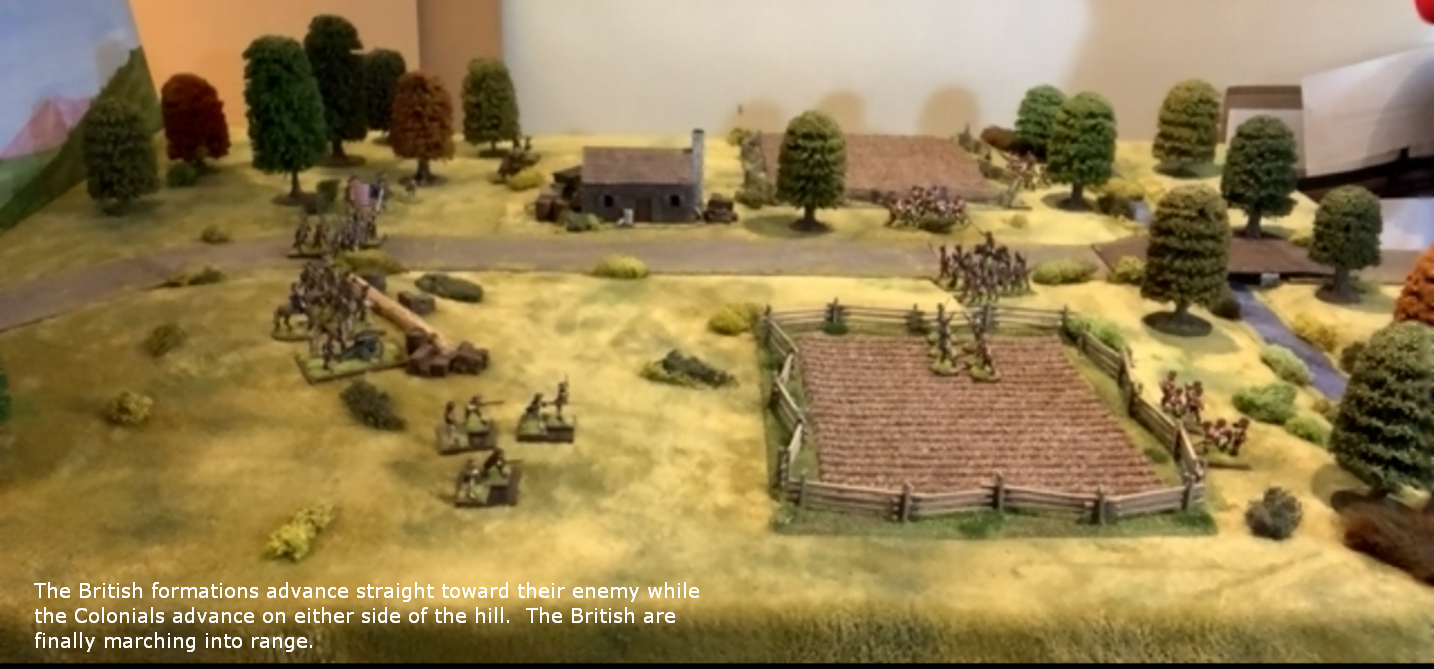
The British force reaches the South Bridge in whatever formation ordered. They may spread out along the eastern board edge.
The Colonials have one artillery section and one militia deployed on the high ground to the west of the South Bridge. Both of these units are situated behind hastily prepared breastworks. One unit of minutemen and the riflemen are deployed on the board as shown (Rebel’s choice). One more militia and one more minutemen unit come on the board on turn 1.
SPECIAL:
River is an obstacle.
Trees and brush along riverbank are difficult.
Fences, woods, and bridge provide cover.
Hasty breastworks on the hill provide hard cover.
Orders of Battle:
British:
1 x Grenadiers: Shock, VET (8pts)
1 x Light Infantry: VET (7pts)
2 x British LI skirmishers: VET, Good Shooters (5pts each)
1 x Loyalist militia skirmishers: GREEN (1pts each)
total = 26 points


 That was another fun game but not the outcome for which Matt expected. Matt experienced several crucial bad rolls which either prevented his troops from activating or broke his units while testing morale. Two back-to-back rolls of snake eyes is no good when testing morale. After a bit of post-game armchair generaling, talk turned to the next installment.
After scattering the colonials at Barrett’s Farm, the British gather their dead and wounded and return to Concord where the main, expeditionary force is stationed. There was no interference from the rebels on the two mile march back to Concord over the North Bridge. Good thing. Following these exertions, the British are battered and fatigued.
Having returned to Concord, the major is congratulated on the success at Barrett’s Farm but cautioned on the casualty count suffered in overcoming the rebels. After sending the wounded off for care and making arrangements for the dead, you are informed that another patrol, mostly of skirmishers has encountered organized resistance near the South Bridge. This patrol has been driven back to the east bank of the river, fatigued. The skirmishers report that the rebels have a section of guns overlooking the South Bridge and its position threatens the security of Concord, itself. A fresh unit of combined grenadiers and another of light skirmishers are allocated to your mission as replacements since both of your units saw heavy action at Barrett’s Farm and suffered heavy casualties.
As the British patrol reaches the South Bridge, the situation becomes clear. Rebel artillery and a militia unit are deployed upon the crest of the hill with supporting skirmishers deployed to the front. How best to tackle the enemy positions and drive these damned rebels from the field?
The Map:
The area shows the farm and hill on the west side of the South Bridge. Since it is April, the fields have been plowed but no crops are up. It is about midday with plenty of time to see a conclusion to this skirmish.
 |
| Action at South Bridge Sketch Map |
Matt transformed my sketch map above into this:
 |
| Action at South Bridge battlefield Photo courtesy wargamesinthedungeon |
The British force reaches the South Bridge in whatever formation ordered. They may spread out along the eastern board edge.
The Colonials have one artillery section and one militia deployed on the high ground to the west of the South Bridge. Both of these units are situated behind hastily prepared breastworks. One unit of minutemen and the riflemen are deployed on the board as shown (Rebel’s choice). One more militia and one more minutemen unit come on the board on turn 1.
SPECIAL:
River is an obstacle.
Trees and brush along riverbank are difficult.
Fences, woods, and bridge provide cover.
Hasty breastworks on the hill provide hard cover.
Orders of Battle:
British:
1 x Grenadiers: Shock, VET (8pts)
1 x Light Infantry: VET (7pts)
2 x British LI skirmishers: VET, Good Shooters (5pts each)
1 x Loyalist militia skirmishers: GREEN (1pts each)
total = 26 points
Americans:
1 x Light Artillery: (4pts)
2 x Colonial militia: (4pts each)
2 x Minutemen skirmishers: Good shooters (4pts each)
1 x Riflemen skirmishers: Sharpshooters (6pts)
total = 26 points
OBJECTIVES:
Both:
+2 Honor if your company suffered fewer than 33% casualties.
+1 Honor if your company caused at least 33% casualties to the enemy.
+2 Honor for holding one end of the South Bridge.
American:
+3 Honor for driving the British back to the east side of the river.
British:
+3 Honor for driving the Rebels from the field.
+2 Honor for capturing the gun.
+3 Honor for driving the Rebels from the field.
+2 Honor for capturing the gun.
So, how did the battle play out? Well, with "Debacle" in the title, the outcome is not likely good for someone. Let's see who folds.
Photos are annotated so viewing as a slideshow is a good way to view the action.


Next time, we may increase the points allocation to around 30 points each to produce a larger game. In some situations the recommended 24 points is too little.
Thanks again to Matt for hosting another fine game. Until next time.
The table is looking amazing. Many thanks for your report and sharing these inspiring photos.
ReplyDeleteMatt, my remote game host, sets a very fine table.
DeleteHmmm, a debacle indeed, but I feel for Matt as my die rolling in these games is notoriously bad, so Snake Eyes is rather familiar to me! A lovely looking table as always and a nice scenario.
ReplyDeleteOn the points front, maybe dropping some of the Veteran units is one option, or just upping the points total as you plan to do. Either way both will hopefully give a longer game.
Glad you enjoyed it, Steve!
DeleteMatt requested a historical mini-campaign this go-around so I tried to allocate units and points based upon the historical record at the start of the war. Different tactics by the British may have provided a different outcome.
Super looking game and bad dice can always make a game go south.
ReplyDeleteChristopher
Bad Dice and few units can make short work of a good scenario. The game does look great, though!
DeleteAnother great little action, and fabulous table by Matt.
ReplyDeleteYeah, Matt does a wonderful job on his game layout. I am always impressed in his transformation of my rough sketch into beautiful table.
DeleteAnother lovely-looking game in this series. Bad dice rolling aside, was the frontal attack against the well-entrenched Rebels a little ambitious?
ReplyDeleteLovely-looking game, indeed! I think Matt will agree that a frontal assault may have been a bit ambitious.
Deletehindsight is a wonderful thing, sadly history has proven that it takes our British officers a generation to learn the lessons of their forefathers. It felt exactly the right thing to do at the time but I should have completely ignored the entrenchment and wiped the Rebels out everywhere else. But sadly my commanding officer was head strong and over confident. Many a good redcoat lost their life due to his incompetence. I’d like to think He has learnt the lesson. Whatever else he’ll need a change of uniform when he gets back home.....brown trousers !
DeleteIt might be fun to try this action again some time and put your revised plan of attack into practice.
Delete"Brown Trousers" indeed!
I think they call that campaign dress, don't they?
DeleteIndeed!
DeleteA lovely sized game and choke point scenario. Another action with heavy casualties for the British and amongst the Grenadiers too - there will be mutterings in the ranks! If only you had been playing ASL, back to back snakes eyes would have been a game winner!
ReplyDeleteThe next scenario might be called ‘scores to settle’.
Thank you, Norm! Very heavy casualties for the British in this action. Only one British unit made it off the table under its own power.
DeleteThe next scenario may be an ambush as the British attempt to return to Boston from their foray to Concord.
A great looking game, I am feeling your pain, I too suffer from bad dice rolls....even with a dice tower!
ReplyDeleteSo tempted to change my focus and go back and paint some more AWI, the metal in storage is calling my name!
cheers
Matt
Thanks, Matt! A spate of bad dice is a condition we all must face. Matt did it with grace and good cheer. Perhaps we will see a return to AWI painting for you?
DeleteHmm, I don't suppose the dice had been purchased from an American merchant by any chance?
ReplyDeleteStll the game looked great and one must accept these sort of disasters from time to time.
American dice? Perhaps. Matt can answer that one!
DeleteYes, the game looked fab and we must endure a disaster from time to time.
I thought we agreed that this debacle would not be mentioned in dispatches back to senior commanders, my officers have reported that there was a minor skirmish to the south of the town but nothing eventful happened and the British withdrew in good order ? Another example of History written by the victors 😀 I’ll get the photos of the redcoats running away up on my blog later !!!!!!! At least the march back to Boston should be uneventful ?
ReplyDeleteOh! I misunderstood. I thought no dispatches back to BRITISH senior officers!
DeleteI look forward to your battle account since your photos are much better than mine.
This was a fun scrap!
Ha! History has a long tradition of each side having its own interpretation of events. 😀
DeleteReally enjoying this mini, virtual campaign. More please!!
ReplyDeleteSteve, I am glad you are enjoying these skirmishers. More on the way in a couple of weeks.
DeleteIt looks like you are having some great games, would be nice for the British to do well once in a while - however I am biased ;)
ReplyDeleteI am having many enjoyable games. The British won the previous fight at Barrett’s Farm.
DeleteNice report and lovely table. Hope to get something done myself next month, fingers crossed.
ReplyDeleteThank you! Matt gets full table credit. I look forward to seeing what you come up with for remote gaming.
DeleteLooking really great Jonathan!
ReplyDeleteMake sure to give Matt's battle report a look when he posts it. His photos are much better than my screenshots.
DeleteNice gaming between you and Matt, Jonathan! Terrain layout and troops look great.
ReplyDeleteMatt always presents a superb table. I have enjoyed these mini-campaigns with Matt as the Brit and I as the Yank.
DeleteYes agreed a great looking game and probably a historical result? Frontal assaults on guns behind hard cover would never be my first choice, unless the scenario dictated I had to do it! Looked like a mini version of Bunker Hill and that went the same way two or three times before the final assault succeeded - and if you believe the American version, that was only because the defenders ran out of ammunition!
ReplyDeleteThe result seemed reasonable to me. Hubris can be a dangerous trait. Never underestimate your opponent no matter how much they look like rabble.
DeleteThe frontal attack reminded me of Pyle’s famous painting of grenadiers marching up Bunker Hill.
Nice scenario and good looking game!
ReplyDeleteBest Iain
Thank you!
DeleteYou and Matt are certainly having some fun times here. Well done all around. 😀
ReplyDeleteWe are having fun, for sure!
DeleteFantastic fight, Jonathan, I'm really enjoying your and Matt's collaborations! And hurrah for the good guys! ;)
ReplyDeleteI actually own 'Rebels and Patriots' and really like them, though I've never actually played them as I don't have any troops for it... I really need to get to painting some up, I think I've gotten one whole base of British infantry for AWI done...
V/R,
Jack
Thank you, Jack! Glad you are enjoying these mini-campaigns. Matt is hinting that he would like to try some larger battles with Rebels and Patriots with Bunker Hill perhaps on the agenda. first, we need to see if the British can get back to Boston in one piece.
DeleteI look forward to seeing your work on the AWI project.
Jonathan,
DeleteWell, bigger is always better, so Bunker Hill would be a real treat! But I’ll take whatever I can get, so just keep playing, please! ;)
And don’t hold your breath in my AWI project; the lead has already been laying there for two years, and I’ve got so many other projects going on...
V/R,
Jack
Jack, we will try to keep up the pace on these remote games. Another positive of this activity is that Matt is very motivated to continue churning out beautiful units. I understand your predicament; so many projects, so little time.
DeleteA lovely looking game Jonathan... Matt has done a great job with the table.
ReplyDeleteIt’s nicely reassuring to know that I am not alone with my ‘unfortunate’ dice.
All the best. Aly
Thanks, Aly. Matt’s tables are the best. On this day, the Dice Gods were not smiling on the British.
DeleteGreat stuff from both you and Matt. Until the next one!
ReplyDeleteThank you, Mike! There will be at least one game in this series. Let's see if the British can make it back to Boston...in one piece.
DeleteI've been enjoying these - and the play-by-play captions are great!
ReplyDeleteThank you, Markus! Very pleased to see you are enjoying this series of linked battles.
DeleteAS others have noted, a fine looking small game. How long did it take to play out?
ReplyDeleteThe game was over in a little over two hours.
Delete