Wednesday, April 12, 2023

Back to Spain!

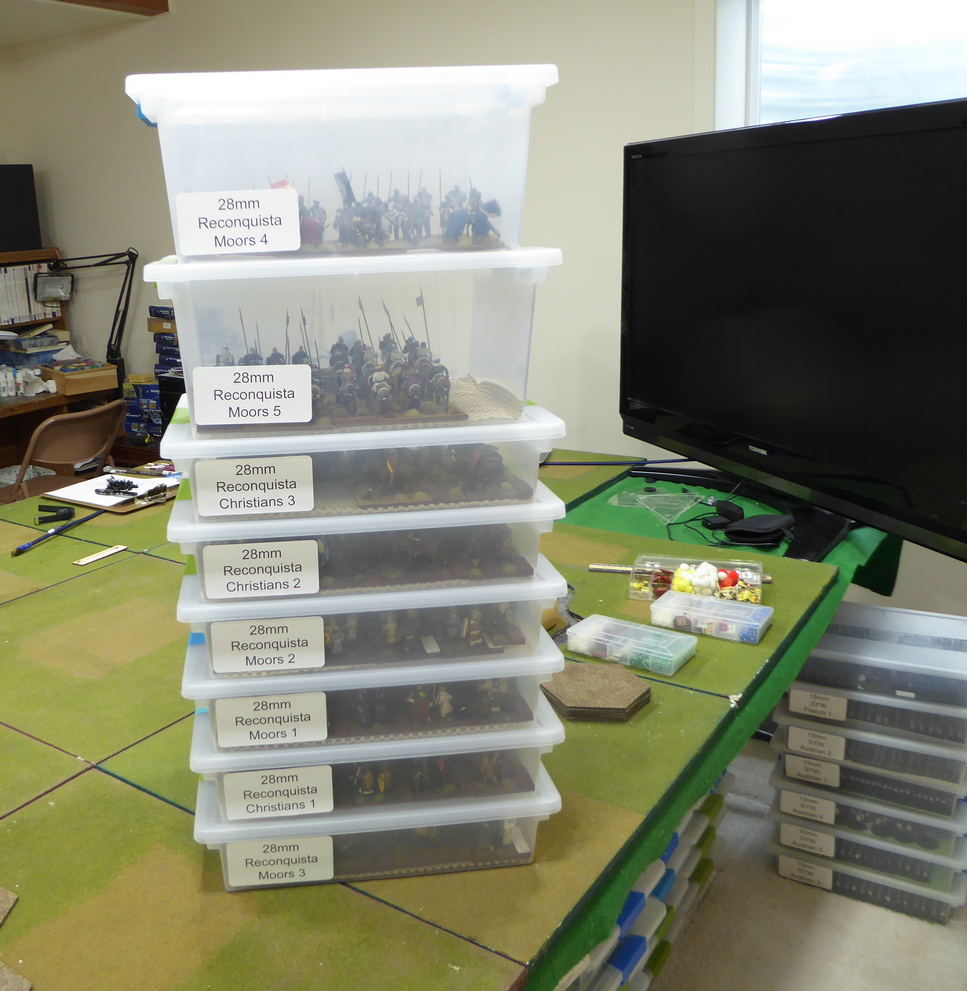
In anticipation of a return to the Reconquista and Spain, I pulled the 28mm collection from its boxes and laid out a parade.
Today's trooping features the Muslim armies gathering for battle.  Not all will take to the field but a goodly number of them will.  The collection has figures from a number of manufacturers including Black Tree Design, Artizan, Perry, Gripping Beast, and maybe one or two more.  The bulk of the figures are definitely BTD picked up ages ago.


The army will go from the parade ground straight into battle in a contest later today on the field of Huesca.
Today's battle sees me matching wits against an opponent fresh off a victory on the plains of Sumeria.  With a string of four defeats at the hands of four different players, which wily opponent will I face on the field?

Saturday, April 8, 2023

Turks Fight for the Draw!

Airstrike!
photo courtesy of Grid based wargaming

Peter and I returned to his WWI Palestine campaign this week to see if the EEF could break through the Turk lines and get back on the march to Damascus.  Peter's account of the action is at A Remote WWI Palestine Campaign Game Report.  We switch from playing on a non-gridded to table to a gridded table in this contest.  Please visit Peter's report to understand the background to both campaign and this battle.  I love Peter's comic style battle sketches as seen in the header graphic!

I would be commanding the Turks once again.  Since Peter said that "a draw is as good as win in this battle", I may have to play for a draw.  Once I saw the scenario and studied the force allocation, I figured the Turks might be lucky to pull out a draw.  To make the challenge even more difficult, the EEF added a unit of mounted camel infantry at the last minute.  The Turks, in this engagement will face armor, artillery, and even airstrikes.  The Turks will have their hands full.

Let's take a look at the battle from the Turkish perspective.

The Turks begin the game with only one unit on table.  I selected the heavy artillery to setup on the road adjacent to the bridge.  All of the EEF forces would arrive on Turn 1.  No Turk reinforcements until Turn 3.  It might be a long three turns. 

EEF advances
By Turn 3, EEF mounted infantry arrive near the bridge and come under fire from the Turkish gun.  The mounted infantry remains mounted and begins taking casualties.  Heavy casualties.  EEF forces are bearing down upon the vital bridge as Turkish reinforcements begin to arrive.
First shots of the battle.  Incoming!
Fighting escalates as the EEF continues to close.  Both Turk guns are now sending shells into the enemy and the machine gun infantry take up position along the wadi.  They prepare for a vigorous defense.  With the enemy pinned at the bridge, the Turks mount a flanking attack using the ford that only they know.  The enemy brings forward its tank screened by the mounted infantry and supported by artillery.  The mounted infantry is being cut to pieces!
Fighting intensifies at the bridge
 as the Turks attempt a flank attack.
Casualties rise in the hot fight at the bridge.
Having suffered heavily from artillery fire, the Egyptian mounted infantry peels off to the left to open a direct line of sight for the armor moving up the road.  The Turks continue exploiting the ford to bring one unit over to the opposite side.
Turks cross the wadi
as the enemy tank makes its way to the bridge.
The Turks keep up a steady barrage supported by machine gun fire at the bridge.  The tank suffers minor damage but presses on.  The EEF, to the front of the machine-gunning Turks, evaporates.  Now, two Turkish infantry units make it across the ford with a third signaling that it may be planning the same. 
As the Turkish flanking force presses on,
the enemy's attack at the bridge stalls.
  Casualties are high.
Seemingly out of nowhere, an enemy airplane is seen overhead.  The plane drops its bombs on the Turks protecting the bridge.  Casualties are frightful.  The air attack silences the machine guns.  They are unable to respond.   
Air attack!
Attacked from the air!
photo courtesy of Grid based wargaming
Still, the fight for the bridge continues with the tank and artillery trading shots.  Realizing the threat to its flank, the EEF begins to redeploy to address this new threat.  The flanking Turks swing about to prepare for action.
Turk flanking force swings into action.
Having its sights set on overrunning the Turkish gun, the tank lurches into action and then suddenly stops.  Boom!  There is an explosion inside the tank and it stops, dead. 
The tank is consumed in a ball of flame and smoke!
Artist's rendering of the moment.
photo courtesy of Grid based wargaming
With the tank dead on the road, the attack against the bridge stalls until units can be shifted over to renew the attack.  While fighting dies down at the bridge, the flanking force engages the enemy.  One Turk pins the enemy to its front as two units move up.  Are these Turks planning to launch a counterattack on the bridge from the enemy's side of the wadi?  EEF artillery shifts from targeting defenders at the bridge to the Turkish flanking force.
Activity switches to the flank attack.
Seeing the Turk mountain gun fall silent to small arms fire, the EEF mounted infantry turns about.  Looks like it is heading back to the village to prevent its capture.  Flanking firefight intensifies as a second Turk joins into the combat.  The enemy has had enough and retires back toward the road.  With the enemy infantry approaching the bridge, the badly mauled Turk infantry falls back. 
Heavy fighting on the flank.
Enemy is forced to retire from the firefight.
With the enemy pressing on toward the bridge, a second aircraft is seen overhead.  Again, the target is the unlucky Turk MG unit near the bridge.  Again, the Turks take a pounding.  This time, however, the defiant Turks crumble.
The enemy moves up another unit of infantry in preparation for storming across the bridge.  After taking so many casualties, the defending artillery fails to fire.  The flanking Turks continue suffering from artillery shelling.  Reaching the village looks impossible.
Turks in the flanking force continue to take fire.
Still, hope remains, and the Turks press on.  An EEF infantry unit is shattered as the Turk MG unit swings around to help interdict attacks across the bridge.  That move pays off and the enemy is cut down from behind.  Only one more enemy unit is within striking distance of the bridge.  That enemy unit moves into position but the clock has expired.
One EEF unit destroyed!
And another!
The Turks press on.
When the smoke clears from the heavy fighting, the EEF still holds the village and the bridge is contested.  A draw for the Turks!  There will be celebrations in Damascus but not by the EEF.  For them, their campaigning appears over.

The Turks hold out and turn back the invaders!

Victory Draw for the Turks!

Another fine game and scenario by Peter.  Good fun with a fight to the last turn and the last die roll.  Many thanks for hosting!  For the Palestinian campaign, this defeat may signal the end to the EEF's offensive.  They will never see Damascus.

What is next?

Thursday, April 6, 2023

Battle of Long Island

After providing Jolly Broom Man a taste of an AWI game using Fields of Honor (see Back to the Revolution), the battle was reset and a call went out for a larger player count.  Four remote players accepted to fill the four commands and the battle was set for a refight Cornwallis' flanking attack as part of the Battle of Long Island.  

Mark and Chris took command of the Rebels.  Steve and David took up their places at the head of the British army.
Heard's Brigade stands in silence.
Red disks denote RESERVE status.
White balls show First Fire bonus.
The Rebels wait in silence.
Note gun section on rear hill covering the main road.
At the beginning of battle, the battlefield is quiet as General Heard positions his brigade on Shoemaker Heights overlooking the bridge.  If the British can breakthrough here, the flank to the American positions at Brooklyn will be compromised.  The Rebels must hold! 

The British army begins the game off table.  Divided into four brigades, all may begin arriving on Turn 1.  Most of the Rebels begin off-table and enter as reinforcements too.
British Army
Rebel reinforcements
Lord Percy begins the attack by ordering Smith's Brigade of four regiments up the road toward the bridge.  Seeing the Redcoats on the road, Heard sends one of his militia regiments off to contest the bridge.  The Rebel 6lbers on the hill east of Shoemaker's Hill makes it presence known by inflicting casualties upon Smith's lead regiment.  Rebel reinforcements from Brooklyn are already reaching the battlefield with Nixon's Brigade in the lead. 
First blood as the British army advances.
Percy chooses not to concentrate his attack solely down the road and against the bridge but advances broadly against the entire American position.  MG Jones is ordered to sweep wide against the Rebel left while MG Pigot pins the Rebel militia on Shoemaker Heights. Seeing the might of the British army to its front, the militia at the bridge quickly reconsider and retire. 
Redcoats advance across a broad front.
MG Jones' Brigade marches off to turn the Rebel left.
Alongside Smith, Mathews' Guard Brigade forms up and chases the militia off with a volley as the British army prepares to cross the stream.  Rebel guns on the hill continue pounding the Redcoats at the stream.  Rifle fire from the Continentals, positioned within the breastworks, cripples the 63rd foot. As Pigot's Brigade forms up at the foot of the heights, all of Heard's militia unleash a devastating volley into the British ranks.  The 5th Foot is sent packing almost before the battle begins!  British casualties are surprisingly high.  Percy may have some very hot work today.  Sensing Heard will soon have his hands full, Nixon quickly brings his brigade up in support.  For now, the Rebels are giving better than they get.
The Redcoats line the stream as they prepare to cross.
Rifle fire stops the 63rd in its tracks.
Casualties are very high.
The destruction of the 5th Foot!
But these early Rebel successes may be short-lived.

On the British left, Smith and Mathews unleash deadly volleys into Heard's militia along the stream.  Two militia regiments scatter.  Having seen half of his brigade disappear, Heard's Brigade is broken.  In what has been called Pigot's Charge (thanks, Chris!), Pigot, at the head of his two remaining regiments, leads the way up and onto the heights.  Heard and the militia to which he is attached are overwhelmed.  The militia scatters in the face of this assault and Heard is killed. Pigot reaches the heights but loses a second regiment in the fighting.  Pigot's Brigade is broken in these efforts.  To finish off the remnants of Heard's Brigade, the guard destroys the remaining militia situated behind the rail fence.
Pigot's Charge!
'X' marks the spot where Heard falls.
As Heard's position collapses,
Nixon brings up his brigade.
The last of Heard's Brigade is destroyed.
Nixon's boys let loose a tremendous volley into the face of Pigot's remaining regiment. The redcoats are cut down.  Before Pigot can get himself out of harms' way, the Rebels advance and Pigot is captured.  On the Rebel left, Jones maneuvers his brigade into position to threaten the Rebel flank. Two volleys from the Redcoats and a regiment of militia forming up at the foot of the hill scatters.
Pigot is captured!
With Nixon now in command of the heights, volleys pour down onto Jones' Redcoats.  Fire is hot and the 10th foot is destroyed.  On the British left, Smith advances his brigade along the road.
Rebels concentrate fire against Jones.
As the Rebels bring up more troops, the firefight intensives.  Jones witnesses two of his regiments disintegrate in minutes.  His brigade is broken.  Back on the British left, the persistent Rebel gun continues its work.  Another of Smith's regiments crumbles.  Smith's Brigade breaks and continued efforts look pointless.  Percy calls off the attack.
First Jones breaks and then Smith.
The Rebels hold out to see victory and drive back the British invaders!

Well done to all players but especially to Mark and Chris for their careful handling of the Rebel army.  My condolences to Steve and David.

This was a very interesting battle to watch unfold.  First, the British took heavy casualties almost before the battle began only to come back to destroy Heard's entire brigade in coordinated attacks.  While Heard was destroyed, his stubborn defense allowed time for the Rebels to bring up Nixon and Parson's brigades to counter every British threat.  

Well played and very fun to watch.

Thanks for a great game, guys!

Monday, April 3, 2023

The Changing Tide of Wargame Interest

One of the long-running questions on the Great Wargaming Survey asks respondents to gauge where they find themselves along the wargaming spectrum.  Are you mostly an historical wargamer, a fantasy/sci-fi wargamer, or somewhere in between?  Genre is the term I use for identifying this wargaming spectrum.  The Genre Scale runs from '0' (Entirely historical) to '6' (Entirely fantasy/sci-fi).

For the 2022 survey, a follow-up question was added.  Since the question above captures only a snapshot in time, I wondered if wargaming genre preferences are static.  The follow-up hopes to address the question of whether this snapshot in wargaming preference changes over time.  Does a wargamer's preferred game genre adapt with time or do gamers remain solidly in one camp over their hobby lifecycle?  Movement along this continuum may hold insights into the future of the hobby.

Today we take a look at this question and responses.

From the survey results, about 65% of respondents marked that their wargaming preferences have remained consistent over time.  Almost two-thirds!  Nearly 25% say that they started playing more historical games while about 10% say they are playing more fantasy/sci-fi games.  With hobby undertones suggesting that historical gaming is on the wane for a variety of anecdotal reasons, it may provide some solace that more than twice as many wargamers are increasing their gaming in historicals than those playing more fantasy/sci-fi games.
Table 1
Preference Changes by Gaming Genre
Breaking the totals down by Gaming Genre along the seven-point scale, do any patterns emerge?

Figure 1 illustrates that wargamers choosing the extremes of the spectrum (Entirely historical or Entirely fantasy/sci-fi) remain remarkably consistent in their selections.  Almost 93% of Entirely historical gamers remain as such.  Similarly, nearly 98% of Entirely fantasy/sci-fi wargamers remain purely fantasy/sci-fi wargamers.  Even the next step on the ladder ('1' for historical gamers and '5' for fantasy/sci-fi gamers) continues to show consistency.  Those wargamers situated somewhere in the middle ('2','3','4' on the scale) maintain consistency in gaming genre for about half of the respondents.
Figure 1
For example, a respondent selecting a ‘2’ on the Genre Scale with “yes, starting to play more historical games” could have been a ‘3’ or higher in the past.  Notice that for all of the genre classifications, a wargamer is more likely to start playing more historical games than playing more fantasy/sci-fi. In all but the Entirely fantasy/sci-fi genre, those starting to play more historicals outpace those starting to play more fantasy/sci-fi by at least two-to-one.  Surprising?  It is to me.
Figure 2
When the totals are aggregated by Primary Interest as in Figure 2 ('0','1' for historicals; '2','3','4' for mixed; '5','6' for fantasy/sci-fi), does this tendency change?
Figure 3
Aggregating the results as shown in Figure 3 demonstrates that primarily historical and primarily fantasy/sci-fi wargamers tends to stick to their genre (consistent preference is 86% for fantasy/sci-fi and 78% for historical).  About half of all gamers having a Mixed interest tend to maintain their chosen interest combination.  Notice that in all groupings, gamers tend to start playing more historicals to fantasy/sci-fi over time.  In particular, 36% of Mixed gamers tend to play more historicals than in the past.  Does this tendency to migrate toward historical wargaming over time bode well for historical miniature gaming?  What if these data are disaggregated by age group?  Does this tendency remain?

Preference Changes by Age Group
From past analyses, survey results illustrate time and again that the younger age cohorts tend toward fantasy/sci-fi wargaming while the older age cohorts tend toward historicals.  Do these younger wargamers migrate toward historicals in later years?
Figure 4
Figure 4 suggests that this may, indeed, be the situation.  For wargamers age 50 and under, roughly 30% of wargamers in each of the age cohorts claim to have started playing more historical wargames.  Starting to play more historicals outpaces starting to play more fantasy/sci-fi by at least 3:1. What do you make of that?

Given your current status along the genre spectrum, has your gaming choice remained consistent over time or are you migrating toward playing more historicals or more fantasy/sci-fi?

Does your individual experience align with the larger survey results?