Pages

Wednesday, November 29, 2017

An Unfinished "Finished" Project

Box of Renegade ECW Lead
When is an unfinished project finished?  When is a finished project unfinished?

While I may never strike upon an answer to the first question, the answer to the second question was resolved last week.  The answer is obvious but before I belt out this revelation, a bit of background leading to this epiphany. 

My 30mm ECW project has not seen any action at the painting desk for exactly six years.  A reasonable assumption might be that after six years of inactivity, the project was complete.  Well, that is what I thought too.  Having painted all of the ECW figures in The Lead Pile and having enough units present and under arms for large games, I figured I was finished.  I did pick up enough cavalry from Empress Miniatures last year to field one more regiment of horse but that hardly counts, right?  The Empress Miniatures' cavalry were so beautiful, I could not resist fielding one more regiment of horse.  By the way, those beautiful sculpts still lay neglected in The Lead Pile

Back to the story at hand.  A few weeks' ago, a gent on TMP was selling surplus ECW lead from a variety of manufacturers in several lots.  One such lot consisted of 80 foot from Renegade MiniaturesRenegade Miniatures?  That caught my eye.  I love those large figures!  Now I already have about a half-dozen Renegade units of foote in my ECW collection.  I like them very much and they fit in well with the bulk of my collection which are comprised of Redoubt figures.  At an asking price of about $0.75 each, I could not pass up the opportunity to snag some figures at a great price.  Did I need more regiments of foote?  Not really but one additional regiment per side would be time and money well spent.  My hope was to be able to field at least two regiments of pike and shot.  I had in mind using any left over shot to form a unit of commanded shot.

When the package arrived and I sorted it all out, what did I have?  With my standard P&S regiment of 27 figures, enough figures were present to muster three regiments of foot.  Only a small handful of figures remain unclaimed.  More than expected and very little wastage.    
Enough figures for three regiments of foote.
After sorting and organizing the lot, I popped out to Renegade's website to confirm exactly what I had.  To my surprise, the website is closed down yet again.  After closing down for at least a year in the not so distant past and then re-opening, I figured their troubles were behind them.  I guess not.  With this revelation, I am very pleased to have picked up their figures on the secondary market.  Who knows when these figures will be available again.  
Latest announcement of Renegade's website
The answer to my second question?  A finished project is unfinished when I happen upon a bargain too good to dismiss.  I am likely not alone.

Monday, November 27, 2017

SYW Austrian Cuirassiers - Serbelloni

Getting a game on the table can re-energize a dormant project.  Having boxes of painted figures already, SYW painting has taken a very low priority in my grand scheme of painting The Lead Pile.  Looking back at the Painting Log, two squadrons of Austrian cuirassiers mustered out in April of this year.  Nothing else has crossed the painting desk in nearly two years.  That inertia may change.  
The recent SYW Mollwitz game provided inspiration to put a handful of SYW figures into the painting queue.  Mustering out from the painting desk are two squadrons of Eureka 18mm horsemen.  The dozen figures called up are two squadrons of the Austrian Serbelloni Cuirassier Regiment.  Two squadrons of the Serbelloni Regiment have been fielded before and this is my attempt to bring the regiment up to full strength.  While six squadrons are the official compliment of squadrons, four squadrons will do for now.   
As mentioned above, these are the first 15/18mm figures to cross the painting desk in a long time.  I need to get more of the 15/18mm projects into the painting queue.  Perhaps that can be a 2018 goal? As a start, two battalions of Austrian Grenz for the 1799 project are at work on the painting desk.  A small step forward...

Friday, November 24, 2017

Peruvian Highlands - Machu Picchu Day 2

A reader responded via email commenting that the Machu Picchu travelogue was interesting but asked when I planned to follow up with a Day 2 travelogue as promised.  Now that the Machu Picchu visit is more than two years in the past, that is a very good question!  The reader is quite right.  I should provide a Day 2 summary of my 2015 visit to Peru's Machu Picchu and follow up on commitments made. To refresh fading memories, Machu Picchu Day 1 can be explored at, Machu Picchu Day 1.

Having climbed Huayna Picchu on Day 1, the main objectives of Day 2 were two hikes: one to the Sun Gate (Intipunku) and the second to the Inca Drawbridge.  The remainder of the day would be spent further exploring the ruins of the citadel. 

As on Day 1, we entered the ruins in the early morning hours.  From the main gate, we opted for a short, steep climb to reach the storehouse for our first glimpse of the day of the citadel. 
Storehouse with citadel in background
After a quick look around and to regain our bearings on the layout of the citadel and environs, the three of us struck out on the Inca Trail to Intipunku.  Guidebooks suggest a two to three hour round trip for the excursion even though the distance is only about two kilometers.  For travelers hiking the Inca Trail with a destination of Machu Picchu, the Sun Gate offers the first glimpse of the citadel.  While we would not be making the trek to Machu Picchu along the Inca Trial, we would get the experience of viewing Machu Picchu from this eastern vantage point.
Beginning of stone path to Intipunku (Sun Gate)
The route to the Sun Gate is longer than it appears.  Some say the high altitude distorts distance.  I do not know about that but the walk was longer than eyesight would suggest.
Trail from Sun Gate to Machu Picchu with shrine in middle left.
Breaking up the hike to the Sun Gate was a stop at a shrine and cemetery marked by a huge 50 foot rock.  Bingham discovered a well preserved burial at the base of the huge rock.
Nancy taking a rest stop at the shrine with rock monument in background
Several passages of steep stairs interspersed the cobbled trail  often requiring a quick stop to catch one's breath before continuing on to the saddle of the mountain. 
Another rest stop on the climb to Intipunku
Upon reaching the Sun Gate, we encountered several small groups enjoying the view.  Some groups were stopping at the Sun Gate after a long trek.  Others, like us, were making an excursion from the main citadel.
Structures at the Sun Gate
You are here!
Structures at the Sun Gate seen from above
Looking upon the citadel complex from the Sun Gate, the switchback road up to the citadel is visible in the foreground.  While a trail exists from the valley floor up to the citadel requiring a 90 minute walk, we opted for the 20 minute shuttle bus ride from our hotel in Aguas Calientes up to the citadel. 
Road winding up to Machu Picchu
Jon taking a rest at Intipunku with citadel in background
After a brief rest and some refreshment, we headed back down the trail to the citadel.  On the hike back, the citadel can be clearly seen as situated in a saddle.
Machu Picchu from Inca trail
Machu Picchu from Inca Trail
Having arrived back at the citadel, we sat down for lunch on the terraces overlooking the citadel.  Of course, our lunch was interrupted several times by llamas wandering the place untethered.
Our lunchtime view - marvelous!
Local resident photobombing my photography
With the recounting and pictorial of the journey to the Sun Gate taking more space than expected, I will end the Day 2 Machu Picchu travelogue with lunch at the citadel.  An exploration of the Inca Drawbridge and the citadel warrants its own entry so I will return to MP at a later date.  I will not wait another two years.  I promise.

Tuesday, November 21, 2017

Entex Nieuport 17C

Having been out of the market for 1/72nd WWI model aircraft more years than I care to remember, I am surprised at the number of old kits available via eBay.  Some times, the models are quite inexpensive too but I have seen others command high prices.  For $6 including shipping, this Entex Nieuport 17C was a bargain.
One recent kit won on eBay is the Entex Pocket Pak Bi-Planes Nieuport 17C.  A fine little model, this is the first N17C to make it into the collection and the first Entex model.  The kit was likely produced in the 1970s so is at least 40 years old.  Surprising that these old kits are still around.  This one arrived unbuilt with the box in great shape. 
The kit was easy to build.  For a paint scheme, I attempted to impart a distressed look.  The result looks distressed to my eye.

Sunday, November 19, 2017

German Special Teams - Sniper and Panzerschreck

To the most recent Chain of Command game, Jake brought along a few figures from the latest Brigade Games' 28mm WWII kickstarter project.  "Surplus to demands," says he.
Figuring I could use a few German weapons and teams, a sniper/spotter and panzerschreck were offered up as an offering to The Lead Pile.
Well!  These fine figures did not linger in The Lead Pile long.  This trio jumped the long painting queue and went right onto the painting desk.
Expect these to see action in the next CoC game where I field Germans.

Thanks again for the figures, Jake!

Friday, November 17, 2017

Scenario: Battle of Mollwitz, 10 April 1741

Carl Rochling's Prussian Infantry at Mollwitz 1741
Taking advantage of an Austria in a weakened state due to years of conflict, a demoralized army, and bankrupt treasury, Frederick II assembled his well-trained but untested army to make a land grab dash.  The target?  Austria's province of Silesia.  In December 1740, Frederick invaded.  Thus began the First Silesian War. 

With Great Britain weighing in on the side of Maria Theresa promising to bankroll an offensive to reclaim lost territory, FM von Neipperg took command of the newly raised Austrian Army.  Von Neipperg took to the campaign trail in March with a goal of splitting the two Prussian forces and defeating each in detail.  This wedge would be driven into an area south of Neisse.
Austrians drawn up in front of Mollwitz
Despite heavy snows and mud clogged roads, Neipperg advanced upon Breslau.  When Frederick realized the danger, he ordered his forces into a blocking position and situated his army astride the Austrian line of advance upon Breslau.  After receiving nearly two feet of snow on 9 April, the two armies arrayed for battle outside of the small hamlet of Mollwitz on the following day.  The Austrians had their backs to the village and the Prussians deployed over one mile away.  The battle opened about 1300 and was over by 1900. 

For more historical details on the campaign and battle, please visit the recommended sites below:
Obscure Battle: Mollwitz
British Battle.com: Mollwitz
Battle of Mollwitz - N. Bonaparte

Drawing inspiration from Jeff Berry's Obscure Battles (listed above) and the scenario designs of: 
I put pencil to paper to build my own reinterpretation of young Frederick's first battle.  By the way, I encourage giving both James and Colin's Mollwitz games a look; beautiful spectacles in 28mm.
My 18mm armies arrayed for battle on 6 x 6 table
With heavy snow and the two armies more than one mile apart, closing with the enemy will take time.  In the historical battle, it took the Prussian infantry two hours to close to within musketry range of Mollwitz after having repulsed the Austrian cavalry attacks.  Given those conditions, march rates will be halved as the deep snow will be as rough ground.  The stream will, likewise, be treated as rough ground.  Grazing fire will be as "Bad Weather."  The presence of two feet of newly fallen snow will negate all charge bonuses.
Mollwitz Battle Maneuvers
Source: warfarehistorynetwork.com/daily/military-history/
the-battle-of-mollwitz-opening-move-for-prussian-expansion/


Since Frederick was convinced to retire from the battle early on, there is a chance in the game that Frederick will act similarly.  To reflect this possibility, the following is in force: 
After third Prussian unit broken and every unit broken thereafter, Frederick rolls Command Test.  (-1) for each broken unit.  If he fails (Poor or worse), he must leave the field and Schwerin takes over.  Schwerin acts as Lt Gen for infantry until Frederick departs.
The above rule is directly lifted from Colin's game plan.
Austrian Cavalry
Looking at the Order of Battle, both sides face interesting challenges. The Austrians maintain more and better cavalry while the Prussians field more and better infantry.  To win, the Austrians must hold Mollwitz at the conclusion of the battle at 1900.  With a long distance to march on Mollwitz, Prussian infantry cannot wait too long before stepping off for an attack on Neipperg's infantry. 
While I wrestled with troop ratings, what I settled upon seems reasonable given the historical accounts of the battle.  Should all Prussian infantry be rated superior rather than only the grenadier formations?  Should the Austrian rabble be degraded to inferior or would standard be sufficient?  Since I wanted at least one troop grade difference between the Austrian and Prussian infantry, Inferior to a mix of Standard/Superior seems reasonable.
Prussian Cavalry
With the Austrian Left Cavalry Wing under the impetuous Romer, Austria will automatically receive Movement Initiative on the first turn.  Will Romer shred the Prussian Right Wing Cavalry at the onset of battle?  Will the superior Austrian cavalry be able to defeat the Prussians before the superior Prussian infantry can close with the inferior Austrian infantry?

Rather than having Romer deployed already on the Prussian flank as shown in the Fawkes diagram below, Romer will begin on the left flank in line with the remainder of the Austrian army.  Can Romer still pull off a crushing attack against the inferior Prussian cavalry on the Prussian right by beginning to fore rather than the flank?  I guess we will see.  
Map of the Battle of Mollwitz 10th April 1741
by John Fawkes
The above battle background and game details should provide just enough information to tantalize and prepare my opponent for this upcoming test using Honours of War.  My thanks to Colin for sharing his work on Mollwitz for HoW

Tuesday, November 14, 2017

More Moors

Dipping into the well again to pull up another unit of Moors for the Reconquista project.  The well is not yet dry although I am beginning to see the bottom.
As mentioned several times in the past, these BTD Warriors of Islam figures are some of my favorite poses in the range.  The standing pose with grounded spear is much preferred to the soldier advancing with spear.  Great facial characteristics and they all look quite serious and mean business.
Really, I have lost count of the number of similar stands that have mustered off the painting desk.  There must be at least a half-dozen units in exactly this pose.  A quick check of the Painting Log shows six units.
A quick reconciliation of the Painting Log with the Palouse Wargaming Journal suggests that the project has not been out on the parade ground for four years.  Many Reconquista units have crossed over to the painted side of the ledger in the past four years.  Perhaps the Reconquista collection ought to get a parade ground review?  I bet the size of this project surprises me when deployed out on the gaming table for review.  The gallery ought to get an update too with all new photos.

Saturday, November 11, 2017

Fox's Gap - An ACW BatRep in 10mm

The Action at Fox Gap had another outing on the gaming table using Two Flags-One Nation. After the first bloody fight (see: Action at Fox Gap Conclusion) that ended in a bloody draw, I wanted to give the scenario a rematch after a post-mortem of the rules, scenario, and play development.  Units were returned to their starting positions and the battle was joined.
Battle map
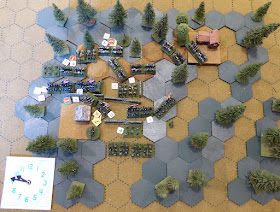
In translating the battle map to the game table, notice that I have dispensed with the entanglement of trees that hindered play in my first game.  My sleeve and arm were constantly catching a tree as troops were maneuvered through the dense foliage.  In place of the forest of trees, forest green hex tiles have been laid down to represent these woods' areas.  Model trees are placed sparingly to give the look of a united forest.  I like the look and improves play.
Initial deployments with troops on table
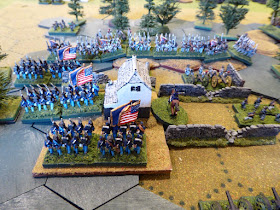
0900: At 0900, the action at Fox's Gap transforms from a probing operation into a full contact operation.  Seizing the initiative, Union General Cox joins the 23 OHa as it skirts Beachley Farm and closes with the 5 NC hunkered down along the Ridge Road on the Confederate right.  With Cox attached, the Ohioans can fire and move.  Unfortunately, their fire at long range is ineffective. 
The battle opens
Ohioans advance on the Confederate right
Perhaps being a bit brash, the Federal West Virginian cavalry advances upon Bondurrant's Rebel guns.  The Rebel guns deal death to the dismounted cavalry and they suffer heavy casualties.  Since cover does not diminish the effect from artillery, the troopers receive the full brunt of the cannonade.  Not able to stand up to the belching fire, the troopers fall back in disorder.  On the Confederate right, men from the 5 NC fire upon the 23 OH as the two Federal units close upon Rebel positions.  Both Federal units suffer casualties on the approach.
WV cavalry suffer mightily from Bondurrant's guns
Troopers fall back, disordered
5 NC fired into advancing 23 OH
0912: Cox slips over from the 23 OHa to join the 23 OHb.  Having unlimbered, Gibson's Federal battery brings Bondurrant's guns under fire.  The Rebel guns suffer only light casualties and dismiss the fire.  Both wings of the 23 OH fire upon the 5 NC before 23 OHb, under Cox's leadership, advances to the foot of the ridge.
Federals open up the firefight
Firefight in front of Beachley's Farm
Rebels respond
0930: As Cox hustles from one wing of the 23 OH to the other, the Confederate line braces for Cox' threat to lead an assault against the defenders lining the Ridge Road.  To distract Bondurrant, Gibson's guns keep the Rebel guns under fire while the 30 OHa brings the guns under small arms fire as well.  Bondurrant suffers more casualties but maintains his position.

As anticipated, Cox leads the 23 OH along with the 12 OH in an assault upon the Confederate positions on Ridge Road. 

From the left of the Fedeal line, the 23 OHa clashes with the 5 NCa in the woods.  The Federal assault goes in half-heartedly but the raw 5 NC fails to get off a meaningful volley to stop the Ohioans.  Both combatants suffer casualties but both stand their ground in disorder as the close range firefight continues.  To the right, of the 23 OHa, the 23 OHb charges up the hill to come to grips with the 5 NCb.  The Federals maintain the resolve to close but the raw Tar Heels break for the rear.  The 5 NCb takes heavy casualties and abandons its defensive position behind the wall protecting the Ridge Road.

In the third attack, the 12 OH with Scammon in the lead, charges into Bondurrant's guns.  On the way in, the 12th takes light casualties while the battery suffers casualties in the close fighting.  Seeing the guns holding onto their position in defiance, the Ohioans lose their nerve and fall back in retreat.  Garland fails to rally the 5 NCb. 
Initial Federal assault goes in
In close combat, you win some and lose some
Bondurrant continues dishing out death and destruction
0948: The first Special Event of the game is drawn and produces a "Confused Order" for the Federal troops.  The 23 OHb falls back.  Cox joins the 23 OHb to bolster its resolve.  Gibson's battery fires into Bondurrant's battery in conjunction with the 30 OHa.  Bondurrant suffers light casualties and continues to hold onto his exposed position.
Situation at 9:48
With Cox in the lead, the 23 OHb charges into the 5 NCa.  The Tar Heels take two hits while the Ohioans take no losses.  Scammon attempts to rally the 30 OHa to no avail.
Federals pour fire into Confederate positions
Cox leads the 23 OH into the 5 NC
Bondurrant returns fire on the 30 OHa.  Taking more casualties, the Ohioans are forced to withdraw in disorder.  On the Confederate far right, Rosser's cavalry finally make it into the fray. forcing the battered 23 OHa to fall back to escape the wrath of their weapons.  Also driven back from Confederate small arms fire is the 23 OHb.  Despite support from Rosser's dismounted troopers on their right, the 5 NCa fails it Capability Test and falls back.  In the Confederate center, the stalwart gunners of Bondurrant's battery holds its ground, ambivalent to its mounting heavy casualties.
Federal sent reeling back from the front line
Situation at 10:06
1006: With much of his command falling back from the fight having suffered heavy casualties, Cox calls off his attack.  Garland, having only one regiment badly damaged maintains the high ground and prevents the Federals from taking Fox's Gap on this day.

Rather than a hard fought draw seen in the first game, the second game I call a hard-fought win for Garland and his North Carolinian troops.  The Federals suffered heavy casualties with four of the six Union regiments at 50% casualties or greater.  As in Game One, Bondurrant's battery performed heroic feats while taking on all comers.  With 75% casualties, the Rebel gunners stood their ground unflinchingly.  Amazing display of valor.

On the Federal left, Cox and the Ohioans never managed to turn the flank and ended up in frontal assaults against prepared troops.  Even though raw, the 5th NC put up just enough fight to dissuade the Federals from pursuing a turning maneuver one more time.  Really, the Federal forces were spent without much remaining in offensive capability.

Was it fun? Yes!  Did the game produce tension and drama? Yes!  Did it provide a believable narrative?  I think so.  A lot of action in a small space.  A decision reached in only an hour of game time.  With only a handful of units per side, every unit's behavior and every casualty taken impacted upon the game.

Having several battles under my belt with TF-ON, time to provide my impressions of the game and put down a few thoughts on tactics and the processes embedded within.  That will be for another time, however.  Back to the painting desk for me. 

Note:  A technical error caused only a portion of the BatRep to be published earlier this morning and the original was unrecoverable electronically.  Luckily, a recent blogger "Preview" was displayed on another page.  Many screenshots and transcriptions later, the BatRep has returned (mostly) intact.  Thankfully, all was not lost.